
The short answer: a node canvas builds AI video as a visible chain: text, reference images and models joined by wires, with every input in plain view. In ScreenWeaver, the Production tab is that canvas, and your storyboard builds it for you. The art direction, characters, places, objects and every shot arrive already wired, so your first move is making video, not plugging cables.
Filmmakers move to node editors for a simple reason. A chat box gives you one prompt and one output, then forgets the rest. A canvas keeps everything on the table: you see which reference fed which image, which image started which clip, and you can change one block without rewriting everything else.
The catch is the blank page. Most node tools open on an empty grid, and the first hour goes into wiring before a single frame exists. This guide walks through ScreenWeaver's Production tab, where that hour is already done. The running example is the demo project The Photo: one scene in a car at night, in the rain, where Thomas hands his sister Émilie an old photo of the two of them as children. Four shots, two characters, one place, one object.
The canvas starts full
Finish your storyboard, open the Production tab and zoom out. Everything you defined upstream is already there, stacked in sections from top to bottom.
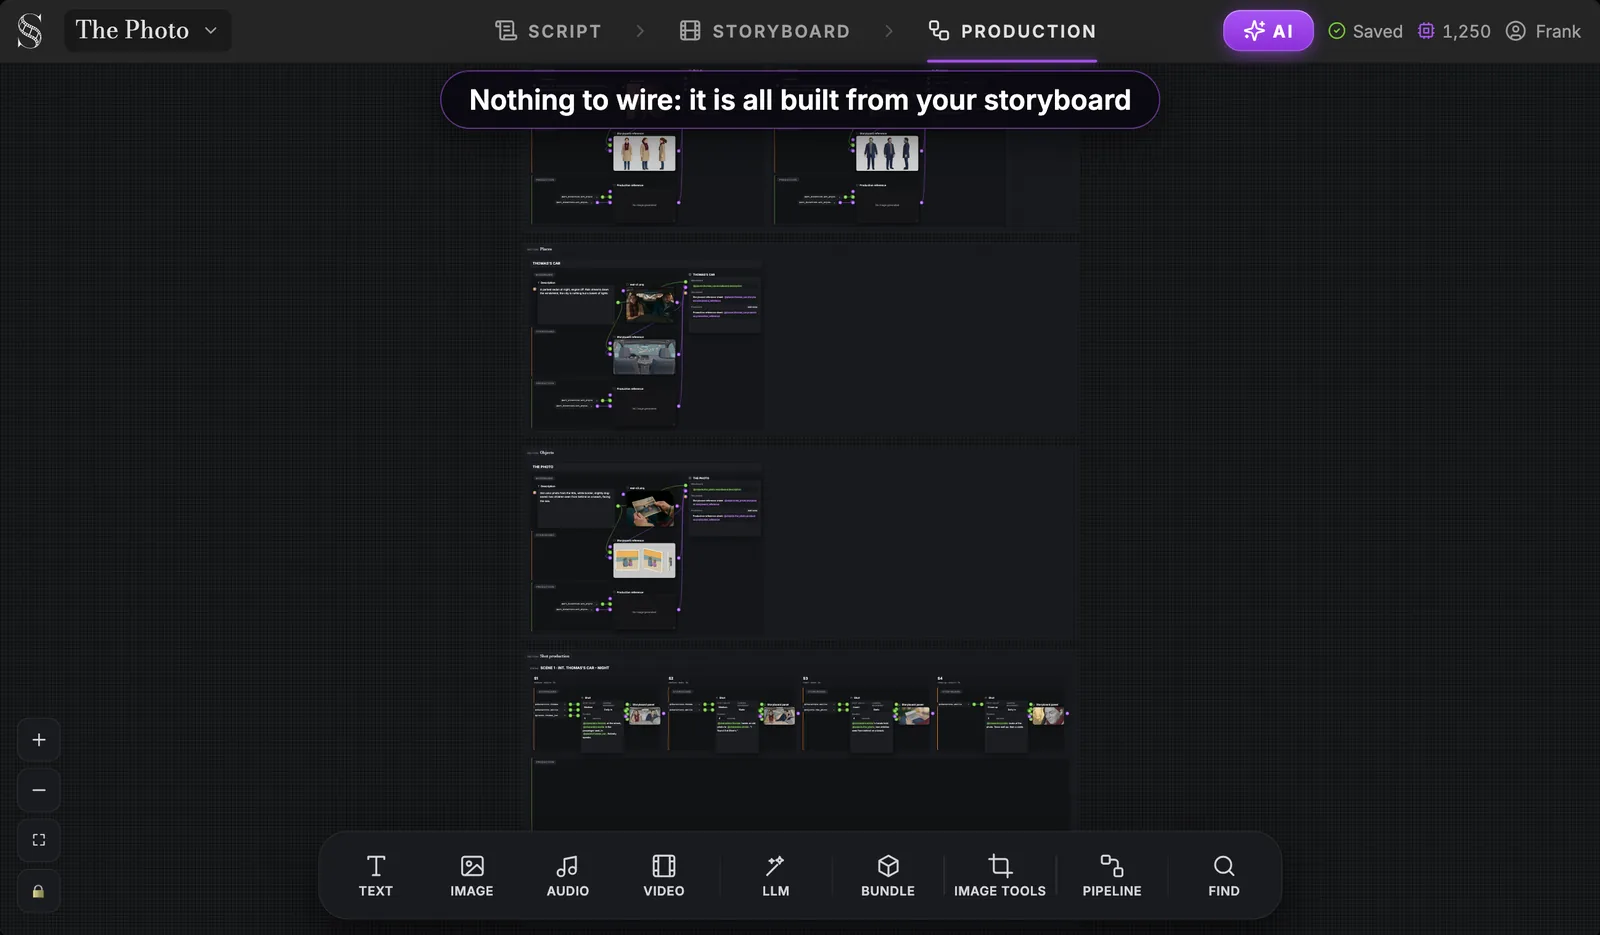
You do not draw these wires. Each tab feeds the next automatically: the script feeds the storyboard, and the storyboard feeds this canvas. The order of the sections is the order of the work: the look of the film first, then the people, places and props, then the shots, scene by scene. For the full path from page to picture, see our overview of the AI film production workflow.
Getting around takes three gestures: scroll pans the canvas, pinch or Cmd+scroll zooms, and Space+drag pans as well.
The toolbar: every node you can add
At the bottom of the canvas, one toolbar holds every node you can place yourself. Click a tile, then click inside a group to drop the node there.
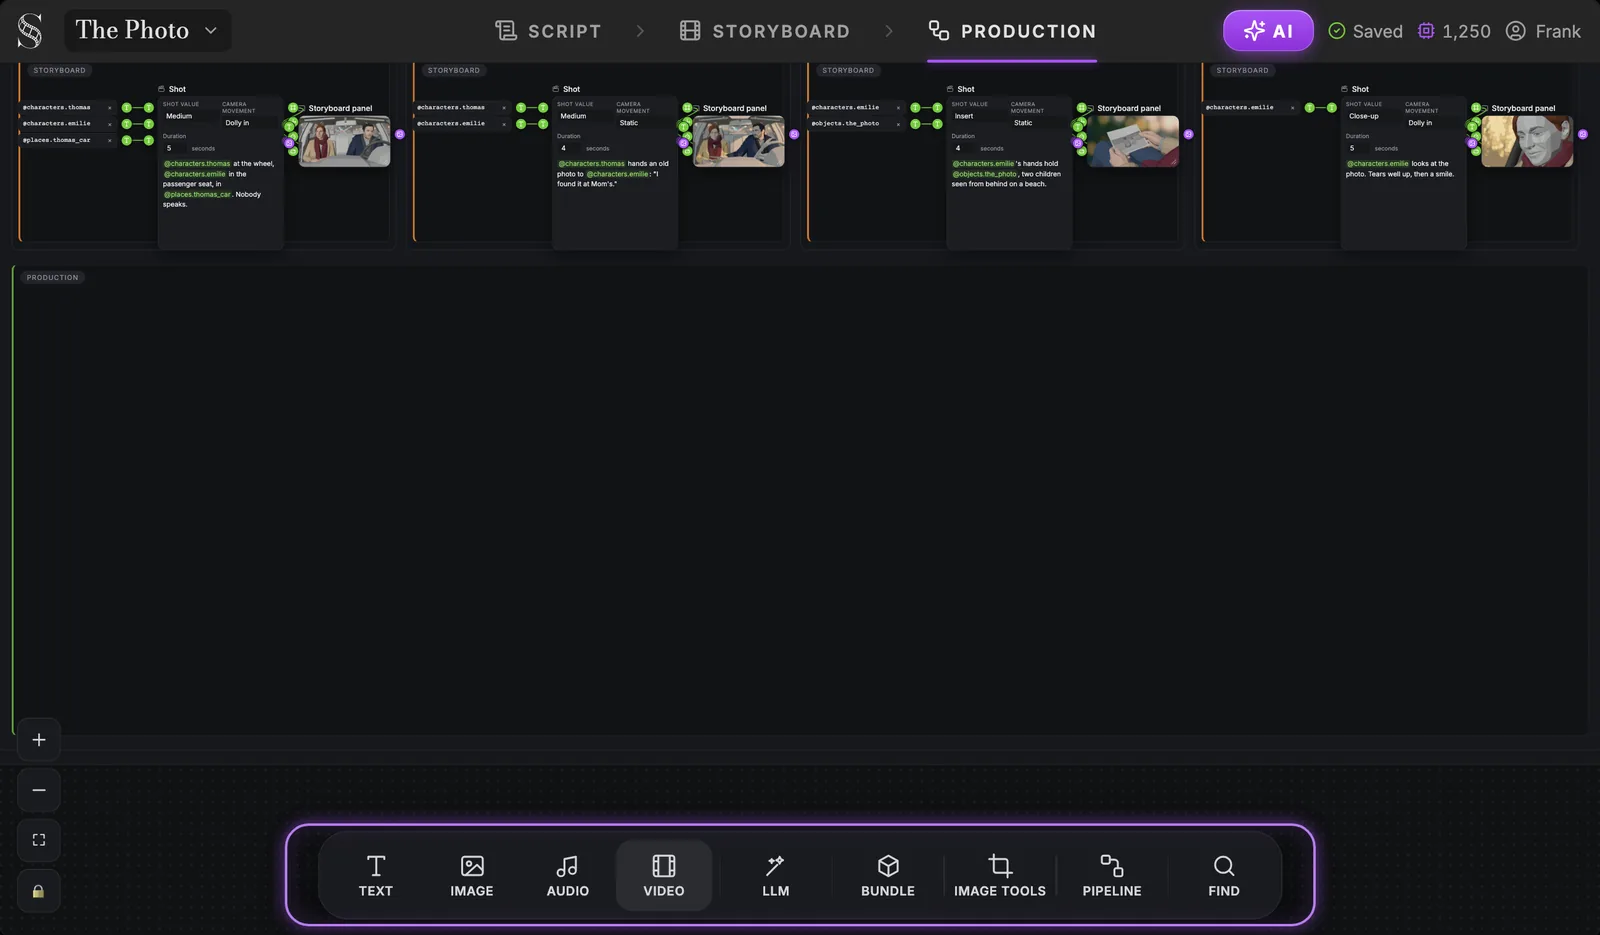
| Tile | What it gives you |
|---|---|
| Text | A text node: a prompt, a style note, a description. Its output plugs into any text port. |
| Image | An image node: generate from a prompt and @ references, or click to add your own image. |
| Audio | An audio file you upload, converted to WAV. It is an input for other nodes, not a sound generator. |
| Video | A video node. Its mode depends on what you wire into it (more below). |
| LLM | A Gemini node for text work, with a reference mode: Attach media or Names only. |
| Bundle | A Media bundler node that gathers your takes, with Bundle and Download ZIP. |
| Image tools | Crop, and Camera angle to change the viewpoint of an existing image. |
| Pipeline | A ready-made chain of nodes, added to a scene's Production group. |
| Find | A search to reach a node on a large canvas. |
Two more node types never come from the toolbar: the Shot node and the Story element node. Your storyboard and your story elements create them.
Artistic direction: one source for the look
The first section on the canvas is Artistic direction. It holds two nodes: an Art Style text and an Art Style image. Together, they are the single source of the film's look.
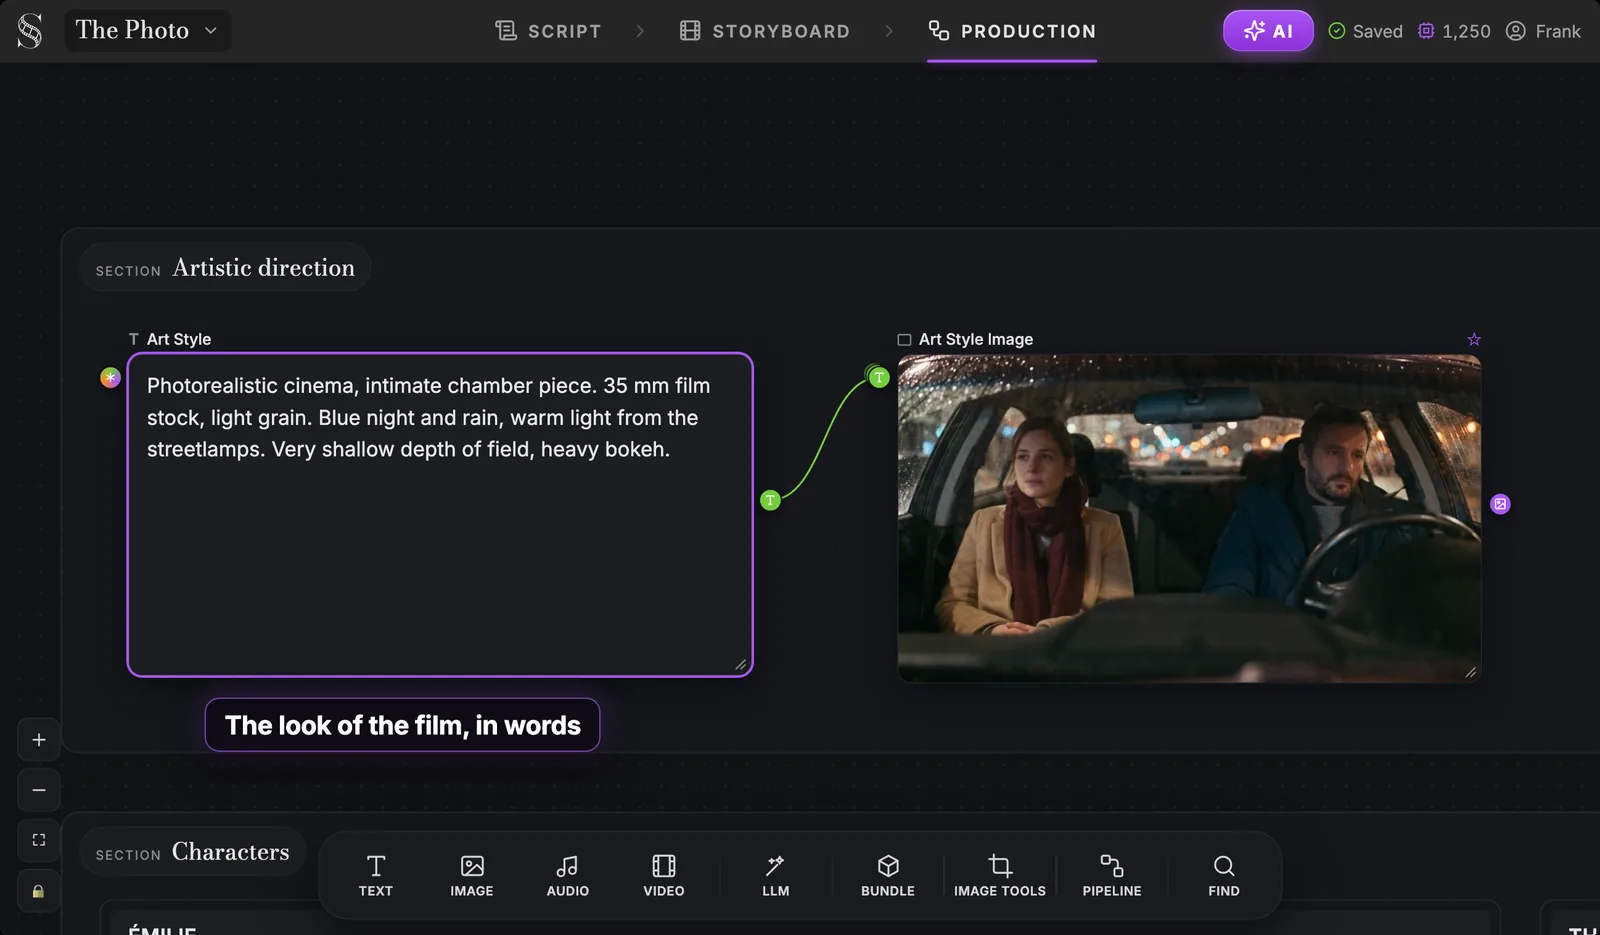
In The Photo, the text reads like a note from a director of photography: photorealistic cinema, an intimate chamber piece, 35 mm film stock with light grain, blue night and rain, warm light from the streetlamps, very shallow depth of field. Write filmable properties like these, not adjectives such as "beautiful". Change this section and every shot that references it follows.
How to read a node
This small section is the best place to learn the visual grammar of the canvas:
- No colored header. Each card has a small icon and an editable title above it: a T for text, a frame for an image.
- A star at the top right of the card: Set as reference output.
- Ports colored by type: text green (#74cd3c), image purple (#a855f7), audio orange (#fb8b24), video teal (#72e1d1).
- Wires take the color of their source. Here, the green wire carries text from Art Style into the image node.
Once you know the four colors, you can read any chain at a glance: a purple wire into a video node is an image, a green one is a prompt.
Characters, places and objects: generated once
Below the art direction come three sections: Characters, Places and Objects. Each story element gets one Production reference: the same entity re-rendered in the film's final style.
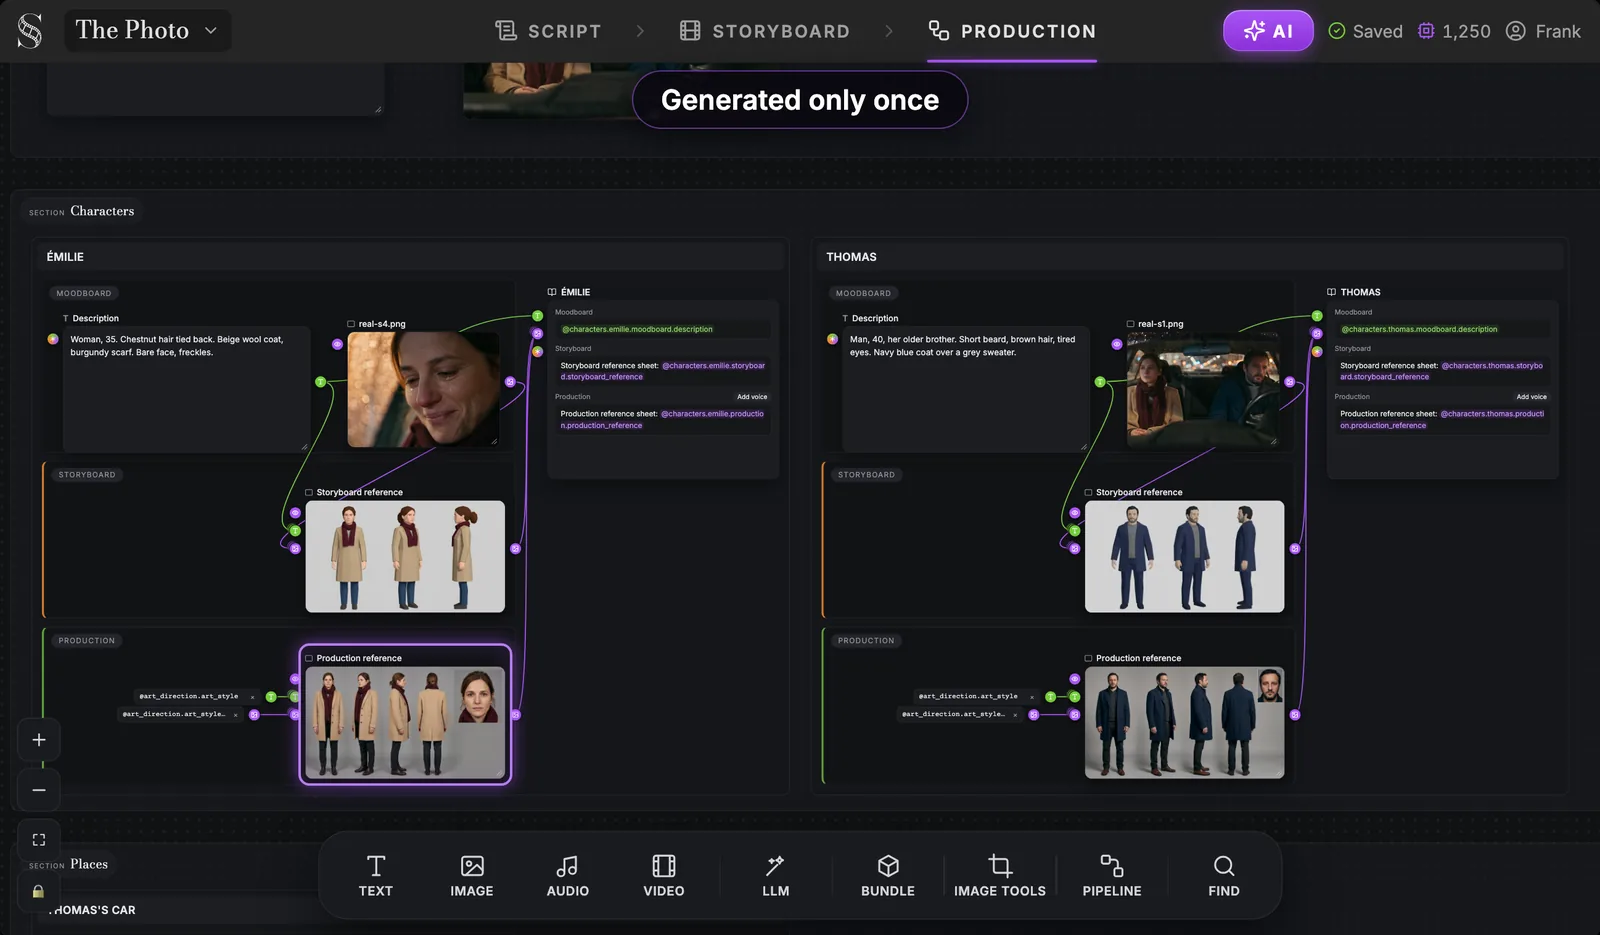
Look at the Émilie group from top to bottom. The moodboard holds her description ("Woman, 35. Chestnut hair tied back. Beige wool coat, burgundy scarf.") and a reference photo. The Storyboard stage holds her previz model sheet. The Production stage holds the Production reference, already linked to that description, with two @art_direction references plugged in on its left. The look comes from the section above; the face, coat and scarf come from the moodboard.
You generate each Production reference once. Every shot of the film then calls it by name, which is what keeps Émilie the same woman from the first shot to the last.
Shot production, scene by scene
Next comes Shot production, organized by scene. Each shot keeps its storyboard group, exactly as you directed it in the Storyboard tab.
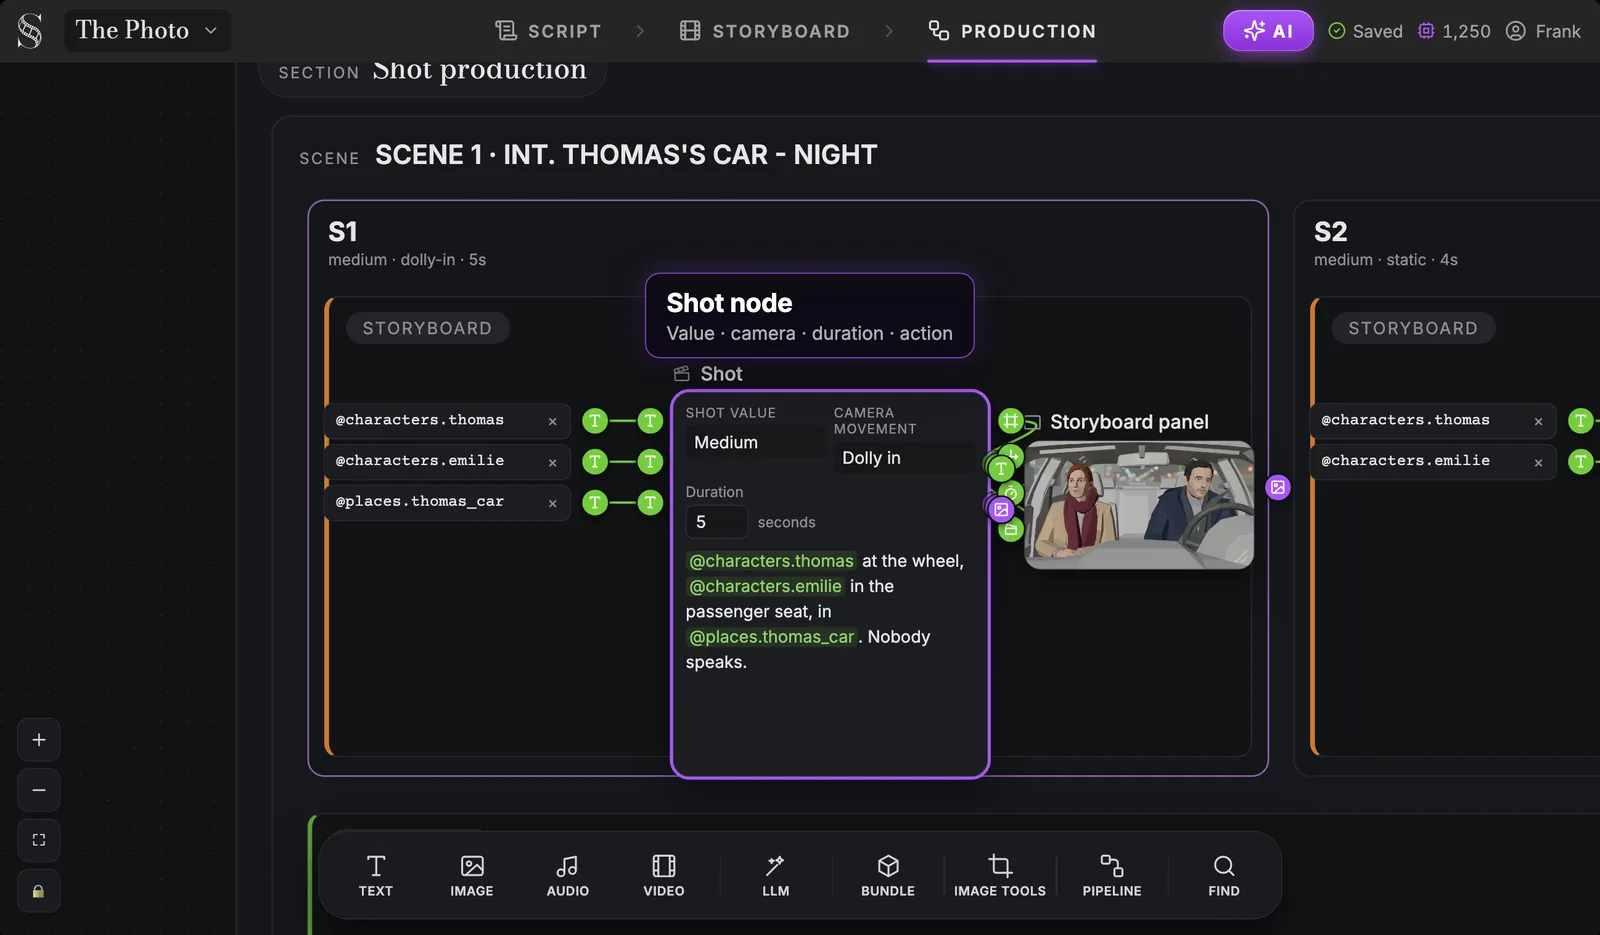
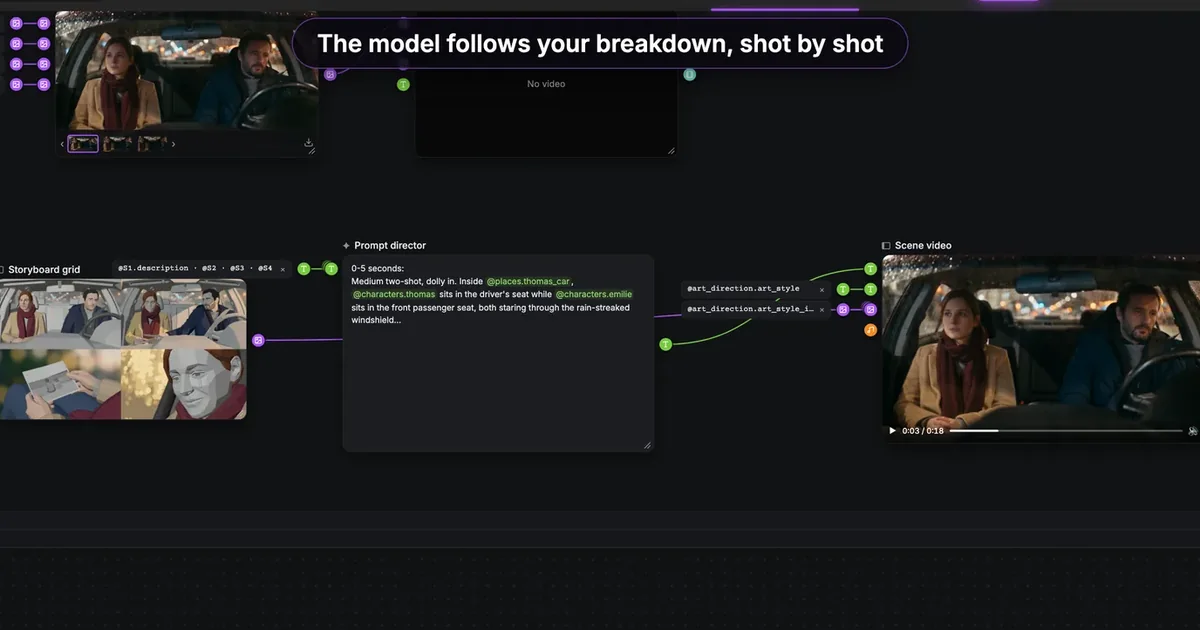
For S1, the Shot node reads: Medium, Dolly in, 5 seconds, and the action "@characters.thomas at the wheel, @characters.emilie in the passenger seat, in @places.thomas_car. Nobody speaks." The three references on the left are already plugged in with green wires, and the Storyboard panel sits on the right: the 3D blocking pass that locked framing and staging. If you have not built that board yet, start with our guide to AI previz from a script.
Below the shot groups, each scene has one more group, and it is the one that matters most.
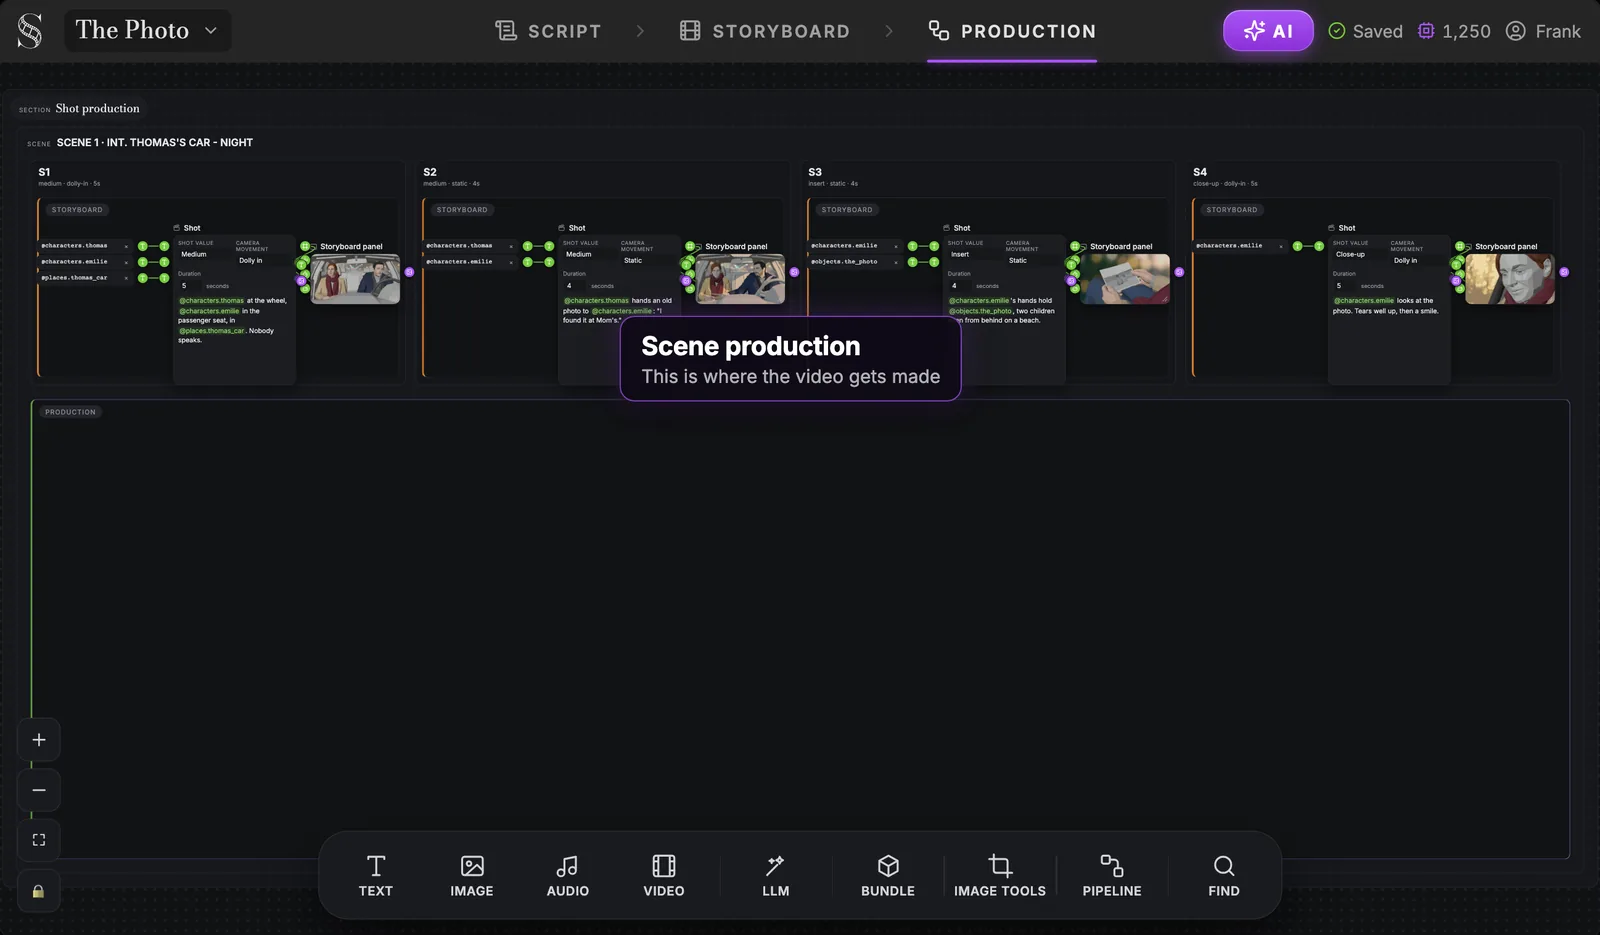
The scene's Production group starts empty. This is where video gets made: either by hand, node by node, as in the next sections, or with a pipeline that builds the chain for you.
Working by hand: the Image node
Say you want a start frame for S1 in the film's final look. Click Image in the toolbar, then click inside the scene's Production group.
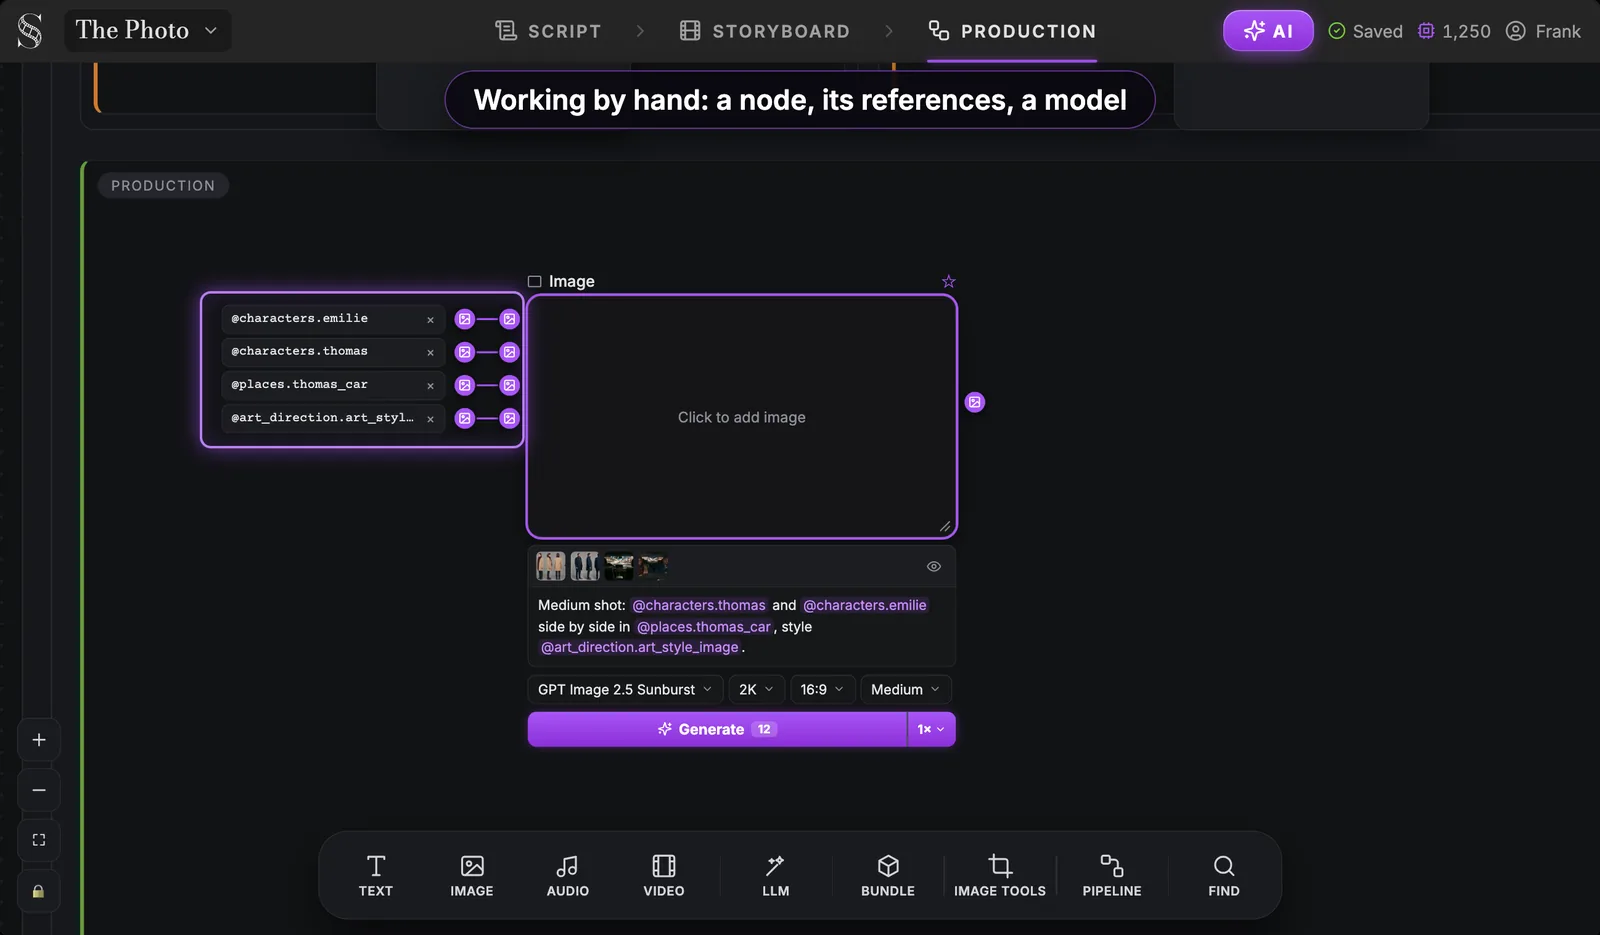
Plug in your references: here @characters.emilie, @characters.thomas, @places.thomas_car and @art_direction.art_style_image, four purple image wires. In the prompt, type @ to call them by name: "Medium shot: @characters.thomas and @characters.emilie side by side in @places.thomas_car, style @art_direction.art_style_image." Under the prompt, set the model, the resolution (2K here) and the aspect ratio (16:9). The Generate button shows the credit cost before you spend anything, and the small menu next to it sets 1x, 4x or 8x images per run.
The model menu is one click away.
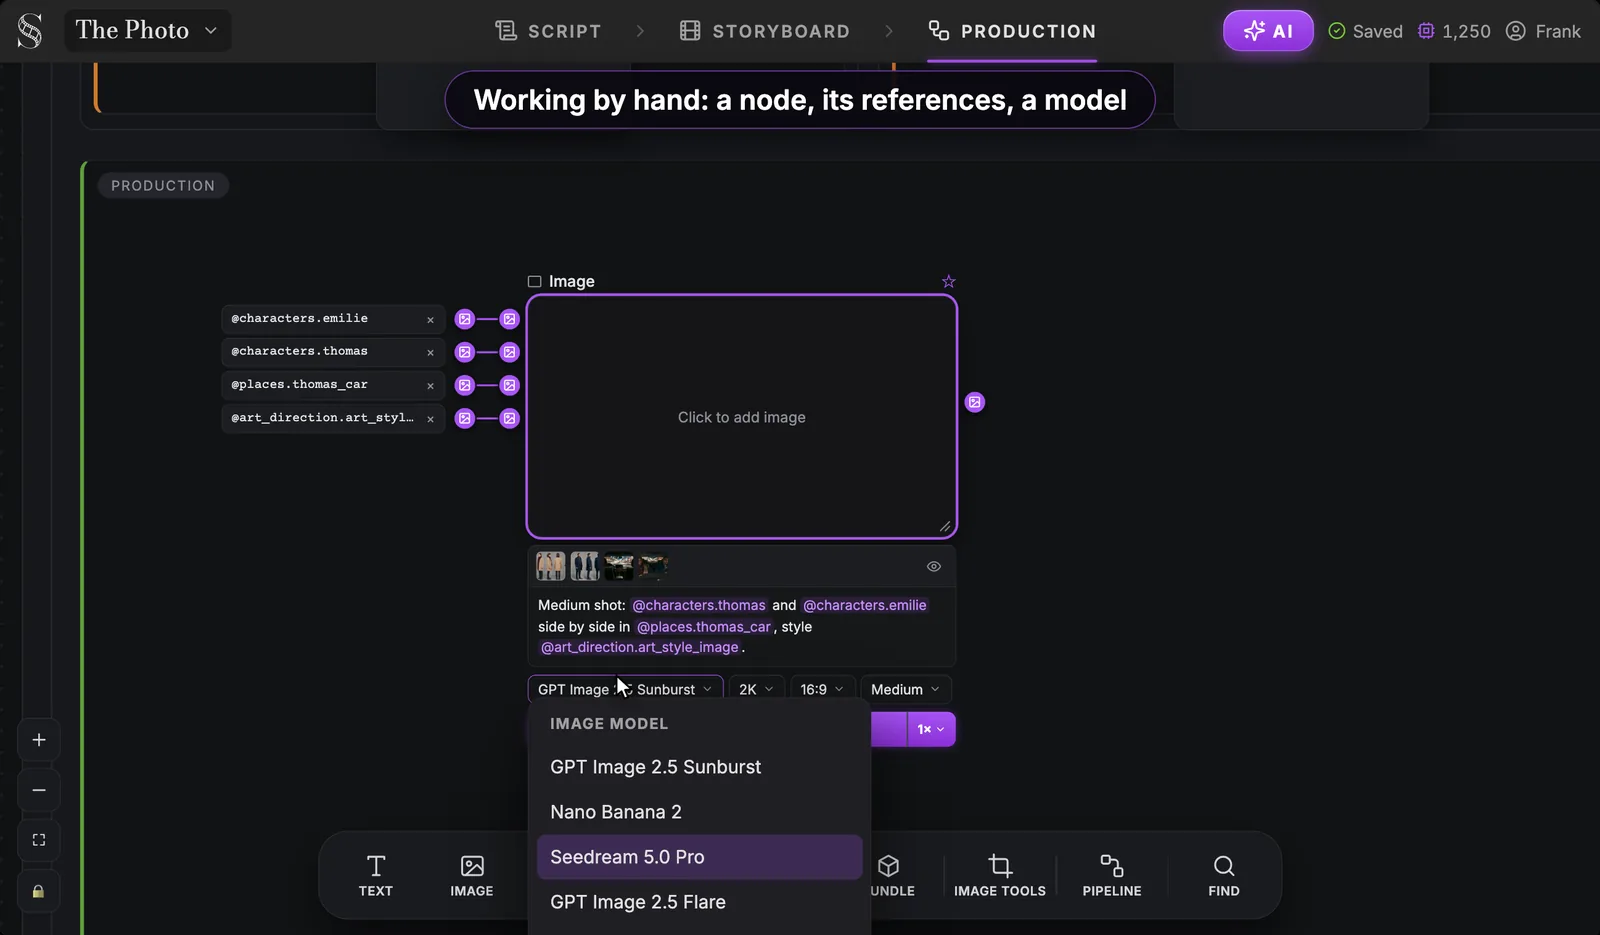
GPT Image 2.5 Sunburst is the default. Nano Banana, Seedream 5.0 Pro, GPT Image 2.5 Flare and Grok Imagine Image are in the same list. Start with the default, and switch when a specific shot asks for it.
Generate a few images and compare them.
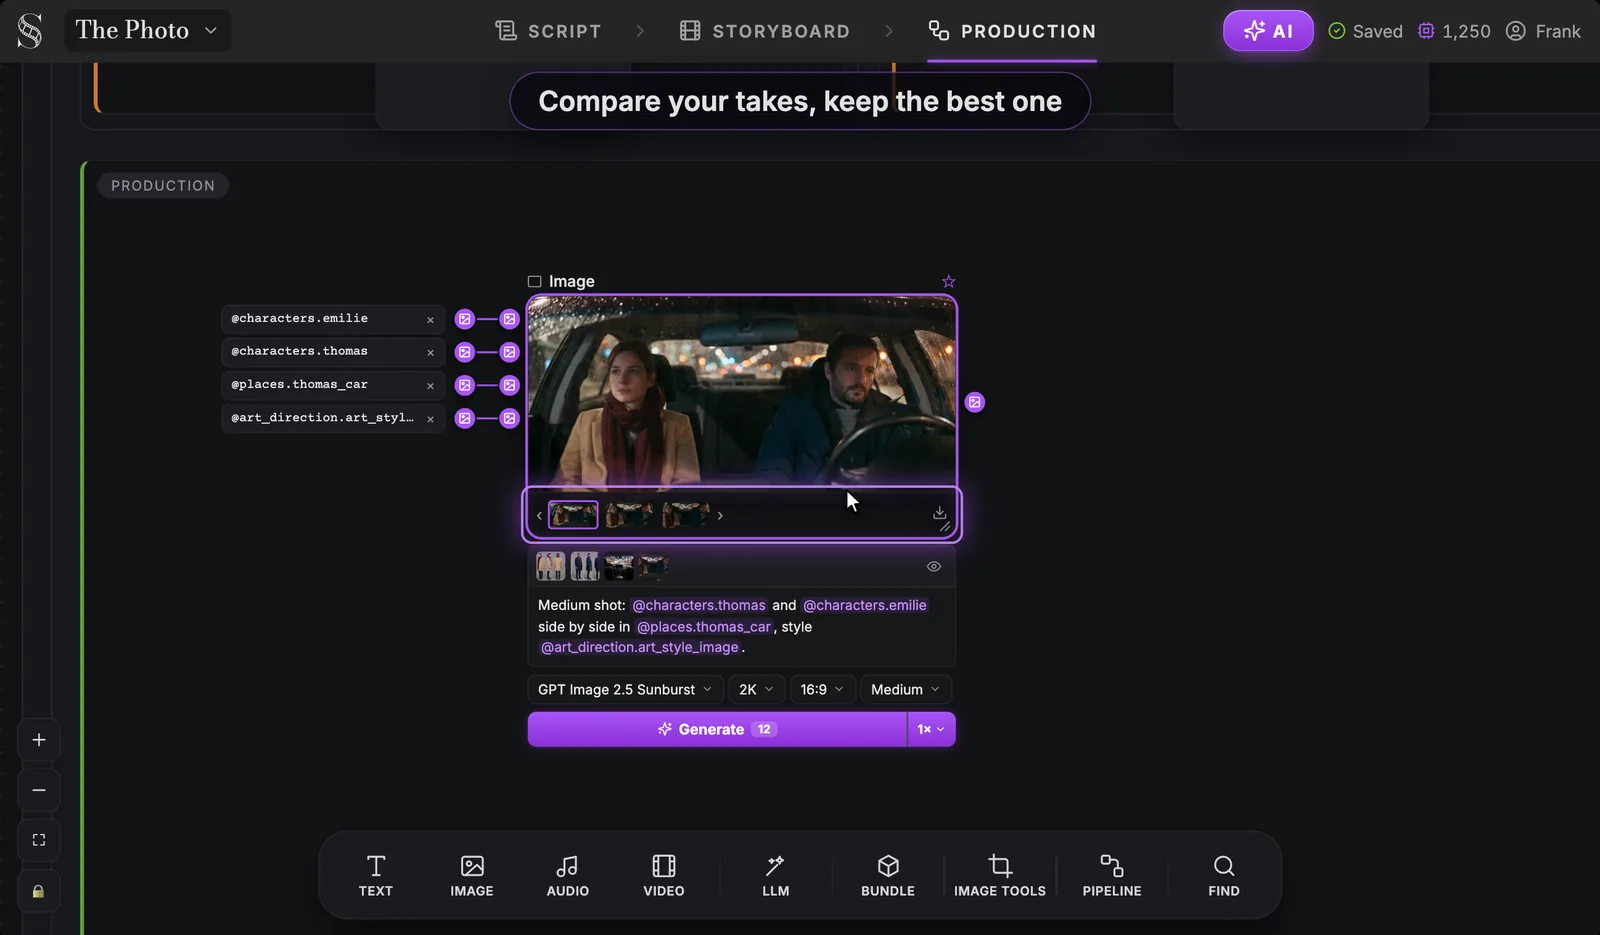
Every node keeps the history of its takes. Browse the strip under the frame, compare, and keep the one where the faces, the coats and the rain match your sheets. This habit saves credits later: pick a strong still before you animate it.
The Video node: the mode follows the wiring
Now add a Video node and wire the image into it. You will not find a mode switch, because there is none: the node reads what you plug in.
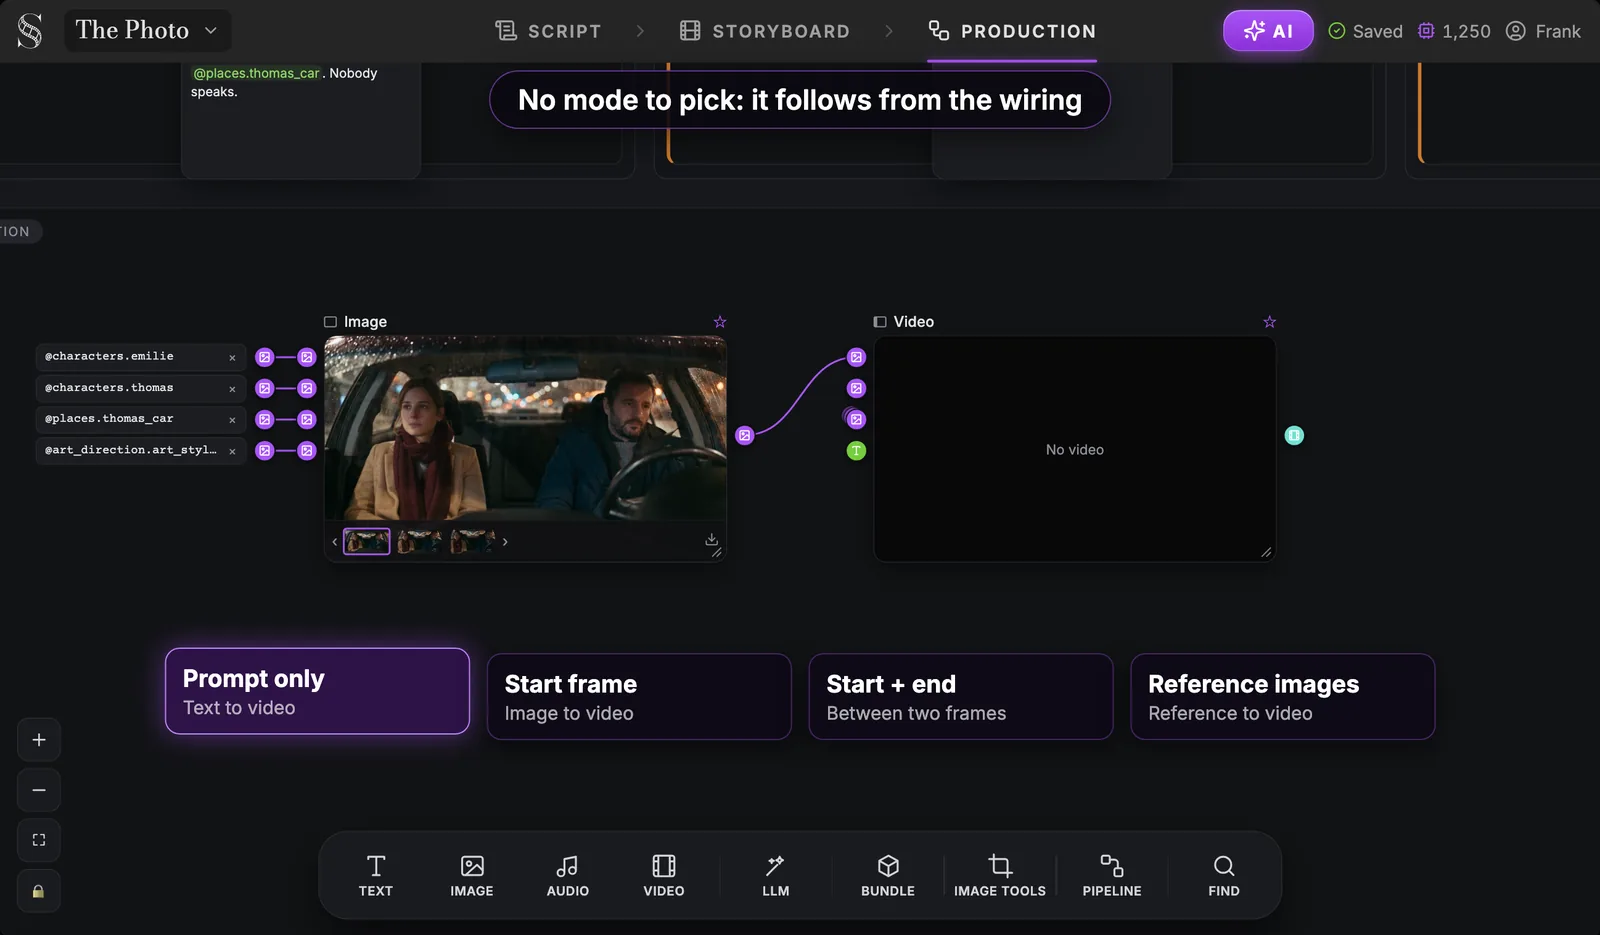
The four cases, as shown on the cards:
- Prompt only (text to video): nothing but text. The model invents the image.
- Start frame (image to video): one image becomes the first frame of the clip.
- Start + end (between two frames): two images, and the model moves from one to the other.
- Reference images (reference to video): images the model uses as references for characters, place and objects.
Then pick the model.
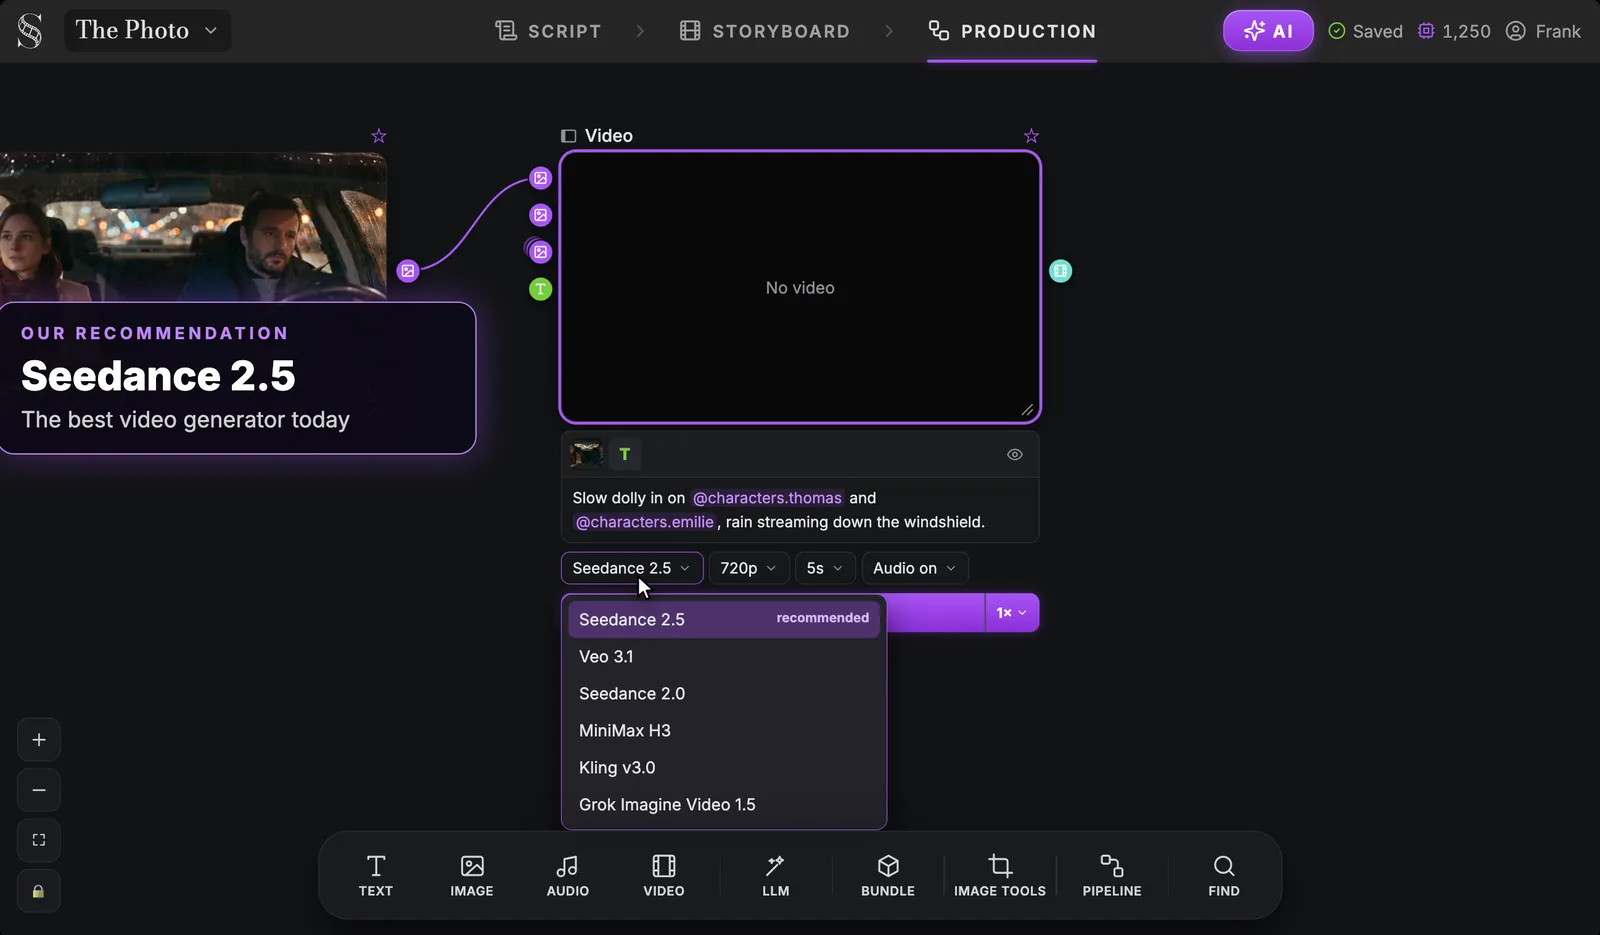
Seedance 2.5 is the default and the model we recommend. It accepts clips from 4 to 30 seconds and renders at 480p, 720p or 1080p. Veo 3.1, Seedance 2.0, MiniMax H3, Kling v3.0 and Grok Imagine Video 1.5 are in the same menu, so you can compare models on the same inputs without rebuilding anything. Our Seedance 2.5 page explains the model in depth, and the AI video model picker helps when a shot calls for something else.
The rest of the settings fit on one row.
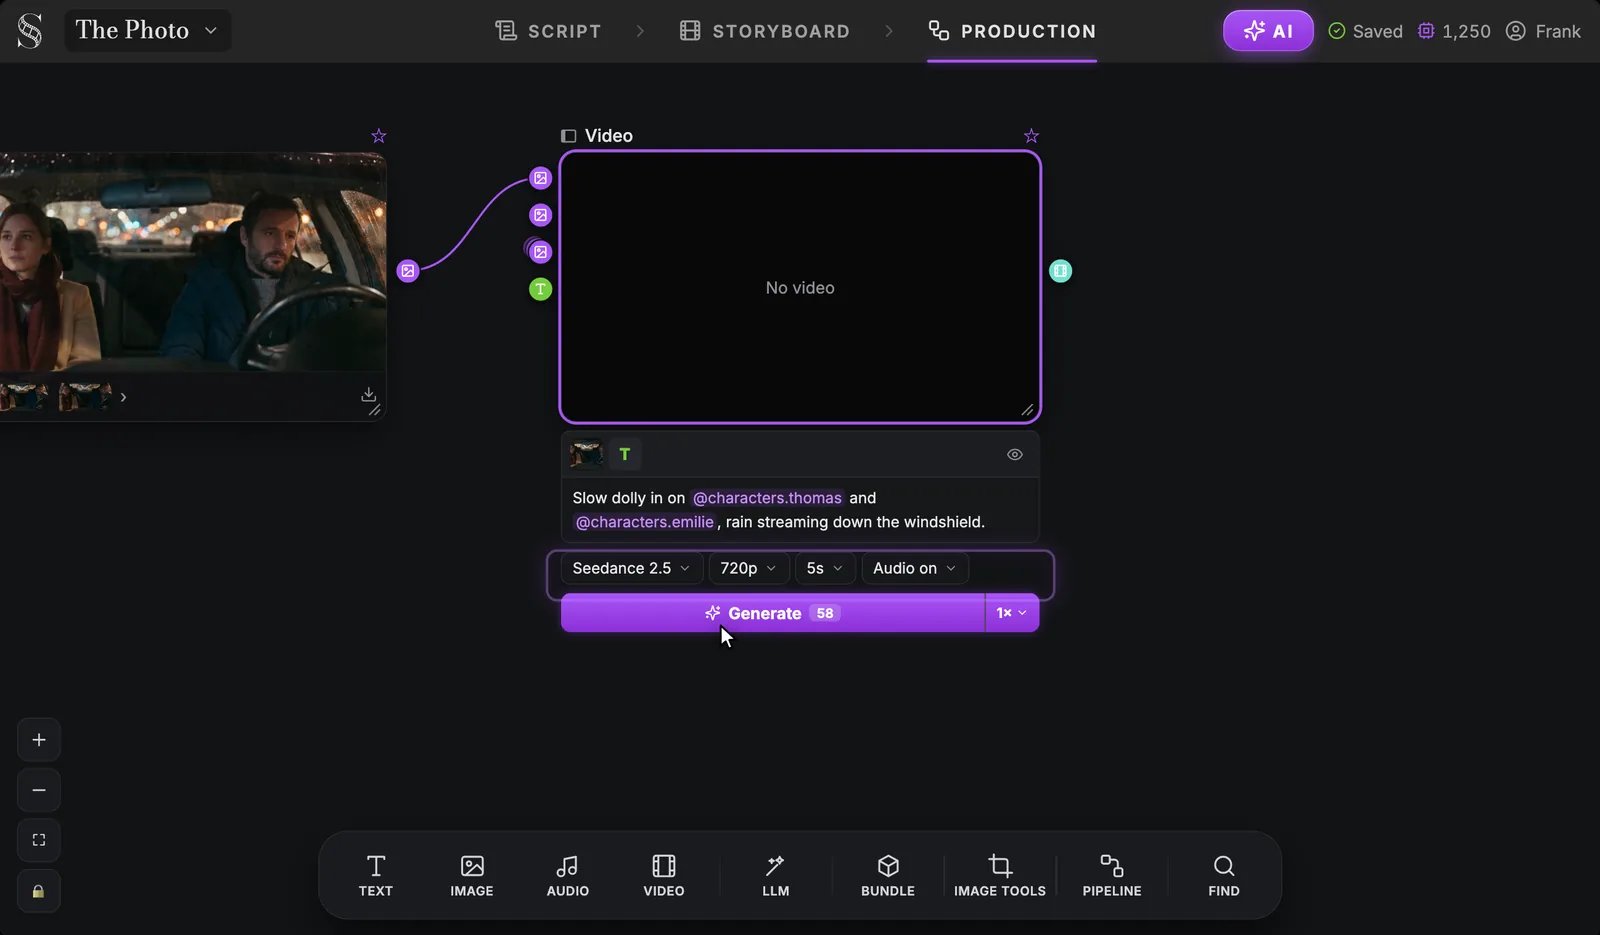
Model, resolution, duration, audio on or off, then a single Generate button with its credit cost. The resolution list includes a 480p · Draft option: use it to test motion cheaply, then spend on 720p or 1080p once the movement works. When a draft take is the one you want, Upscale in the video tools can finish it (Seedance 2.5 Draft finish or Topaz Starlight).
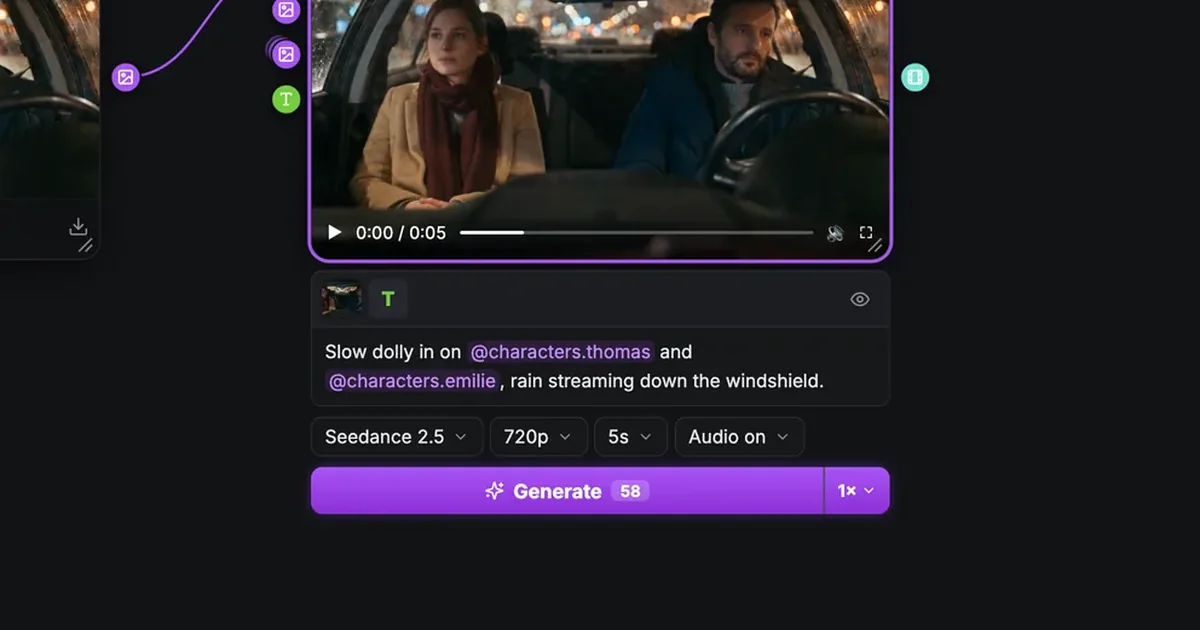
Write the camera movement into the prompt the way the Shot node states it: "Slow dolly in on @characters.thomas and @characters.emilie, rain streaming down the windshield." Our list of camera movement prompts has wording that video models follow.
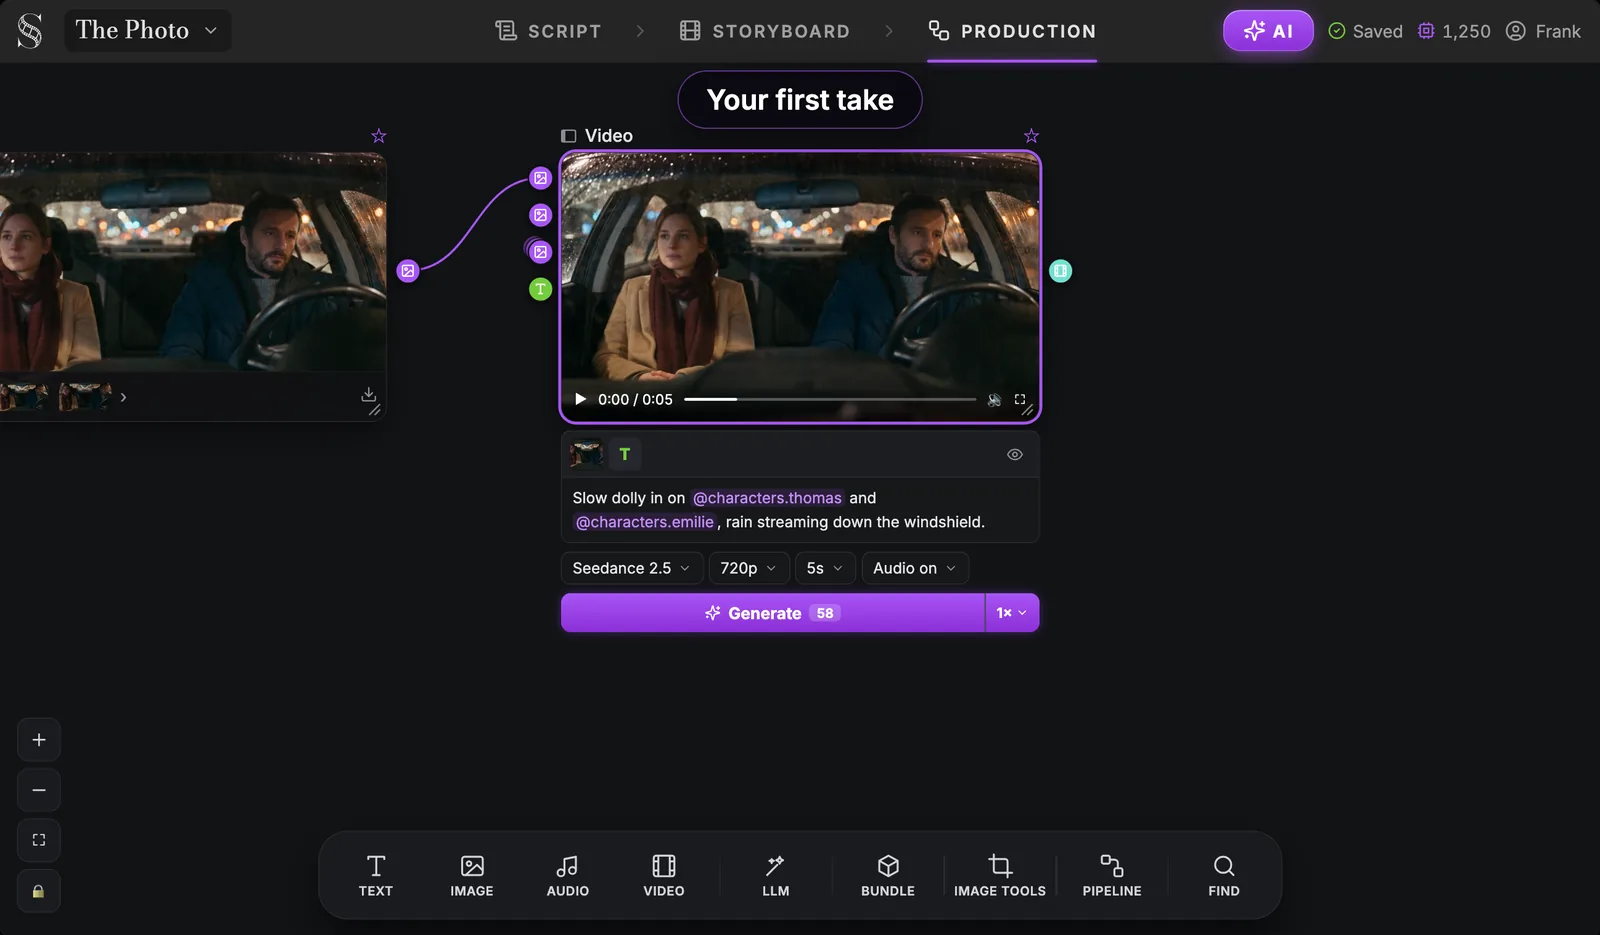
The first take plays right in the node, next to the image that started it. Like the Image node, the Video node keeps every take, so a second try never erases the first.
Try it free
Try Screenweaver for free on your script
It is free. Import your existing project, get a clearer view of your outline, and regain control of your story structure in minutes.
Start FreeSafety nets: see, re-run, recover
A canvas gets busy. Three features keep you in control of what you are paying for.
Show what the model receives
Image and video nodes have an eye icon above their prompt. Click it to reveal the exact prompt sent to the model.
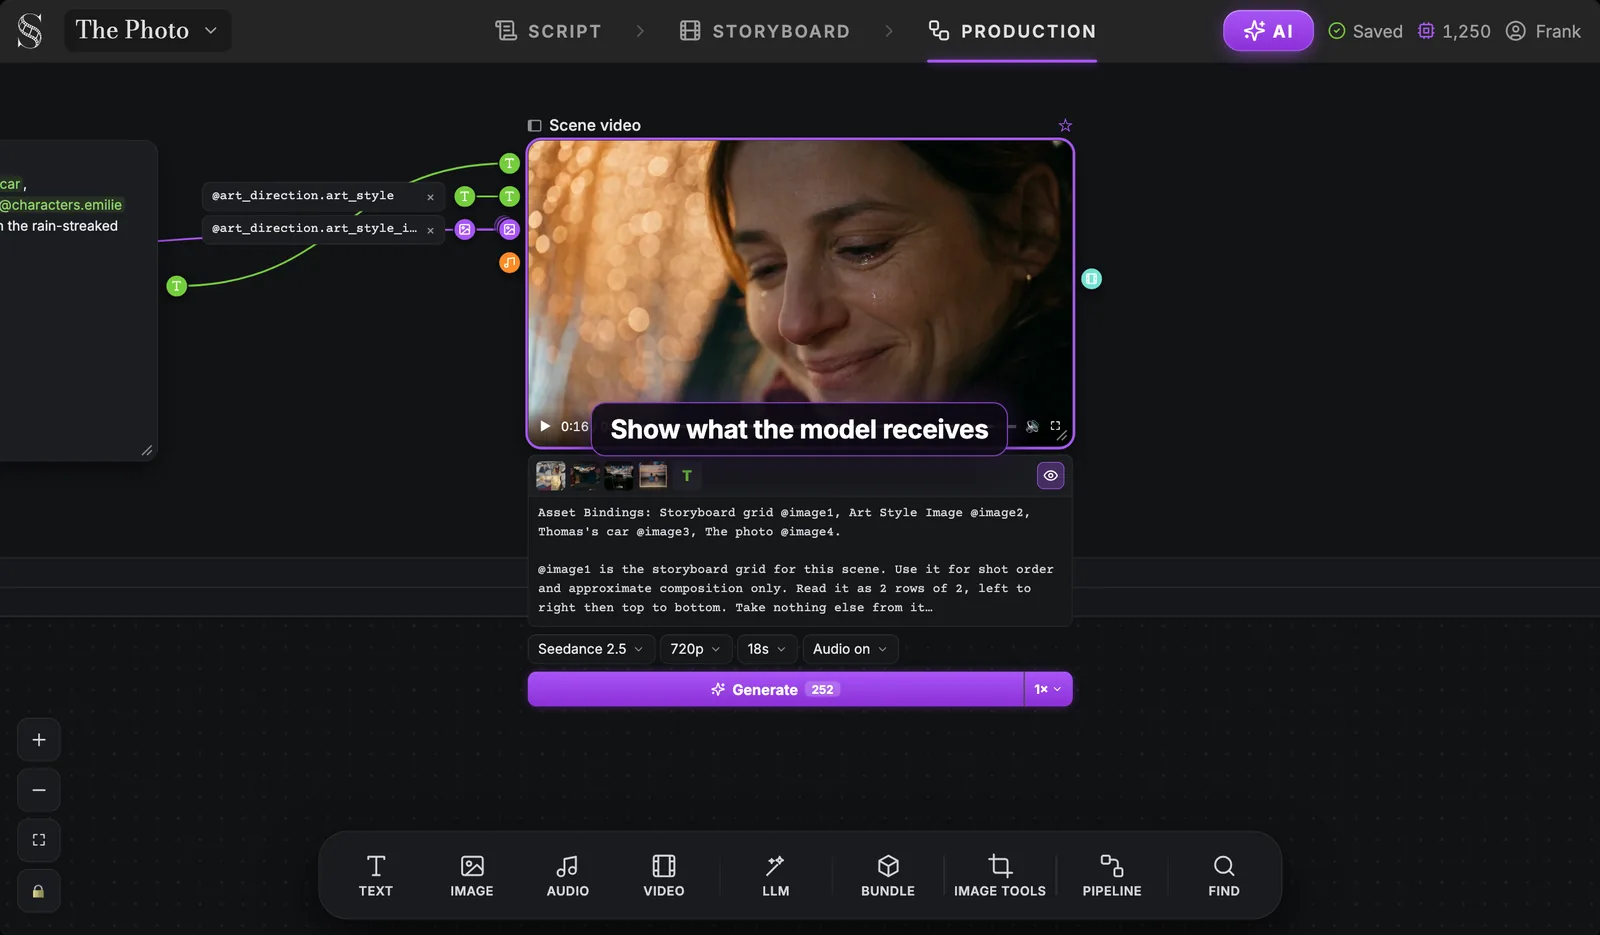
This example is the Scene video node of a pipeline. The Asset Bindings say which image is which (@image1 is the storyboard grid, @image2 the art style image, then the car and the photo), followed by the full prompt sent to Seedance 2.5 for an 18-second clip. When a take surprises you, read this first: it is the fastest way to see why.
The re-run banner
Change an upstream node, and the canvas tells you what is now out of date.
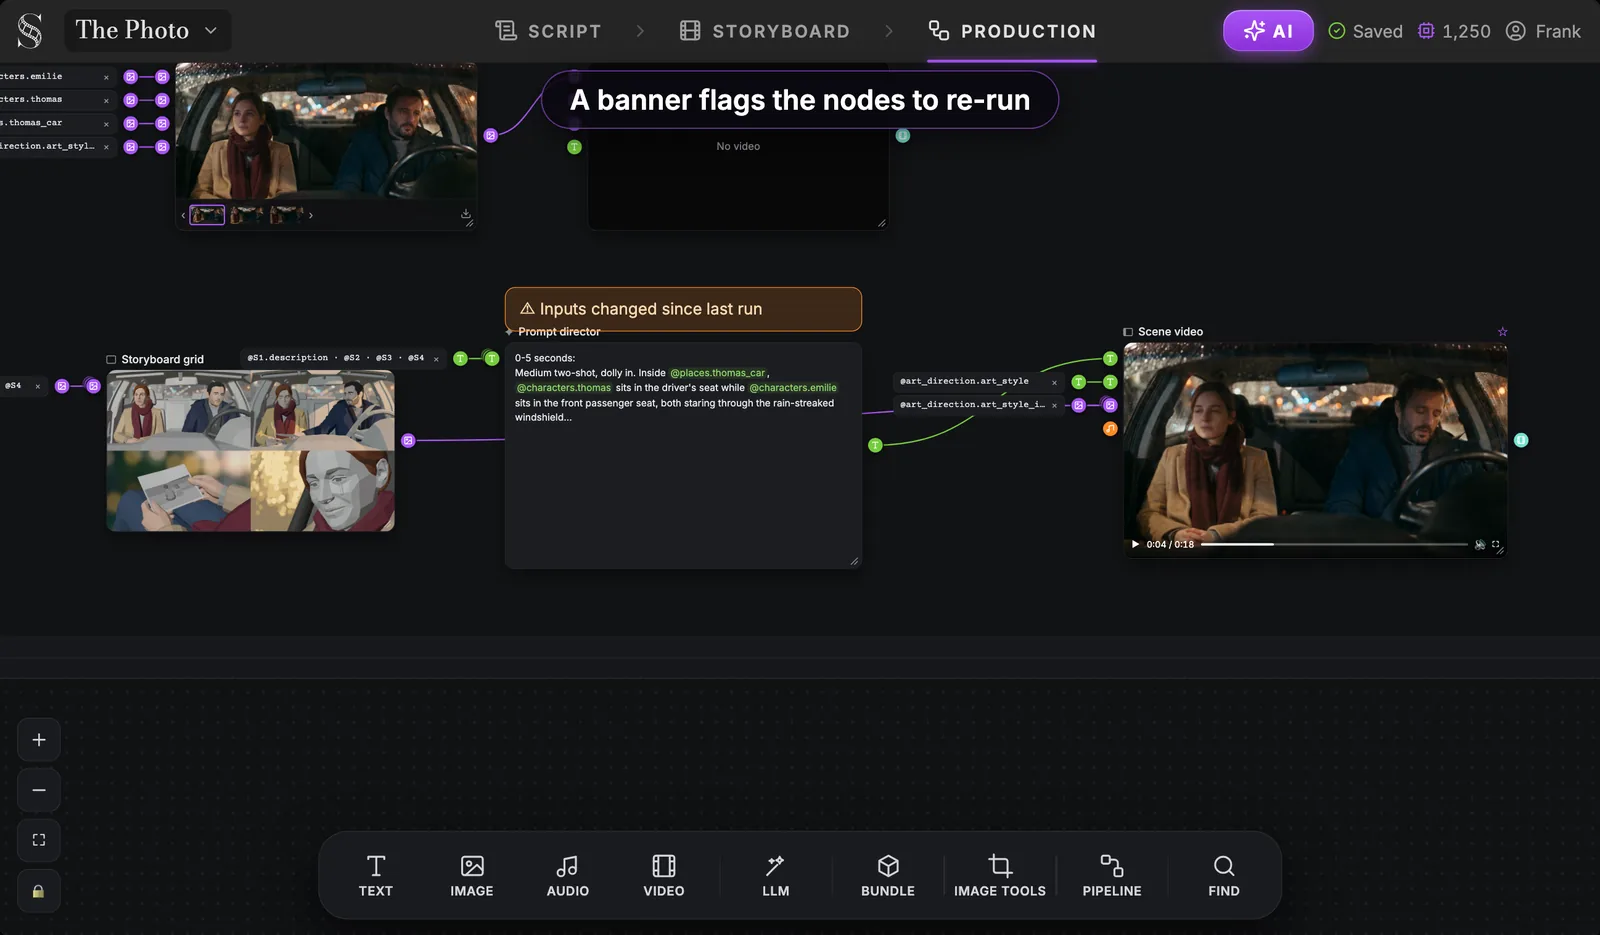
The orange banner "Inputs changed since last run" appears on every node whose inputs moved. You decide what to regenerate, instead of guessing which clips still match the new description or the new art direction.
The AI Center
Every generation, from any tab, lands in one list: the AI Center, opened with the AI button in the header.
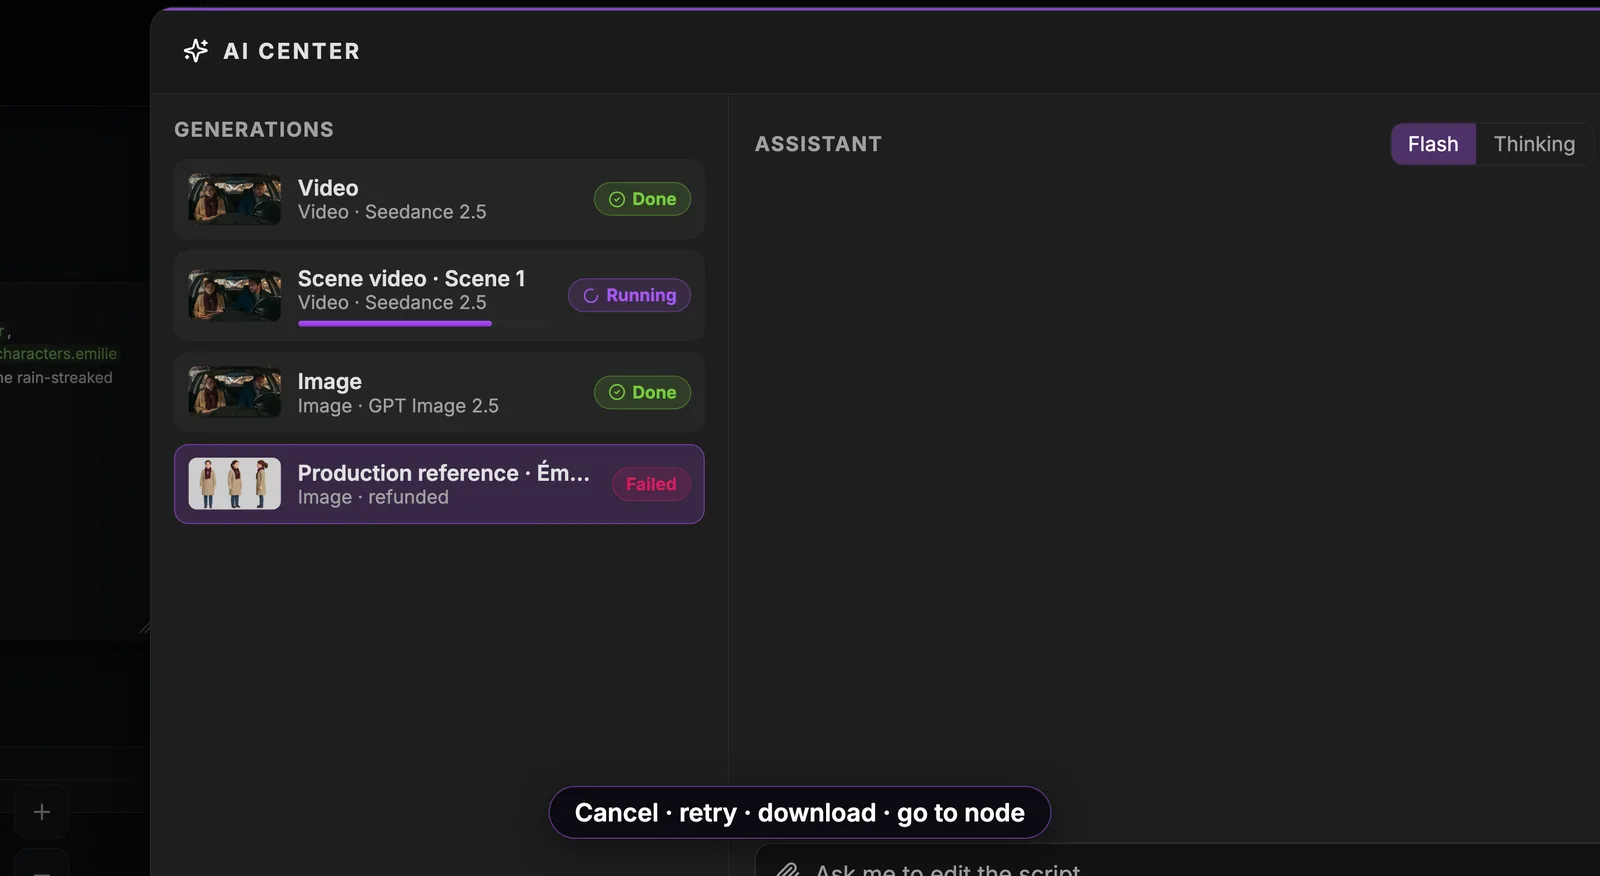
You see what is running, done or failed. From there you can cancel, retry, download, or go to the node that made it. Failed generations are refunded, as the Production reference at the bottom of the list shows.
From rushes to your edit: the Bundle node
ScreenWeaver does not cut the final film. The canvas produces your rushes; you edit them in your own editor. The Bundle node is the bridge.
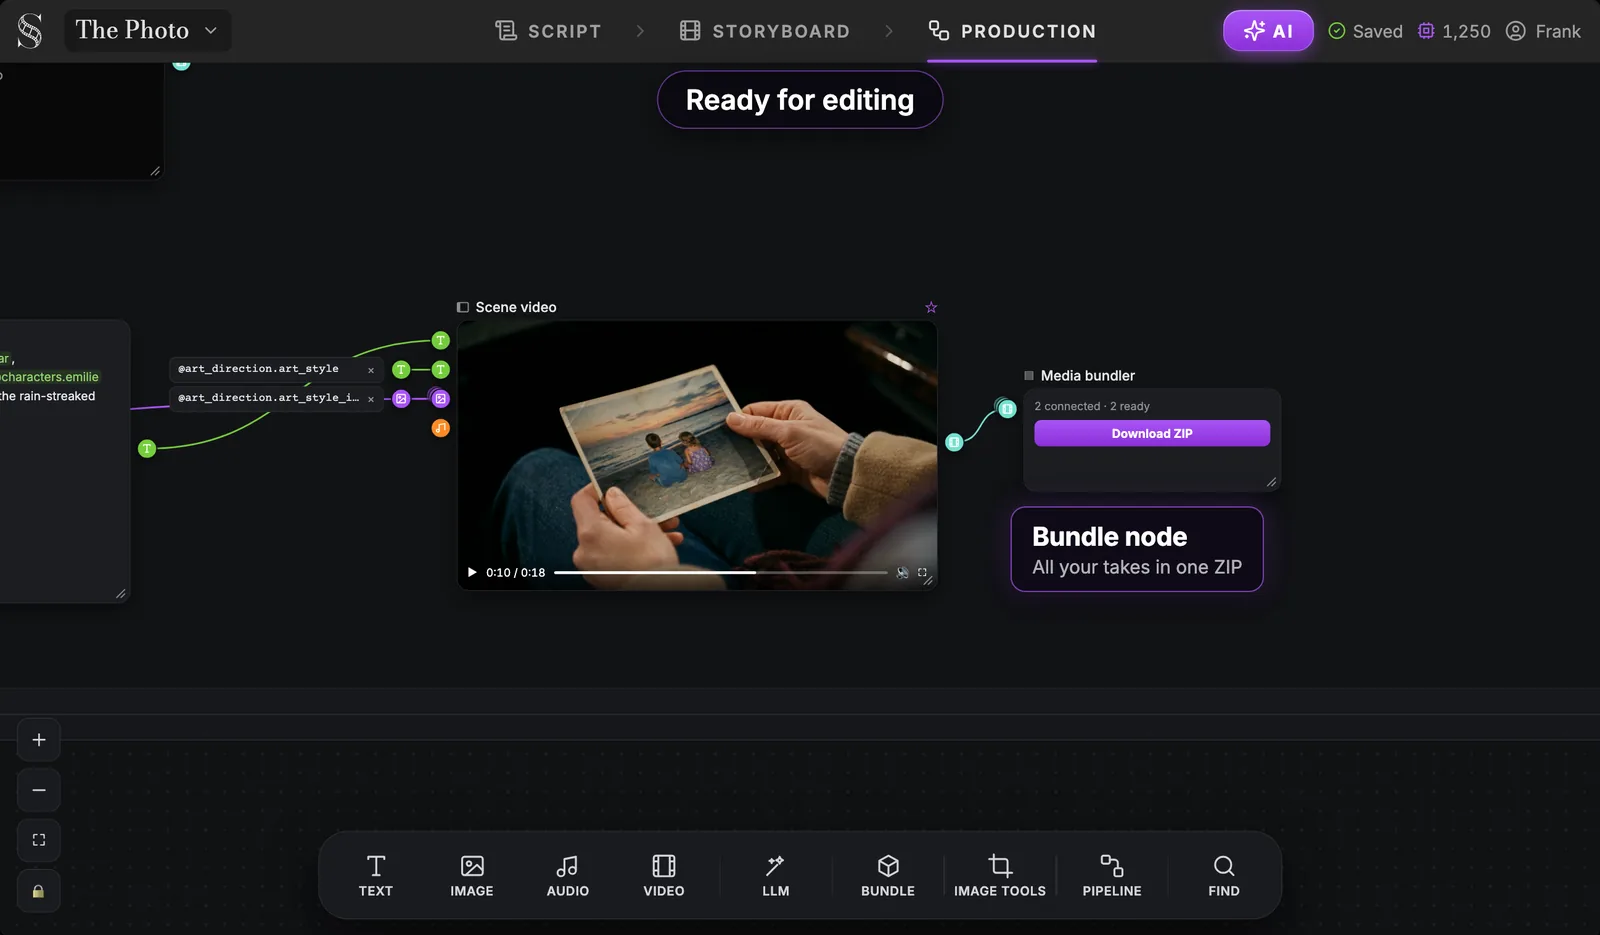
Wire your chosen takes into a Media bundler, check that they are ready, and click Download ZIP. Everything lands in one archive, ready for your timeline.
Sound follows the same logic. Video models can generate audio with the clip (the Audio on setting), and the Audio node brings in files you upload, but ScreenWeaver does not generate voice-over or music. Plan your voices, score and mix in other tools; our sound workflow for AI films lays out the steps.
What it costs: credits
Every Generate button shows its price in credits before you click. Your balance sits in the header, and the full picture is in Billing & credits, from the account menu.
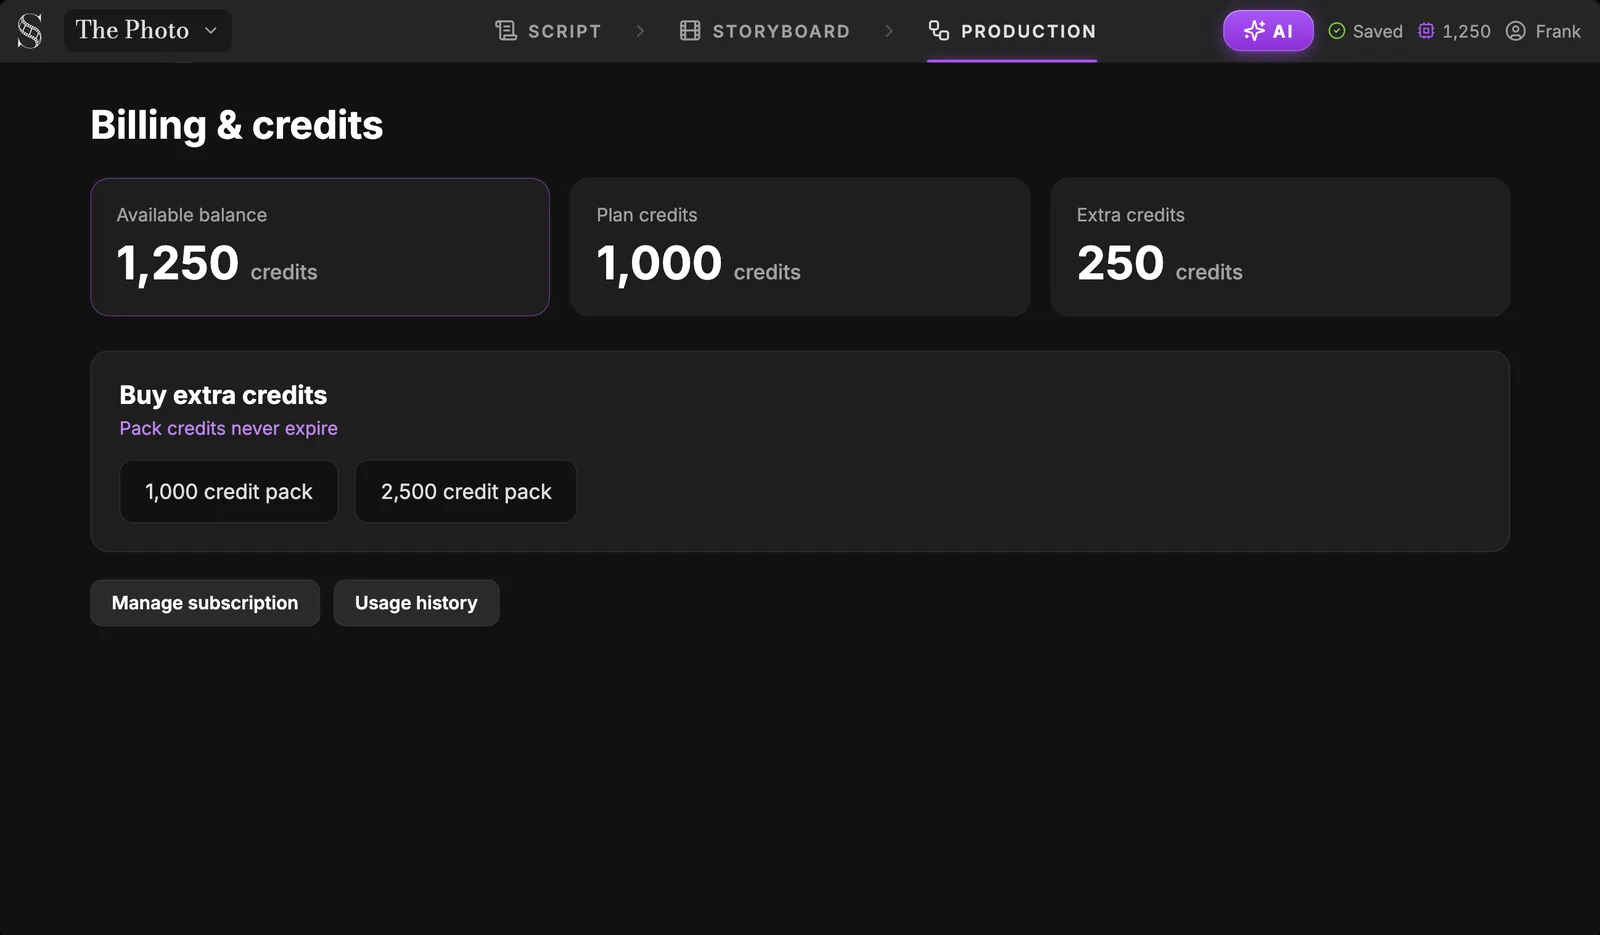
The page splits plan credits from extra credits, and the packs you buy never expire. Usage history is one click away. As for plans: Screenwriter is free forever (script editor, outline, moodboards, import). Auteur, at $39.99 a month with 6,000 credits, unlocks the storyboard and AI video production. Studio, at $149.99 a month with 25,000 credits, adds collaboration, unlimited seats and the lowest rates.
To spend less on the canvas: pick a strong still before animating, test motion at 480p · Draft, generate 1x until a prompt works before asking for 4x, and check what the model receives before a long clip. The AI video cost calculator gives you an estimate before you start, and the mistakes that burn AI video credits lists the common traps. For a deeper look at budgets and rerolls, read AI film cost: credits and rerolls.
When to use a pipeline instead
Working by hand gives you one clip per Video node: perfect for a single shot you want to control frame by frame. When you want a whole scene, with the same faces and the same light across several shots, use the Pipeline tile instead. In a scene's Production group, Add pipeline offers two chains: Reference to video, and Storyboard panels to video. Both gather the context of the scene for you and end on a single Scene video node, like the one in the safety net examples above. Our guide to multi-shot AI video explains both, step by step.
ScreenWeaver or a blank node editor?
If you searched for a ComfyUI alternative for filmmaking, here is the honest difference. A general node editor like ComfyUI is open and very deep: you assemble the graph yourself, node by node, and you can tune almost anything. ScreenWeaver's canvas is narrower and organized around a film: script, story elements, shots and scenes come first, and the graph follows from them.
| General node editor | ScreenWeaver Production tab | |
|---|---|---|
| Starting point | An empty grid | A canvas built from your storyboard |
| Unit of work | A graph | A film: sections, scenes and shots |
| Characters and places | Images you wire into each graph | Story elements with one Production reference each, called with @ |
| Models | What you install or connect | Image and video models in one menu, on one credit balance |
| Best for | Technical exploration, custom chains | Making a short or a series, shot after shot |
If you want full control over every sampler setting, a general editor is the right tool. If you want to direct a film and keep the same characters across hundreds of shots, start from the script and let the canvas build itself.
FAQ
What is node-based AI video production?
It is a way of building AI video as a graph: each node does one job (hold a text, generate an image, generate a clip) and wires carry text, images, audio and video between them. You see every input, you can swap one piece without rewriting the rest, and every node keeps its takes.
Do I have to wire the nodes myself in ScreenWeaver?
No. The Production tab is built automatically from your storyboard: art direction, characters, places, objects and every shot arrive already connected. You add nodes by hand only when you want to, by clicking a toolbar tile and then clicking inside a group.
Is ScreenWeaver a ComfyUI alternative for filmmakers?
For filmmakers, often yes, as long as you know the trade. ScreenWeaver gives up some low-level control in exchange for a canvas organized around the film itself: the script, the story elements and the shots. If your goal is to finish scenes with consistent characters, that structure does a lot of the work for you.
Which video model should I use on the node canvas?
Start with Seedance 2.5, the default and our recommendation: 4 to 30 seconds per clip, at 480p, 720p or 1080p. Veo 3.1, Seedance 2.0, MiniMax H3, Kling v3.0 and Grok Imagine Video 1.5 are in the same menu, so you can test another model on the same inputs in one click.
Can I edit the final film inside ScreenWeaver?
No. ScreenWeaver produces your rushes; you cut the film in your own editor. The Bundle node gathers your takes and downloads them as one ZIP for your timeline.
Can I generate voice-over or music in the canvas?
No. Video models can generate audio with the clip, and the Audio node accepts files you upload (converted to WAV), but there is no voice-over or music generation. Record or generate those elsewhere and mix them in your edit.
How much does a generation cost?
Each Generate button shows its cost in credits before you click, and failed generations are refunded. The storyboard and the production canvas come with the Auteur plan ($39.99 a month, 6,000 credits), and extra credit packs never expire.
Start your first scene
The canvas only builds itself from a storyboard, and the storyboard starts with a script. Write your first scene in the free script editor, then watch it reach the Production tab: create your free ScreenWeaver account.
Final Step
Build your next script with Screenweaver
Move from ideas to production-ready pages faster with timeline-native writing and AI-assisted story flow.
Try Screenweaver