
The short answer: treat every recurring place and every important prop as a story element, exactly like a character. Give it a description a camera can film, generate its reference sheet once, then call it with an @ in every shot, so the same image travels from the storyboard to the video node. And choose props that read in one glance and stay in hand: they are the ones a video model keeps intact.
Characters get all the attention in AI video. Yet in a real scene, the set and the props break continuity just as often: the car gains a sunroof between two shots, the dashboard changes colour, the photo in a hand turns into a postcard. The audience notices, even when they cannot say what is wrong.
This guide uses the demo project from our ScreenWeaver guide series, The Photo: one scene, INT. THOMAS'S CAR - NIGHT, rain. Thomas (40, short beard, navy coat) hands his sister Émilie an old photo of the two of them as children, seen from behind on a beach. "I found it at Mom's." Four shots, one place (Thomas's car), one object (the photo). The screenshots below are the ScreenWeaver interface with that project.
Why sets and props drift in AI video
A video model has no memory between two generations. Write "a car interior at night, rain on the windshield" in four prompts and you get four cars that all match the sentence and none that match each other. The seats change, the steering wheel moves, the light comes from somewhere else. The same mechanism makes faces drift, as we explain in character drift in AI video, and it hits places and objects for the same reason.
Props have it worse than sets. They are small in frame, they move, they pass from one hand to another, and the model has thousands of similar objects to choose from. A photo is a photo until the fourth shot, where it becomes a Polaroid.
The fix is the same as for characters: images, not more adjectives. Build the place and the object once as a reference, then attach that reference to every shot where they appear. Our overview of visual consistency in AI film covers the principle; the rest of this page shows the exact steps.
Places and objects are story elements too
In ScreenWeaver, characters, places and objects share one system: story elements. Each one has a description, a storyboard reference sheet and a production reference sheet, and each one can be called by name in any prompt.
Create them from the script
The fastest way is from the page. Right-click a name in the script and the menu offers to turn it into a character, a place or an object.
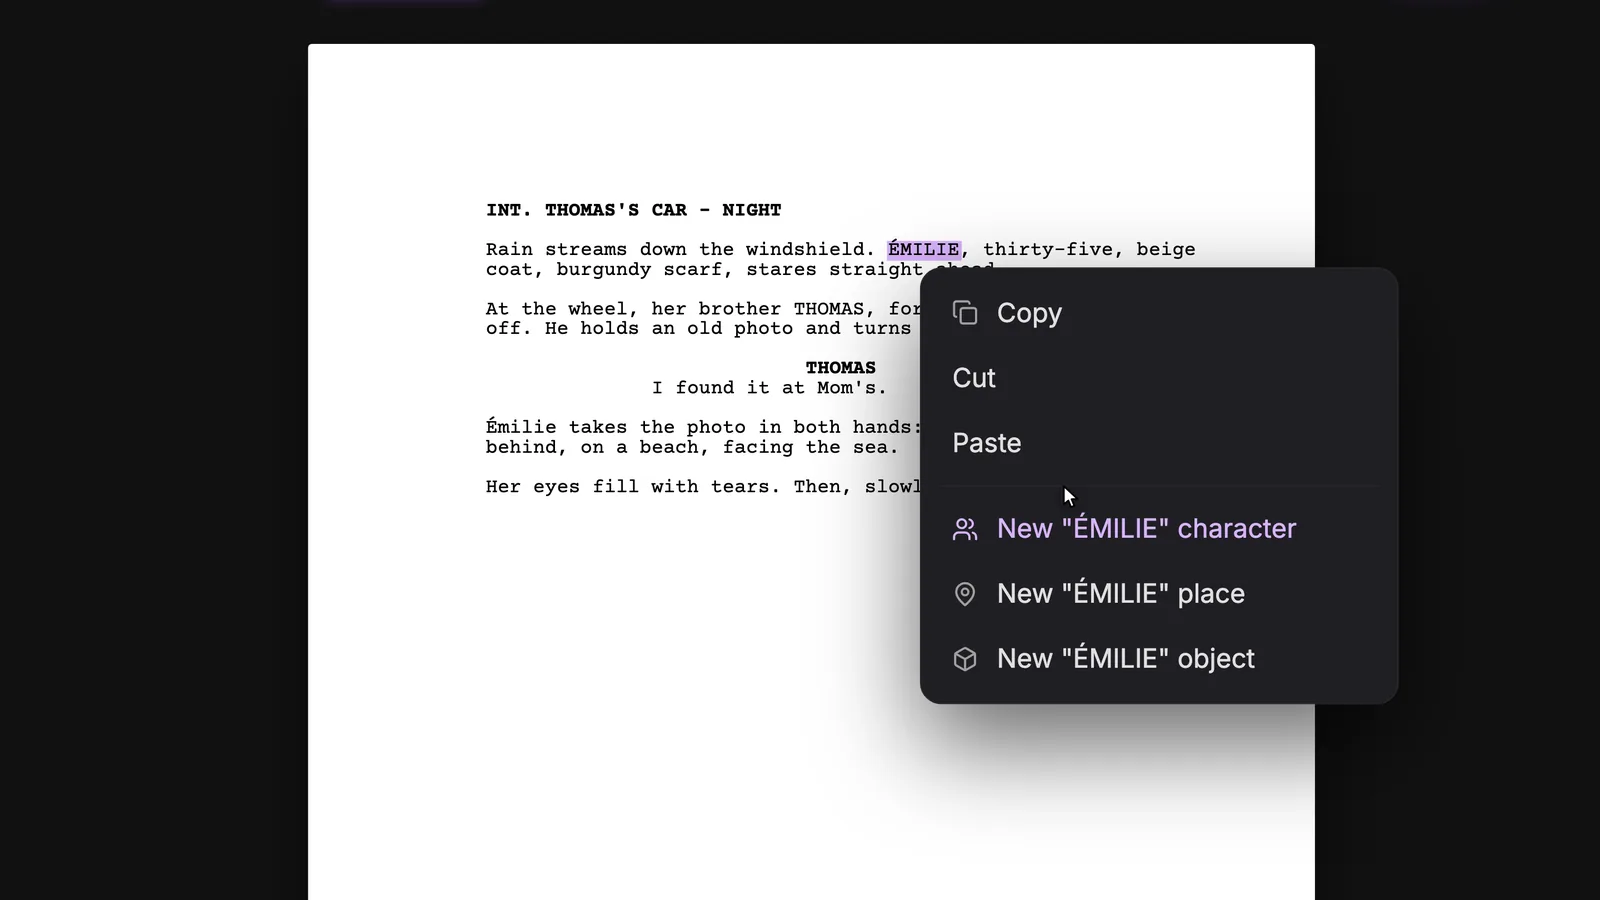
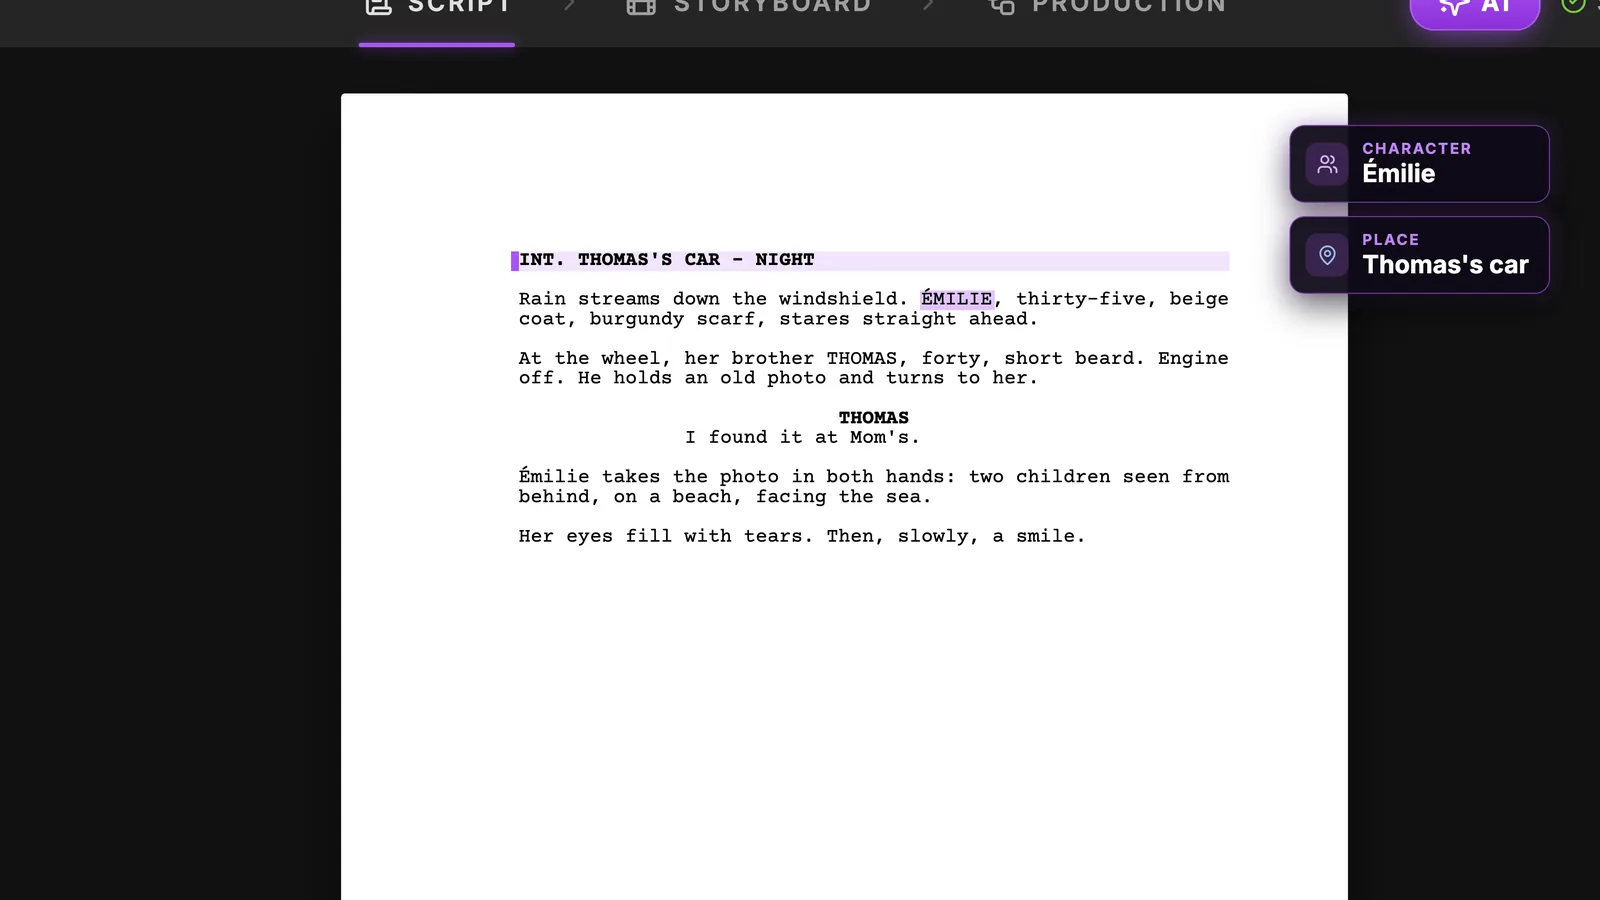
The same menu works on "THOMAS'S CAR" in the scene heading, or on "photo" in an action line: you pick place or object instead of character. Once created, the elements appear next to the page, labelled by type.
Or let the import create the places for you
If your script already exists, attach the PDF or Final Draft file in the AI Center and ask the assistant to import it. It rebuilds the script and its structure, creates the characters from the character cues and creates the places from the scene headings. Our guide to the screenplay editor and script import covers the formats in detail.
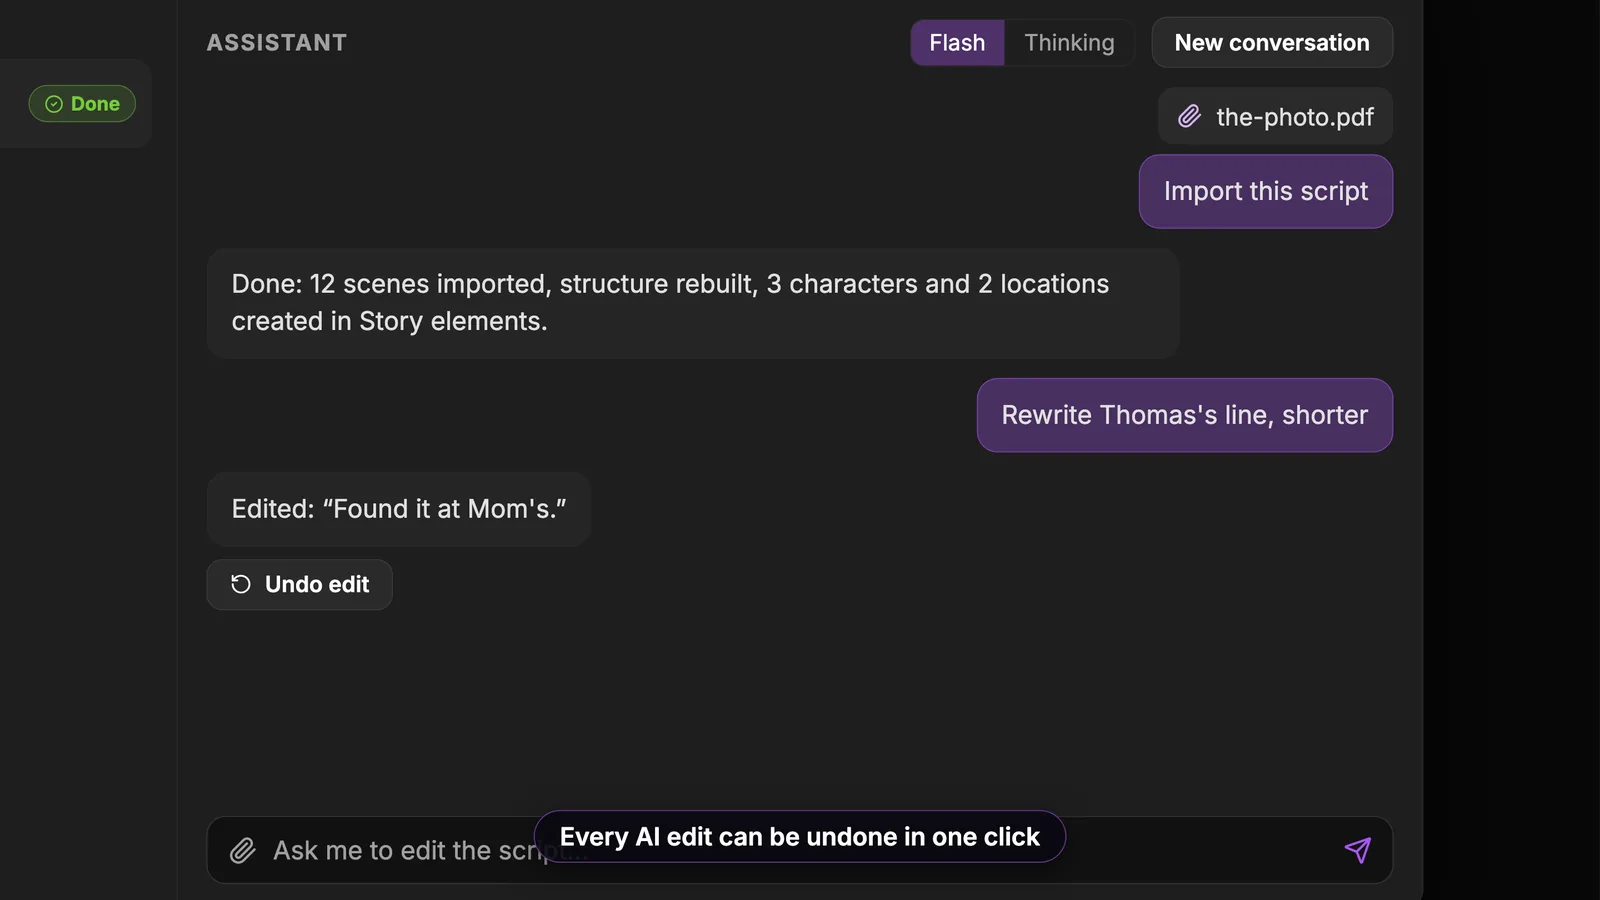
One thing the import does not do: create objects. A scene heading always names a place, but nothing in screenplay format marks which prop matters. Objects are always added by hand, with the right-click menu above. That is a feature, not a gap: you decide which props deserve a sheet.
One group per element
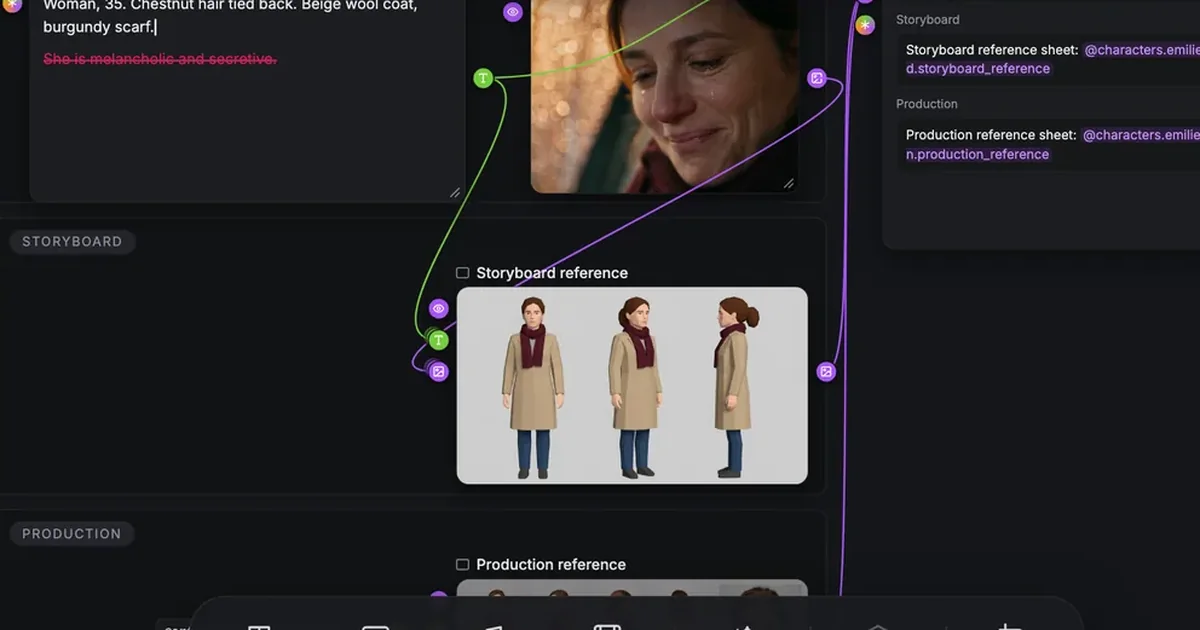
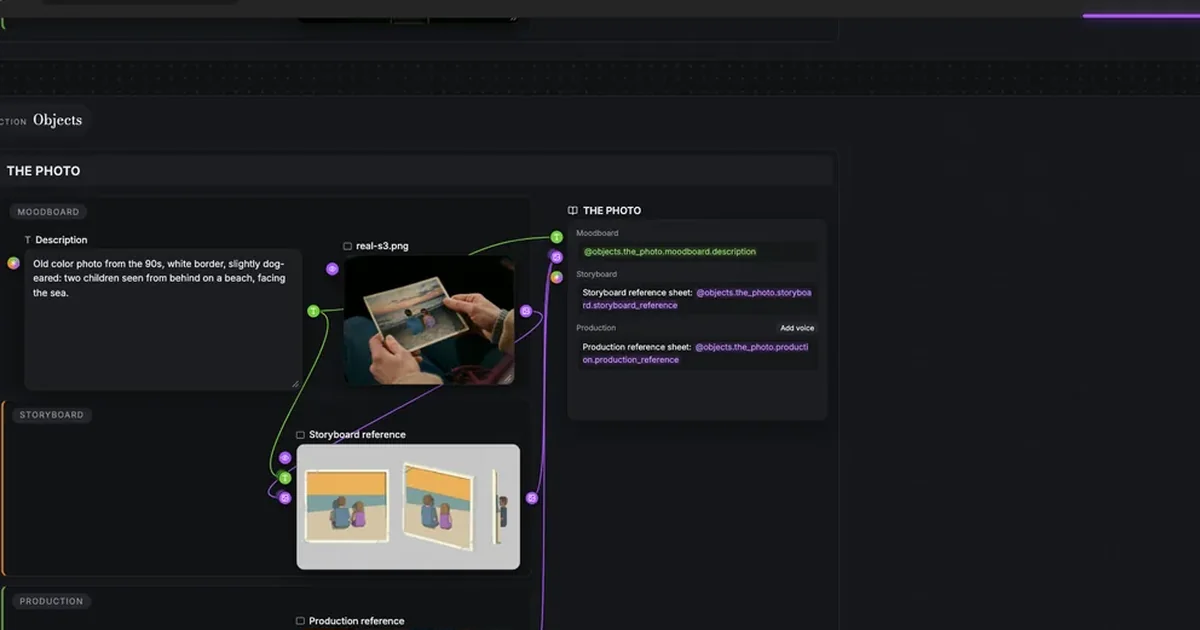
Every story element lives as a group on the Story elements canvas. The group has three stages: Moodboard (a pinned Description, plus any images, text or audio you drop in), Storyboard (the storyboard reference sheet) and Production (the production reference sheet). On the right, the Story element node lists the three fields that other shots will call.
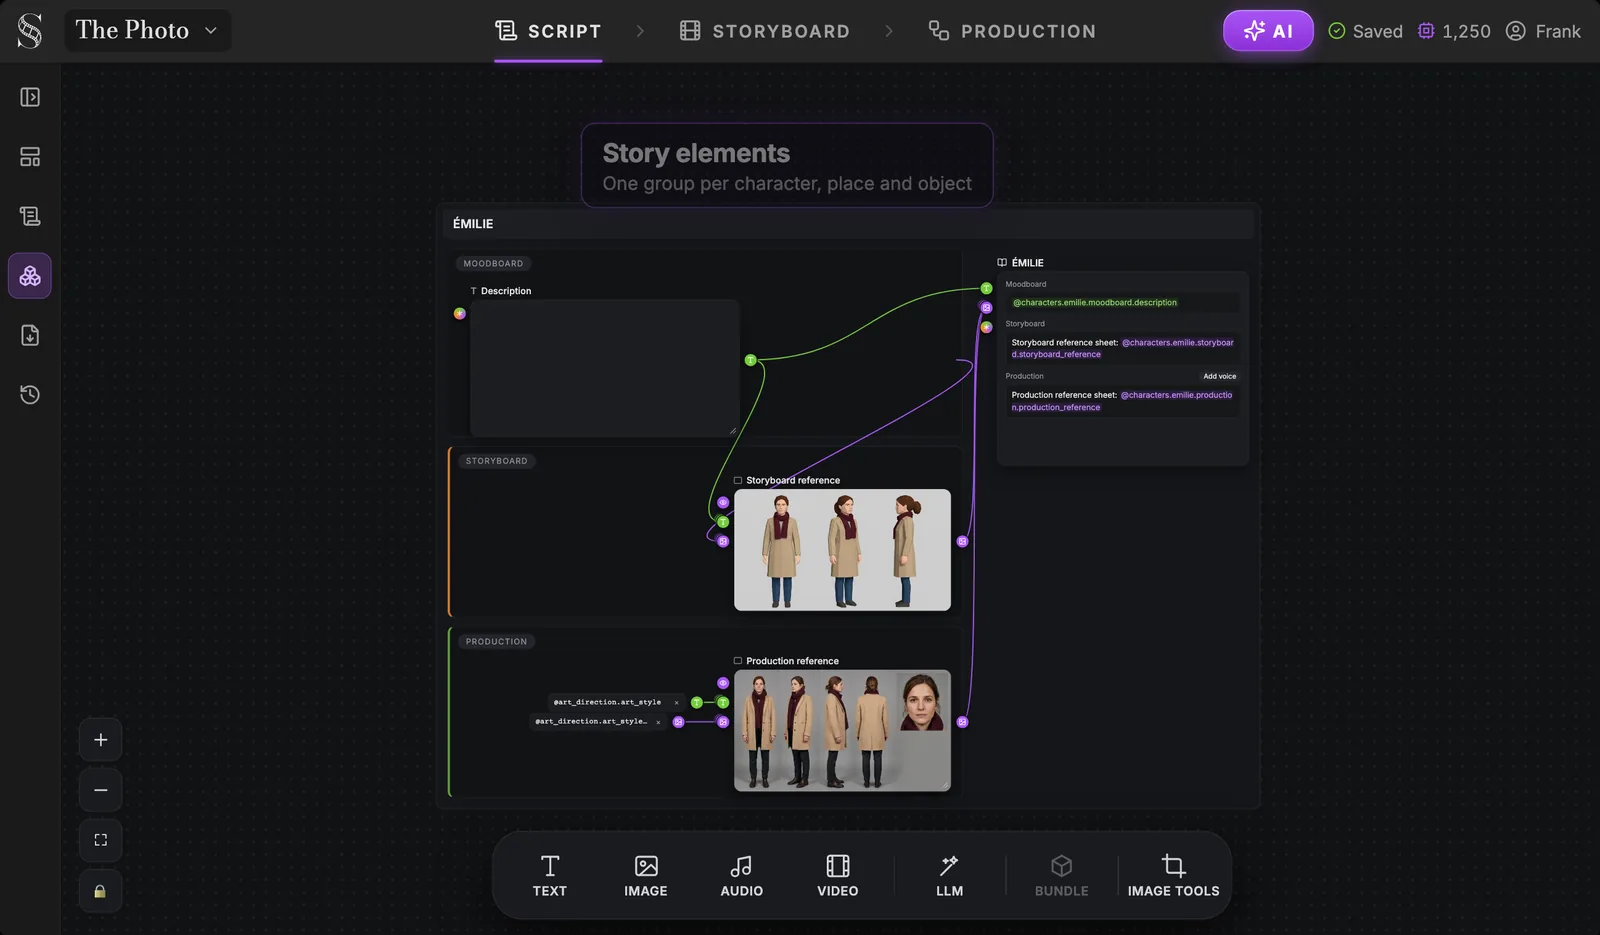
This screenshot shows Émilie, but Thomas's car and the photo get exactly the same group. Learn the layout once and it applies to every element. The guide in this series on moodboard, storyboard and production explains what each stage is for.
Write a description a camera can film
The description is the most important line you will write for a place or a prop. It drives the sheets, and the sheets drive every shot. The rule is the one we give for characters in the AI character sheet guide: write what a camera can film, not a mood.
| Vague (does not render) | Filmable (renders) |
|---|---|
| A cosy, melancholic car | A parked sedan at night, engine off |
| A tense atmosphere | Rain streams down the windshield |
| The city feels far away | The city is nothing but a bokeh of lights |
| A precious old photo | Old color photo from the 90s, white border, slightly dog-eared |
| A happy childhood memory | Two children seen from behind on a beach, facing the sea |
For a place, cover: what it is (a sedan, a kitchen, a rooftop), the time of day, the weather, where the light comes from, the materials and colours you will see in frame, and anything fixed that a shot might show (a cracked windscreen, a sticker on the glovebox).
For an object, cover: what it is, its size relative to a hand, material, colour, era, condition, and what is on it. For a photo, a letter or a screen, describe the content too: the model needs to know what the image inside the image shows.
Leave out feelings, symbolism and backstory. "The car where their father used to drive them to the sea" is good writing for the script and useless for the sheet.
What the sheets look like
A place: one master view, nobody in it
A place sheet is one master view of the environment, seen from a high angle, with no characters in it. It is not a floor plan. Think of it as the establishing shot of your set, before the actors arrive. Leaving the characters out matters: they come from their own sheets, and a face baked into the set would fight with them.
In the Production tab, Thomas's car sits in the Places section with the same group as a character.
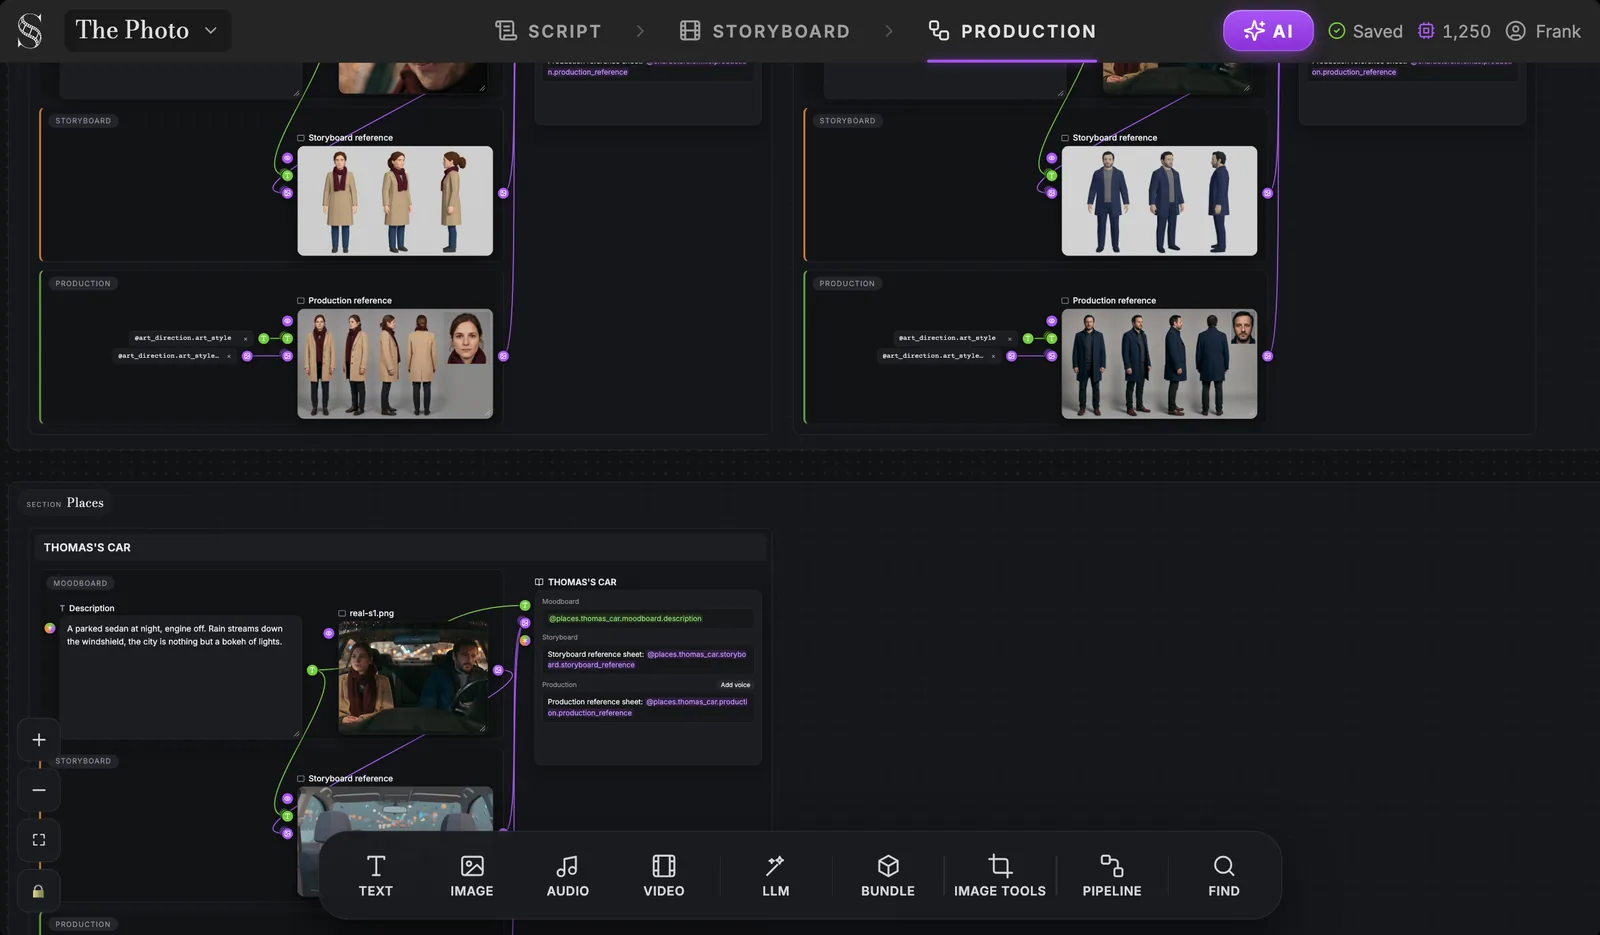
Look at the moodboard: next to the description, a reference still was dropped in. You can drop your own images there (a photo of a real car, a location scout picture); you cannot generate images inside the moodboard itself. Below, the Storyboard reference shows the empty interior: seats, dashboard, windshield, rain. That single view is what every shot inside the car will refer to.
An object: several views and a detail
An object sheet shows the prop from several angles, with a detail vignette. For the photo, that means the print seen flat, at an angle and on its edge, so the model knows it is a thin rectangle of paper with a white border, not a framed picture.
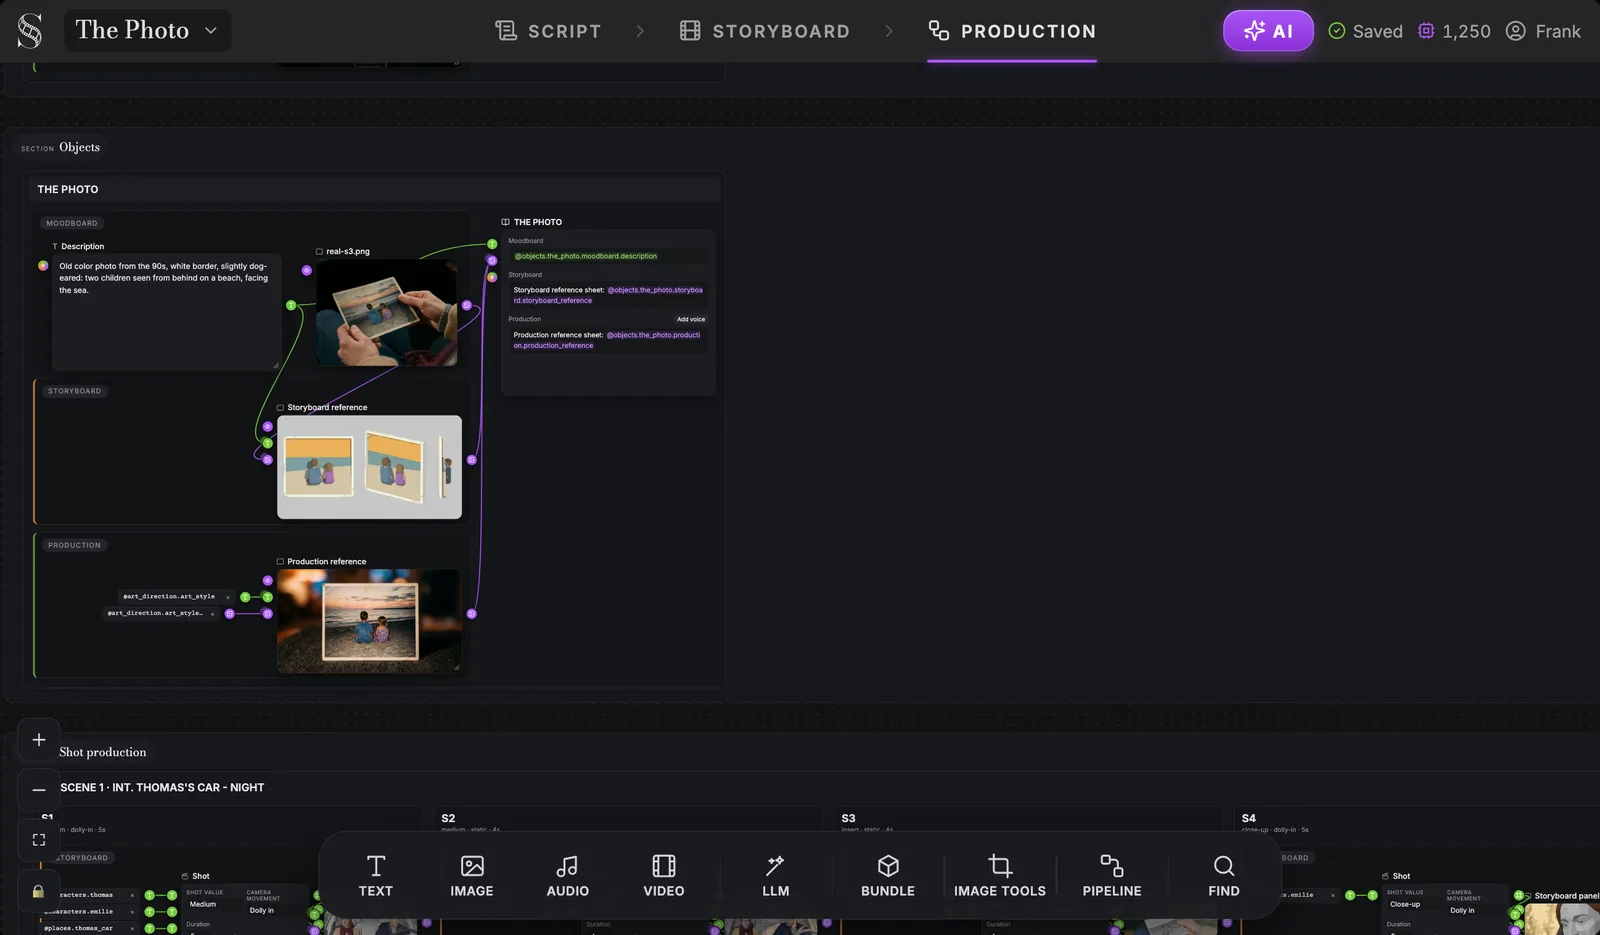
Two sheets: storyboard and production
Each element has two sheets. The Storyboard reference is drawn in the storyboard's previz style, to block the shots. The Production reference is the same place or object re-rendered in the film's final style, driven by the Artistic direction: in the Objects screenshot above, you can see the two @art_direction inputs wired into the photo's Production reference.
Both are generated once and reused in every shot. Do not regenerate a place sheet halfway through a scene: every shot after that point would refer to a slightly different car. If the sheet is wrong, fix it before you produce the scene. The automatic pass that creates missing sheets is covered in AI previz: script to 3D blocking storyboard.
Carry them into every shot with @
A sheet only helps if the shot points to it. In any prompt in ScreenWeaver, type @ and pick the element from the list, grouped by Characters, Places, Objects, Shots and Others. What you cite is what gets carried.
In the storyboard
Each shot of the storyboard has an Action field. Mentions appear as tags inside the sentence.
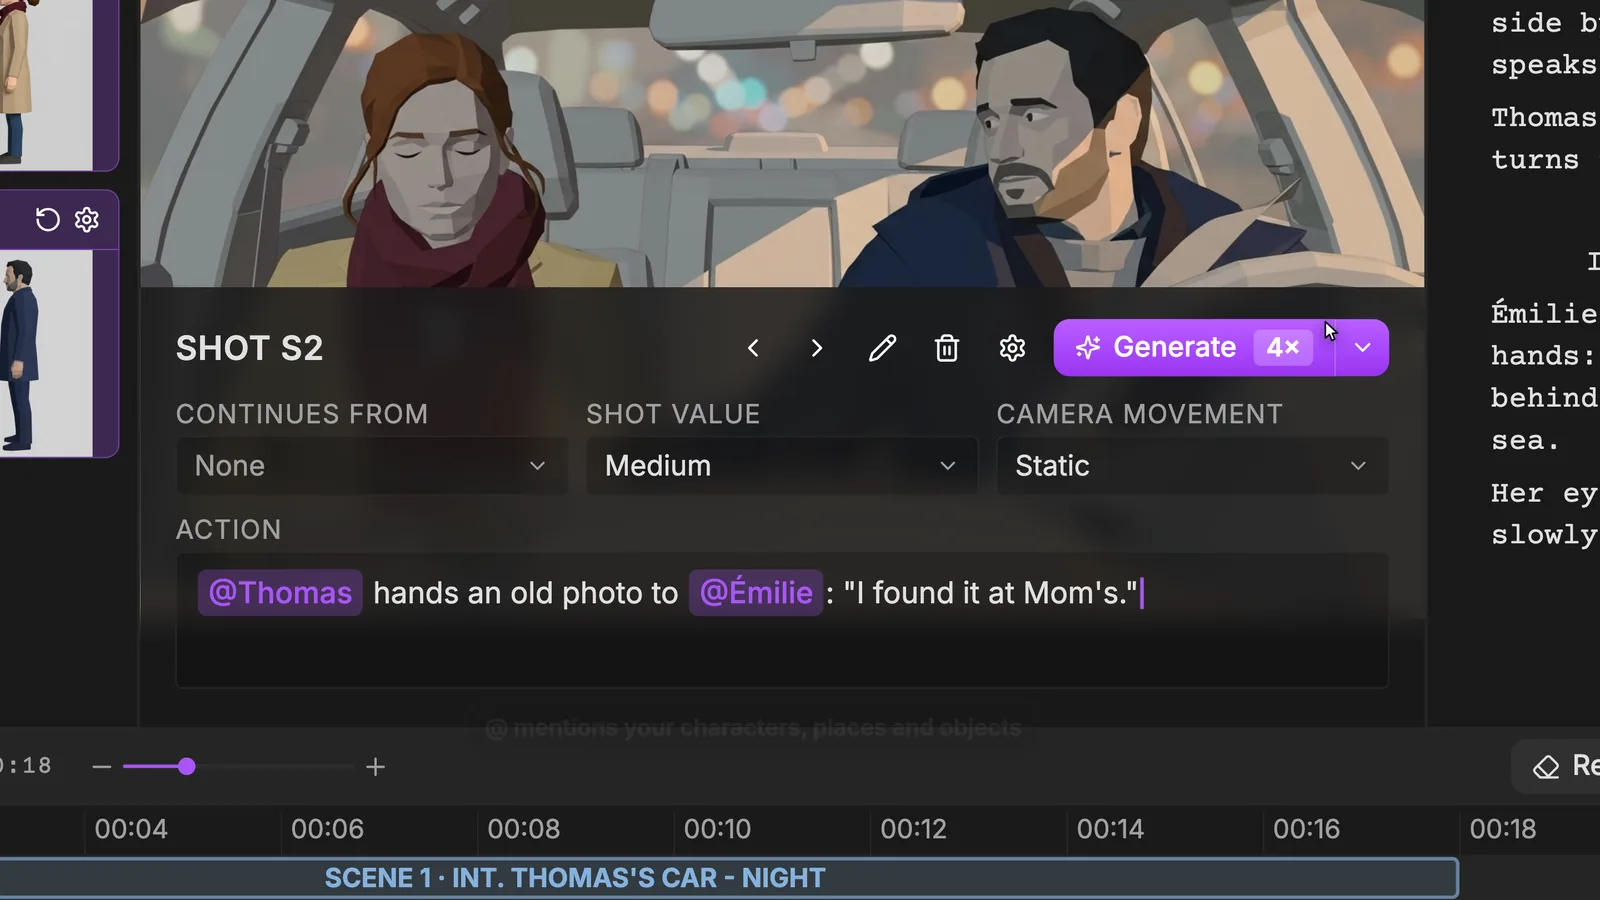
Notice what this action cites: two characters. The photo is in the sentence as plain words. When a prop carries the shot, cite it too: type @, pick the photo under Objects, and the object sheet travels with the shot. The same goes for the place when a shot shows enough of the set to drift.
In the production canvas
When you move to the Production tab, nothing is lost. Each shot keeps its storyboard group: the Shot node (shot value, camera movement, duration, action) with its characters, places and objects already plugged in as references, next to its storyboard panel.
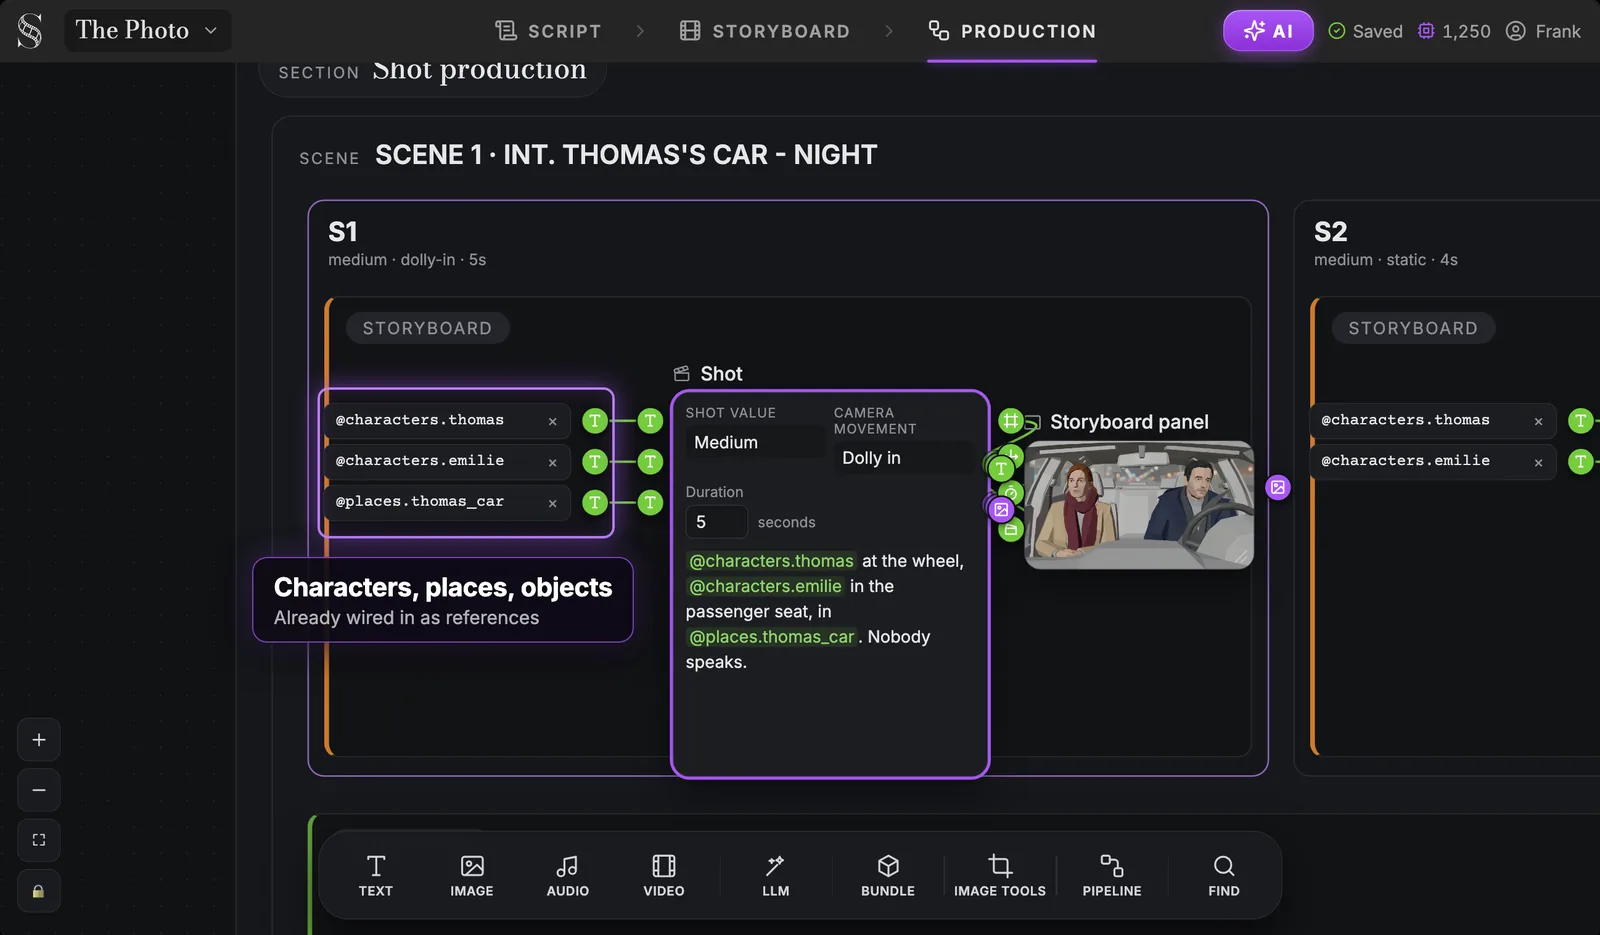
In shot S1, the action says Thomas is at the wheel and Émilie in the passenger seat "in @places.thomas_car". That one mention is why the car arrives in the canvas already wired. In the demo, shot S3 is an insert shot on the photo, and there the object is the subject of the frame: the photo's sheet is what holds it.
In a node you place by hand
The mentions also work when you build something yourself. Place an Image node in a scene's Production group, write a prompt with @, and each mention becomes an input of the node.
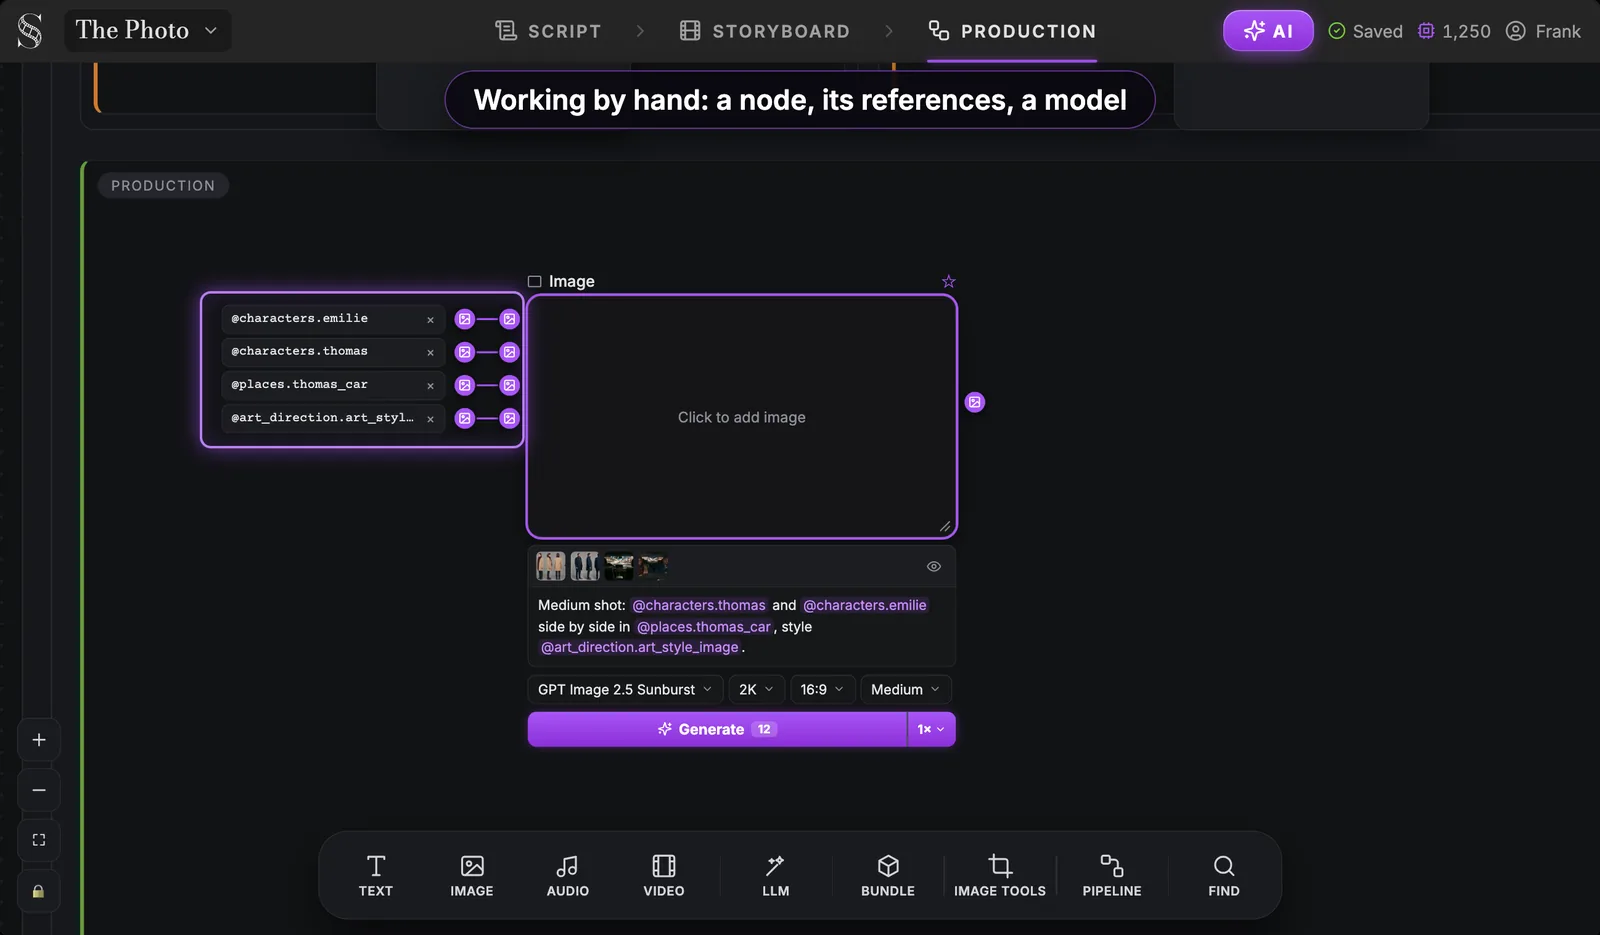
You never describe the car again. "@places.thomas_car" is enough, because the description and the sheets already did the work.
Try it free
Try Screenweaver for free on your script
It is free. Import your existing project, get a clearer view of your outline, and regain control of your story structure in minutes.
Start FreeInto the scene pipeline
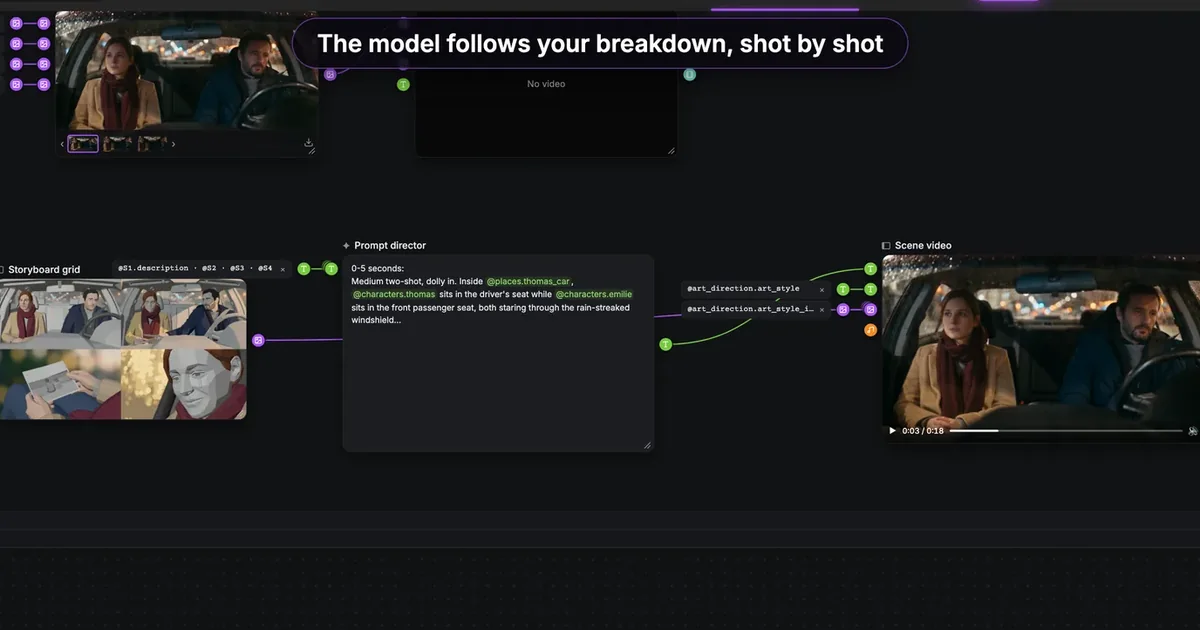
To produce the whole scene as one coherent clip, you add a pipeline in the scene's Production group. In Reference to video, a Prompt director writes the full staging from the action of each selected shot, and the characters, places and objects you cited become references bound at the video node. A single Scene video node then shoots the scene.
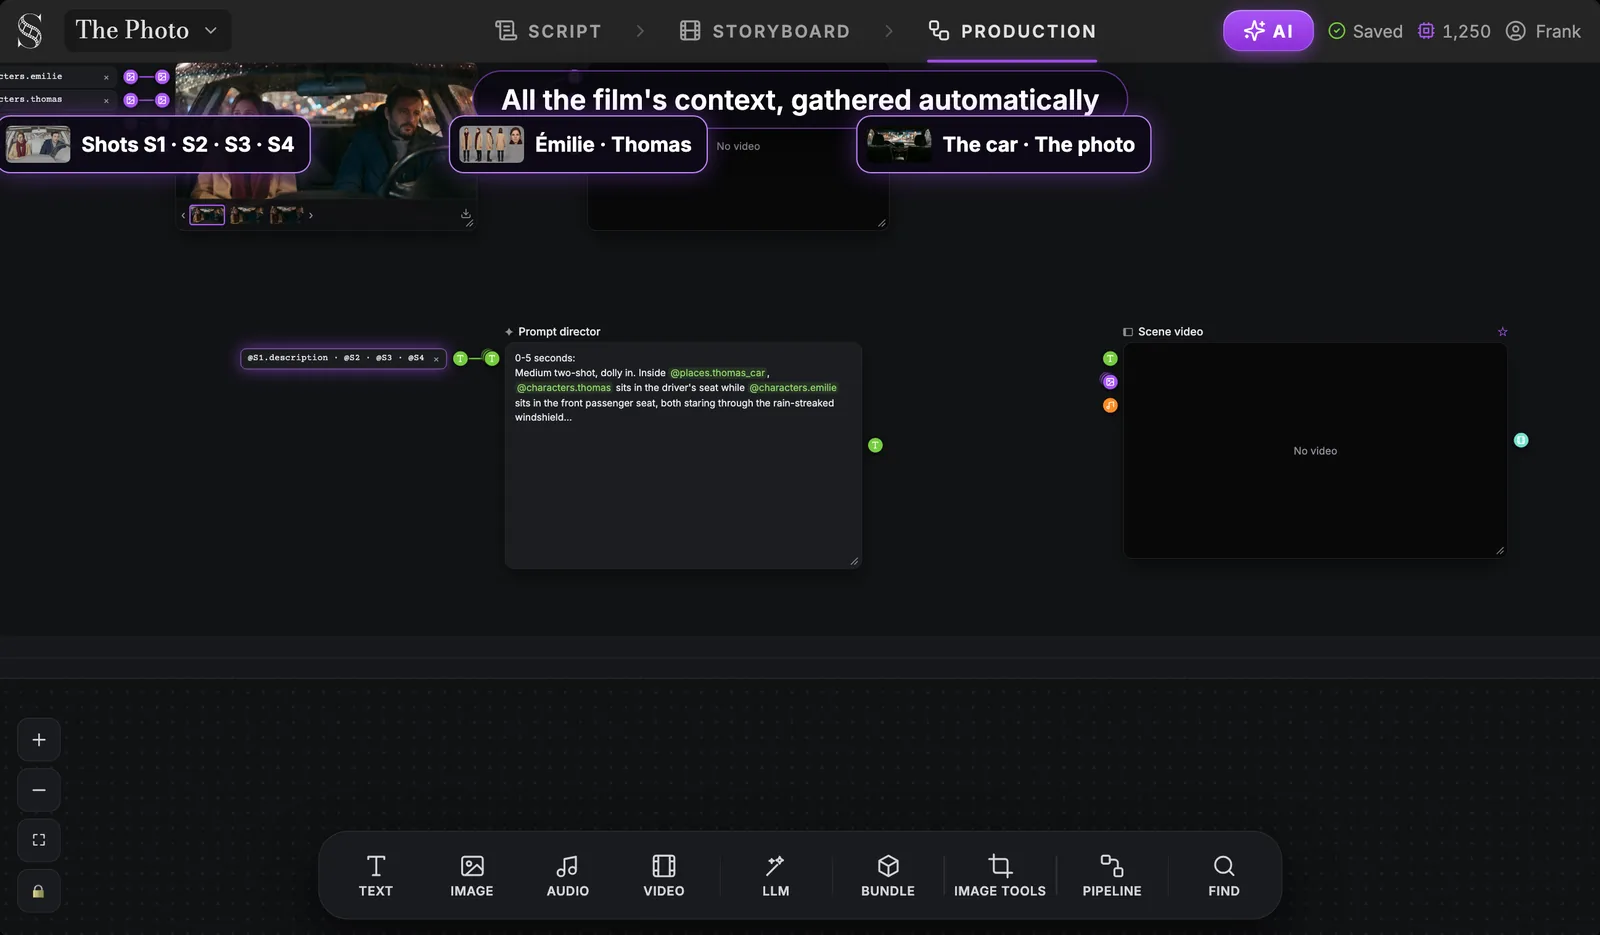
Read the labels: the car and the photo are gathered with the shots and the characters, because the shots cited them. The staging written by the Prompt director names "@places.thomas_car" from its first line. If a prop is missing from that list, it is missing from your actions: go back and add the @.
The second pipeline, Storyboard panels to video, assembles the shots' panels into a grid of storyboard panels and sends it to the video node with the art direction. Open "Show what the model receives" on the Scene video node to check exactly what goes out.
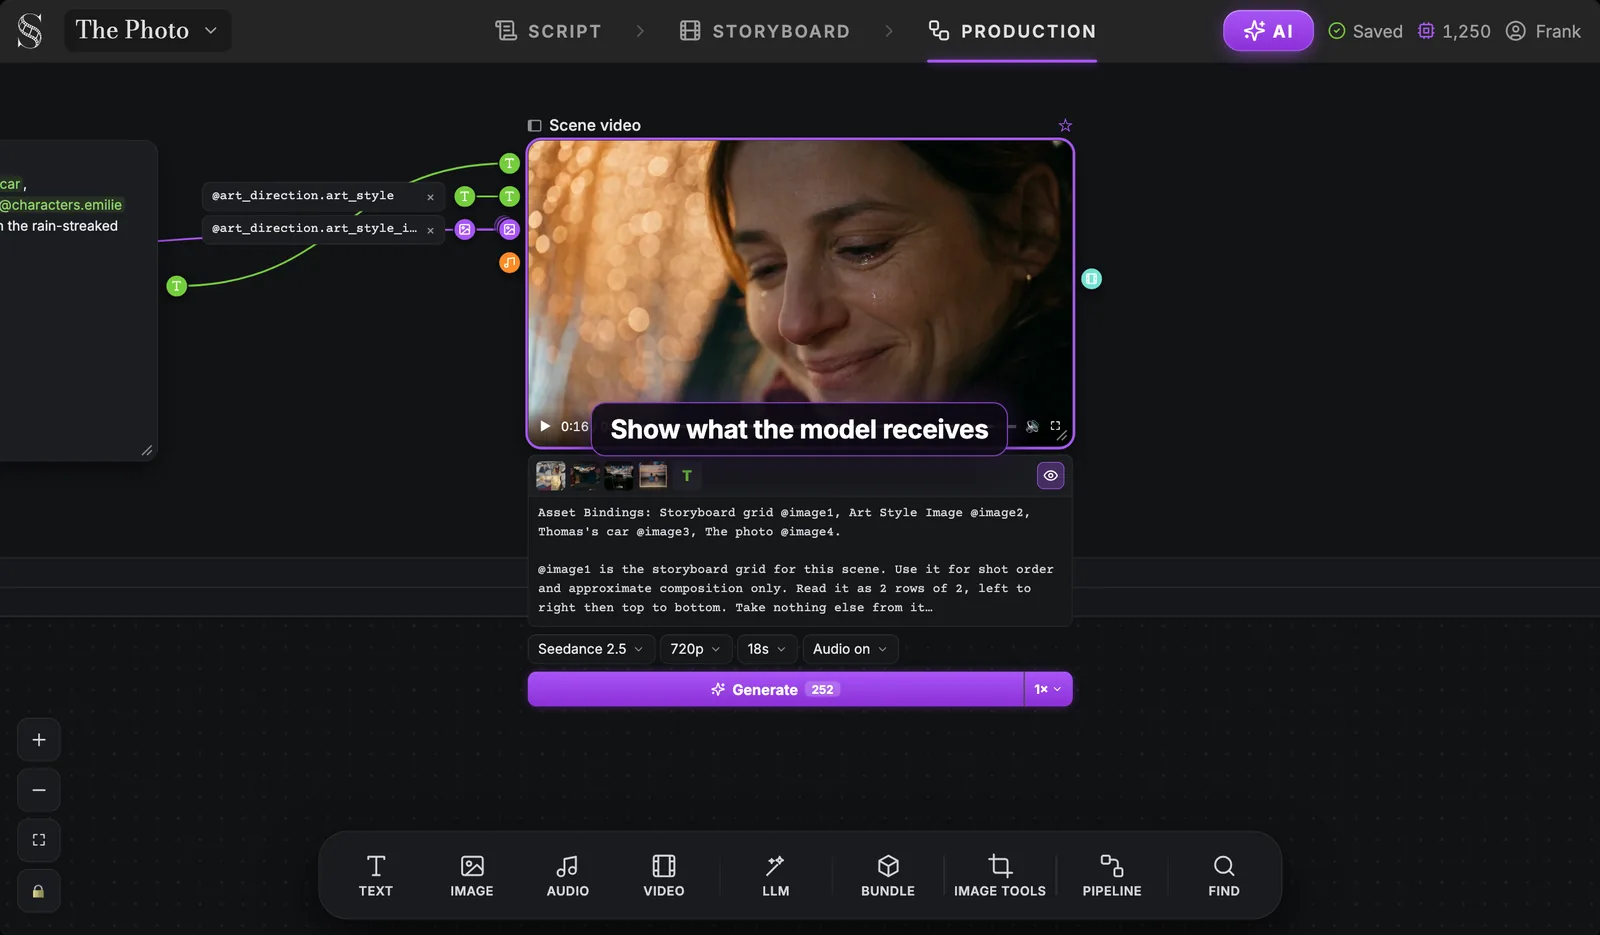
This is your continuity check before you spend credits: if "Thomas's car" and "The photo" are not in the bindings, the model will invent them. The multi-shot scene pipeline guide walks through both pipelines step by step.
Pick props that survive video: a lesson from this demo
The first version of this scene did not have a photo. Thomas took a small key out of an envelope and handed it to Émilie. On paper, it was a better beat. In video, it failed again and again: take after take, the action of a small object coming out of a container would not come out right.
So we rewrote the story. The object is already in his hand when the shot starts, and it is flat: a photo. That is the version you see in every screenshot of this guide. Our reading of why: an object that emerges from a container asks the model to invent something it could not see in the first frame, at a small scale, inside moving hands. A flat object already visible in frame is just something to keep.
The tip that came out of it:
- Choose props that read in one glance. A photo, a red scarf, a lit lighter. Not a key among other keys.
- Keep them in hand or in view. Start the shot with the prop already visible. Avoid pulling it from a pocket, a bag, a drawer or an envelope.
- Prefer flat or simple shapes. A sheet of paper, a card, a mug. Complex mechanisms drift faster.
- Give the prop its own shot when it matters. An insert on the object, as in shot S3, lets its sheet carry the whole frame.
If the story needs the reveal from a container, consider cutting around it: one shot on the hand reaching in, one shot with the object already out.
A continuity checklist before you generate
Run this on every scene before video. It takes two minutes and costs nothing.
- Every recurring place exists as a story element, with a filmable description and a sheet with nobody in it.
- Every prop that matters exists as an object, added by hand, with a description that includes size, material, colour and content.
- Every shot that shows the set or the prop cites it with @ in its action.
- The pipeline's context lists them: the car and the photo appear next to the shots and the characters.
- "Show what the model receives" names them in the bindings.
For the wider checks (wardrobe, time of day, the prop in the wrong hand), see continuity checks for props, time and wardrobe. For sets that span many scenes, our page on location continuity in AI film goes further.
FAQ
How do I keep the same background in AI video?
Make the location a story element with one reference sheet, then cite it with @ in every shot that shows it. The sheet is one master view of the set with no characters, generated once and reused everywhere. Describing the background again in each prompt does not work: the model has no memory between generations.
How do I make props consistent across AI video shots?
Add the prop as an object by hand, write a description with size, material, colour and content, and let its sheet show it from several angles. Then mention it with @ in every action where it appears. Choose props that are simple, flat or easy to read, and keep them in view rather than pulling them out of a container.
Does ScreenWeaver create locations automatically from my script?
Yes, when you import a script through the AI Center: places are created from the scene headings, and characters from the character cues. Objects are never created automatically. You add them by right-clicking a word in the script.
What should a location reference sheet show?
One master view of the environment from a high angle, with no characters in it. It is not a floor plan and not a mood picture. Characters are added later from their own sheets, so keeping the set empty avoids conflicts.
Can I use photos of a real location or a real object?
Yes. Drop them into the element's moodboard, next to its description: the demo does exactly that with a still of the car and a photo of the print held in two hands. You cannot generate images inside the moodboard itself; the sheets are generated in their own stages.
Why does my prop keep changing between shots?
Usually because the shot does not cite it. If the prop is written as plain words in the action, no sheet travels with the shot and the model picks a new one each time. Check the pipeline's bindings: if the object is not listed, add its @ mention.
Do I need a sheet for every object in the scene?
No. Make objects of the props that matter to the story or recur across shots: the photo here, a weapon, a letter, a phone. Background clutter can stay in the place description.
Build your first consistent set
Open your script, right-click the scene heading, and make your first place. The script editor, the import and the moodboards are free on the Screenwriter plan: create your free ScreenWeaver account.
Final Step
Build your next script with Screenweaver
Move from ideas to production-ready pages faster with timeline-native writing and AI-assisted story flow.
Try Screenweaver