
The short answer: ScreenWeaver is an online AI filmmaking app that takes one project from screenplay to finished shots in three tabs: Script, Storyboard and Production. You write or import the script, the app turns its characters, places and objects into reference sheets, breaks every scene into a 3D previz storyboard, then builds a node canvas where you generate images and video, one shot at a time or a whole scene at once. You cut the final film in your own editor.
This page is the map: one section per stage, a screenshot of the ScreenWeaver interface on our demo project, and a link to the full guide for that stage.
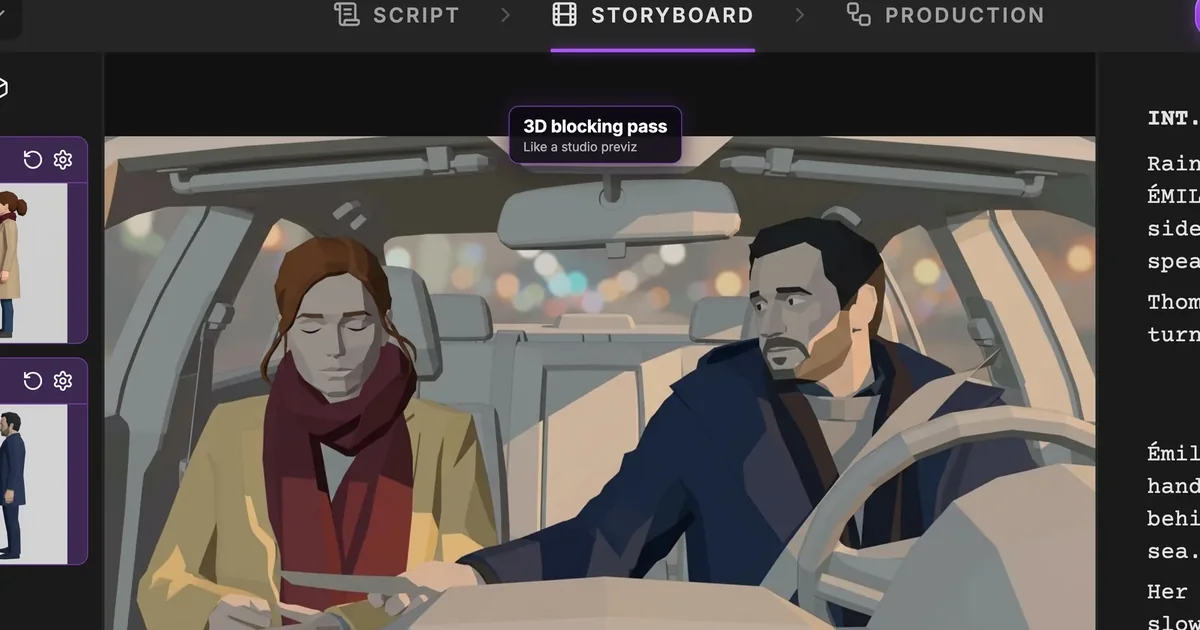
The demo project is called The Photo: one scene, INT. THOMAS'S CAR - NIGHT, in the rain. Thomas hands his sister Émilie an old photo of the two of them as children. "I found it at Mom's." Her eyes fill with tears, then she smiles. Four shots, and every screenshot below comes from them.
How ScreenWeaver is organized
The whole app follows the order of a film production, and the header says so.
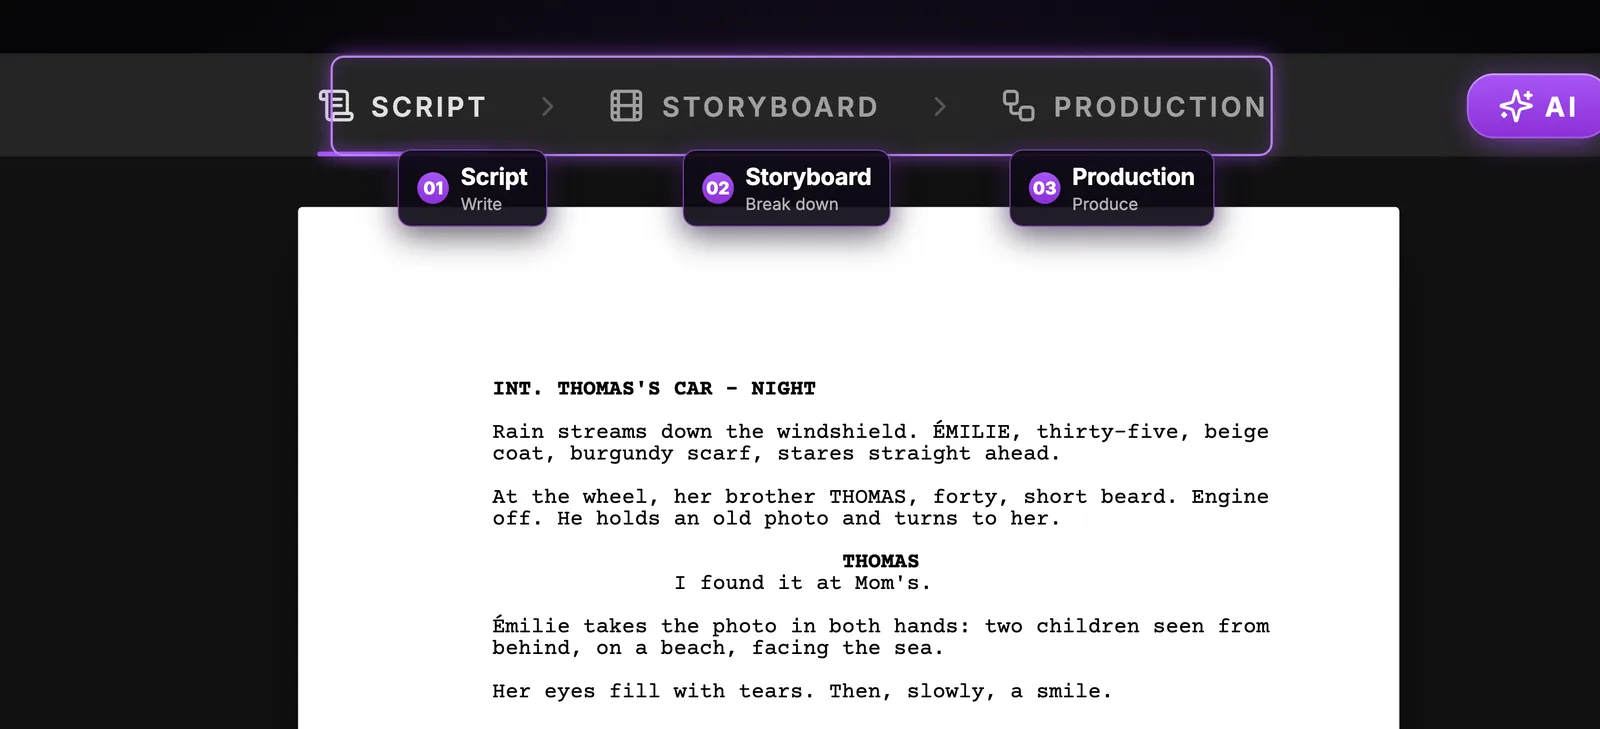
The three numbered tabs are Script, Storyboard and Production, and each one feeds the next automatically. The storyboard reads your script. The production canvas is built from your storyboard.
The AI button on the right opens the AI Center, where the assistant and the list of all your generations live. The project selector on the left holds the title, the format (feature film or series/TV) and the aspect ratio.
1. Script: write or import your screenplay
Everything downstream reads the script, so this is where the film really starts. The Script tab is a real screenplay editor: Courier 12 pt, industry margins, Enter moves to the next logical element and Tab cycles through Scene, Action, Character, Dialogue, Parenthetical, Transition and Shot. An outline view organizes acts, sequences, beats and scenes.
Already have a script? Attach the PDF or Final Draft (.fdx) file in the AI Center and ask the assistant to import it.
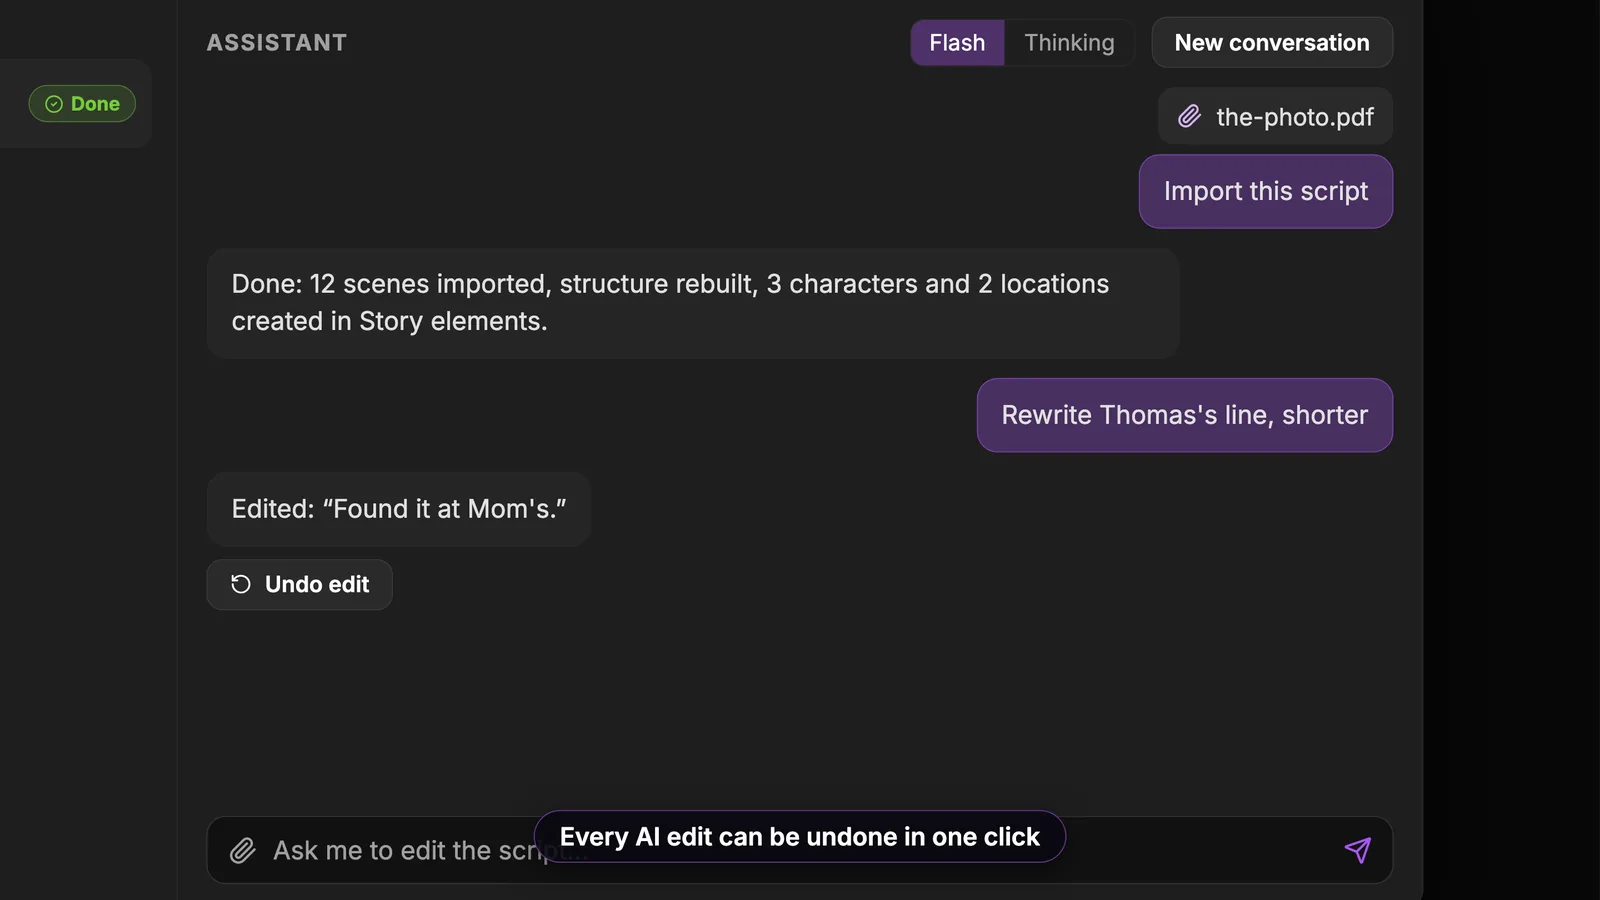
The assistant rebuilds the scenes and the structure, then creates the characters from the character cues and the places from the scene headings. It can also proofread, rewrite a scene or give you feedback, and every AI change can be undone in one click. You can also co-write in real time, with Owner, Editor and Viewer roles.
The Script tab is free forever on the Screenwriter plan, with unlimited projects. If that is all you need today, see our free screenwriting software page.
Full guide: AI screenplay editor: write or import a script, then board it
2. Story elements: characters, places, objects and their sheets
Story elements are the cast and the sets of your film. You create one by right-clicking a name in the script, by autocomplete while you type, or from the Story elements toolbar. Import creates characters and places for you; objects are always added by hand.
Each element is a group with three stages: Moodboard, Storyboard and Production.
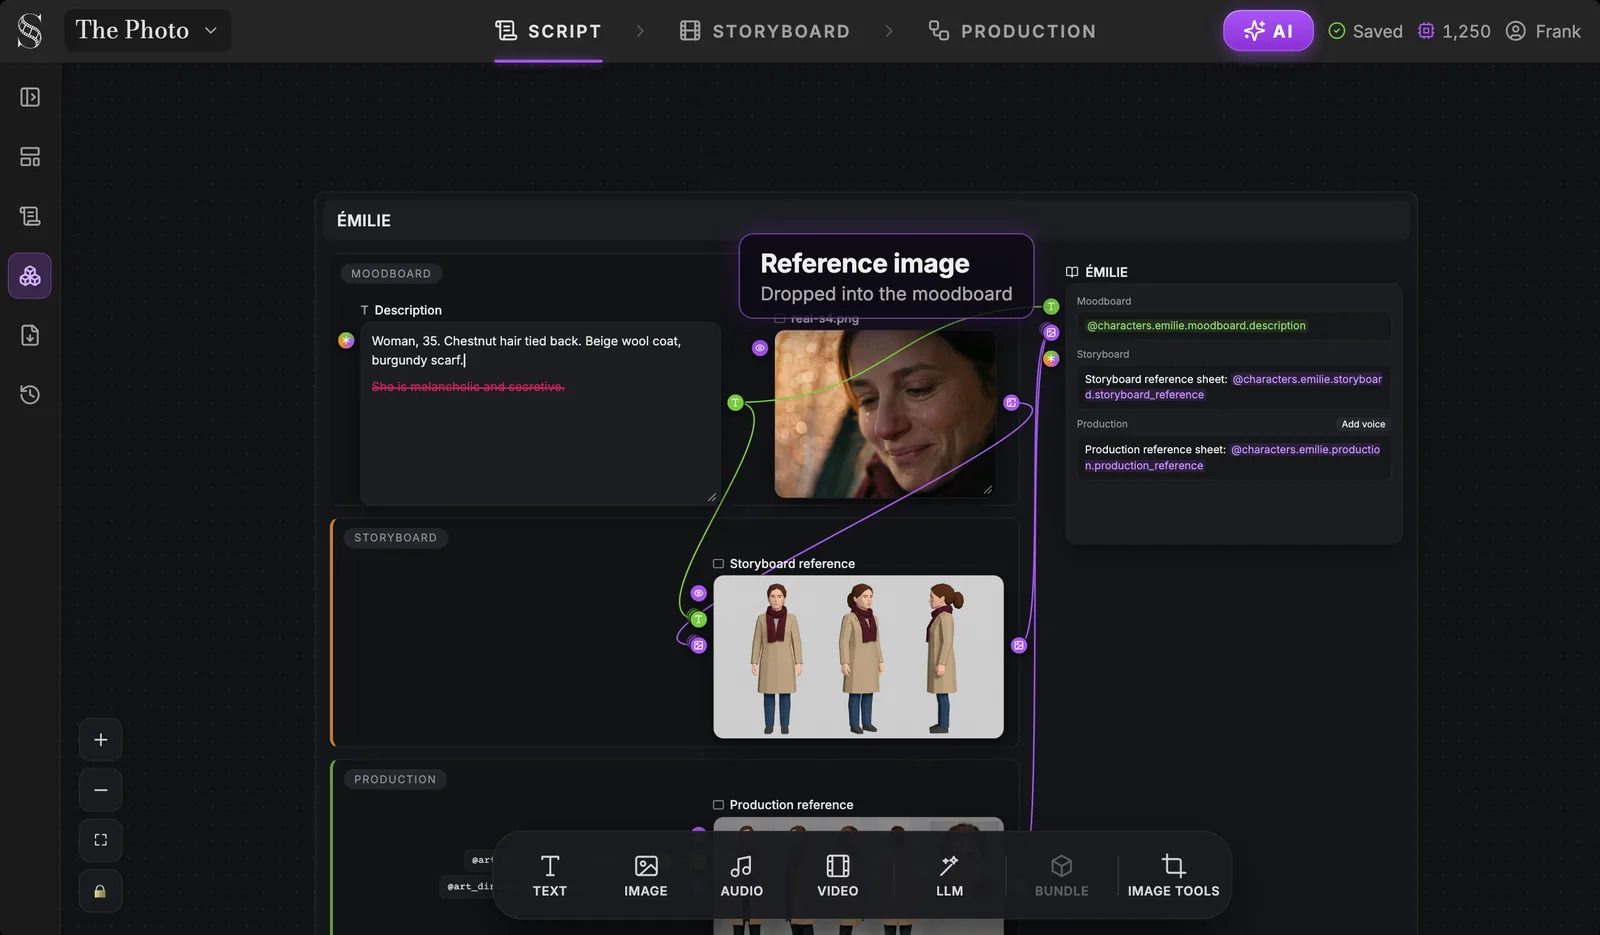
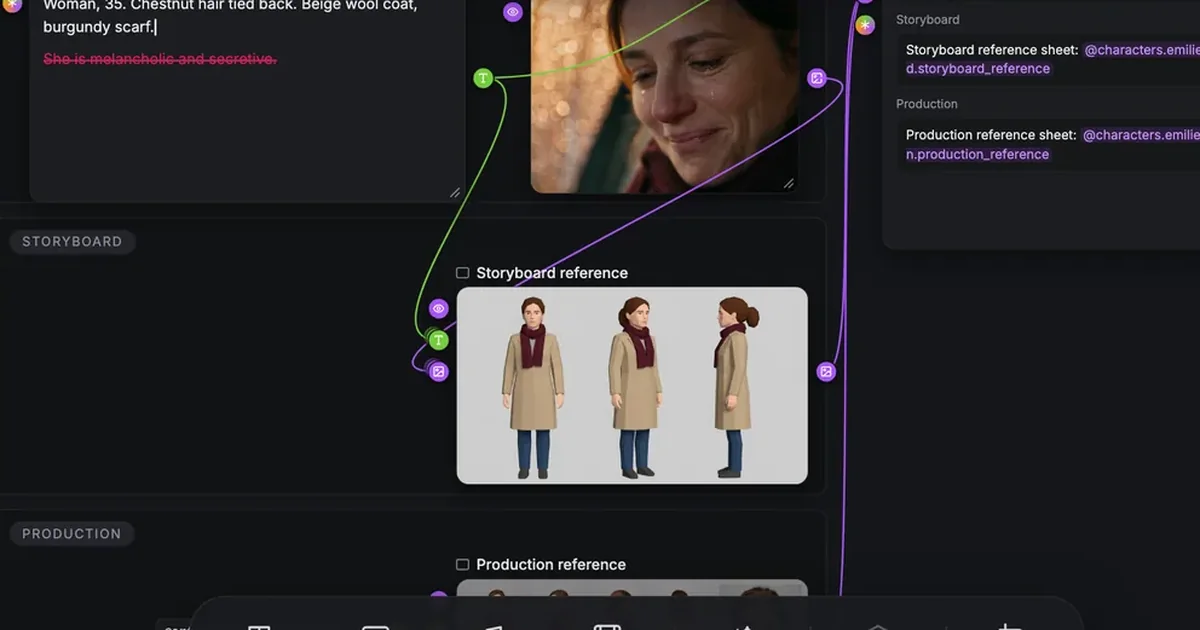
The Moodboard holds a pinned Description plus anything you drop in: images, text, audio. The description is the key. Write what a camera can film ("Woman, 35. Chestnut hair tied back. Beige wool coat, burgundy scarf."), not a personality trait: "melancholic" does not render, which is why it is struck through above. Add voice attaches an audio reference to the character; it does not generate speech.
From that description, ScreenWeaver generates a Storyboard reference sheet: for a character, a full-body model sheet with front, three-quarter, side and back views plus a face close-up, in previz style on plain white. A place gets one master view from a high angle, with no one in it. An object gets several views and a detail. The Production reference is the same element re-rendered in the final style of your film. Each sheet is generated once and reused in every shot, and you call it anywhere by typing @ and its name.
Full guides: how to make an AI character sheet that holds every shot, consistent locations and props in AI video, and moodboard vs storyboard vs production, what each one does
3. Storyboard: from script to 3D previz
The first time you open the Storyboard tab, you choose the project aspect ratio: 16:9 Widescreen, 9:16 Vertical, 2.39:1 Cinematic, 4:3 Retro & Classic or 3:4 Portrait. Then the Auto-generate button does the heavy lifting.
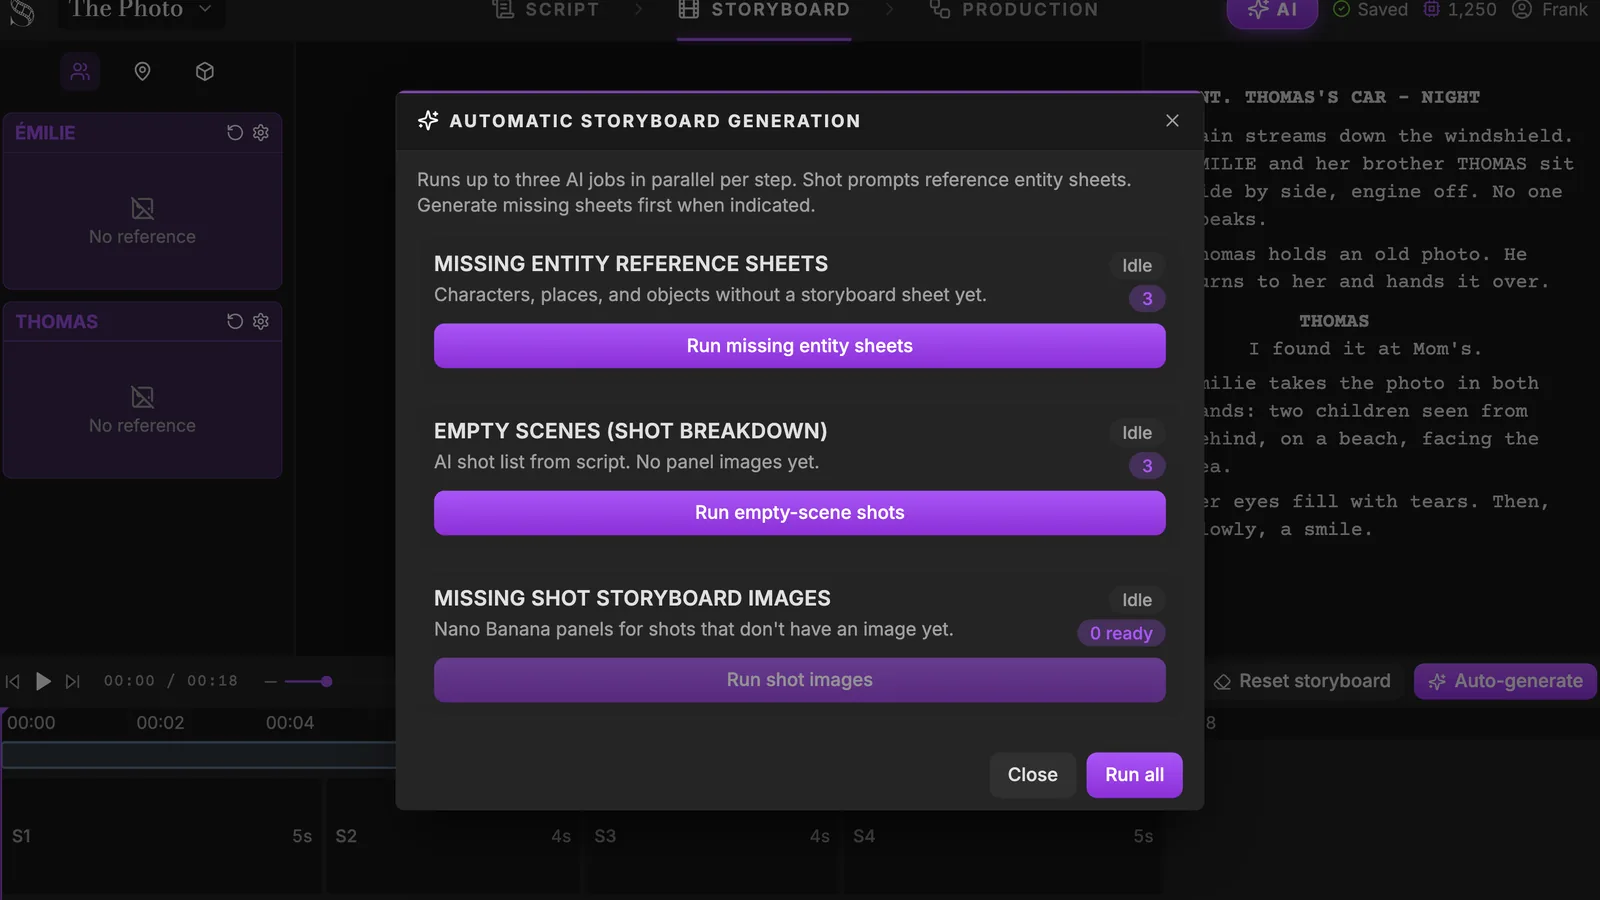
One window, three steps: generate the missing reference sheets, break the empty scenes into shots, then draw an image for each shot. Run all chains them. Up to three jobs run in parallel, the credit cost is shown before each action, and you can close the window: the jobs continue in the AI Center. The AI reads each scene and decides how many shots it needs, with a shot value and a camera movement for each.
Each panel is a 3D blocking pass, like the previsualization studios do before a shoot.
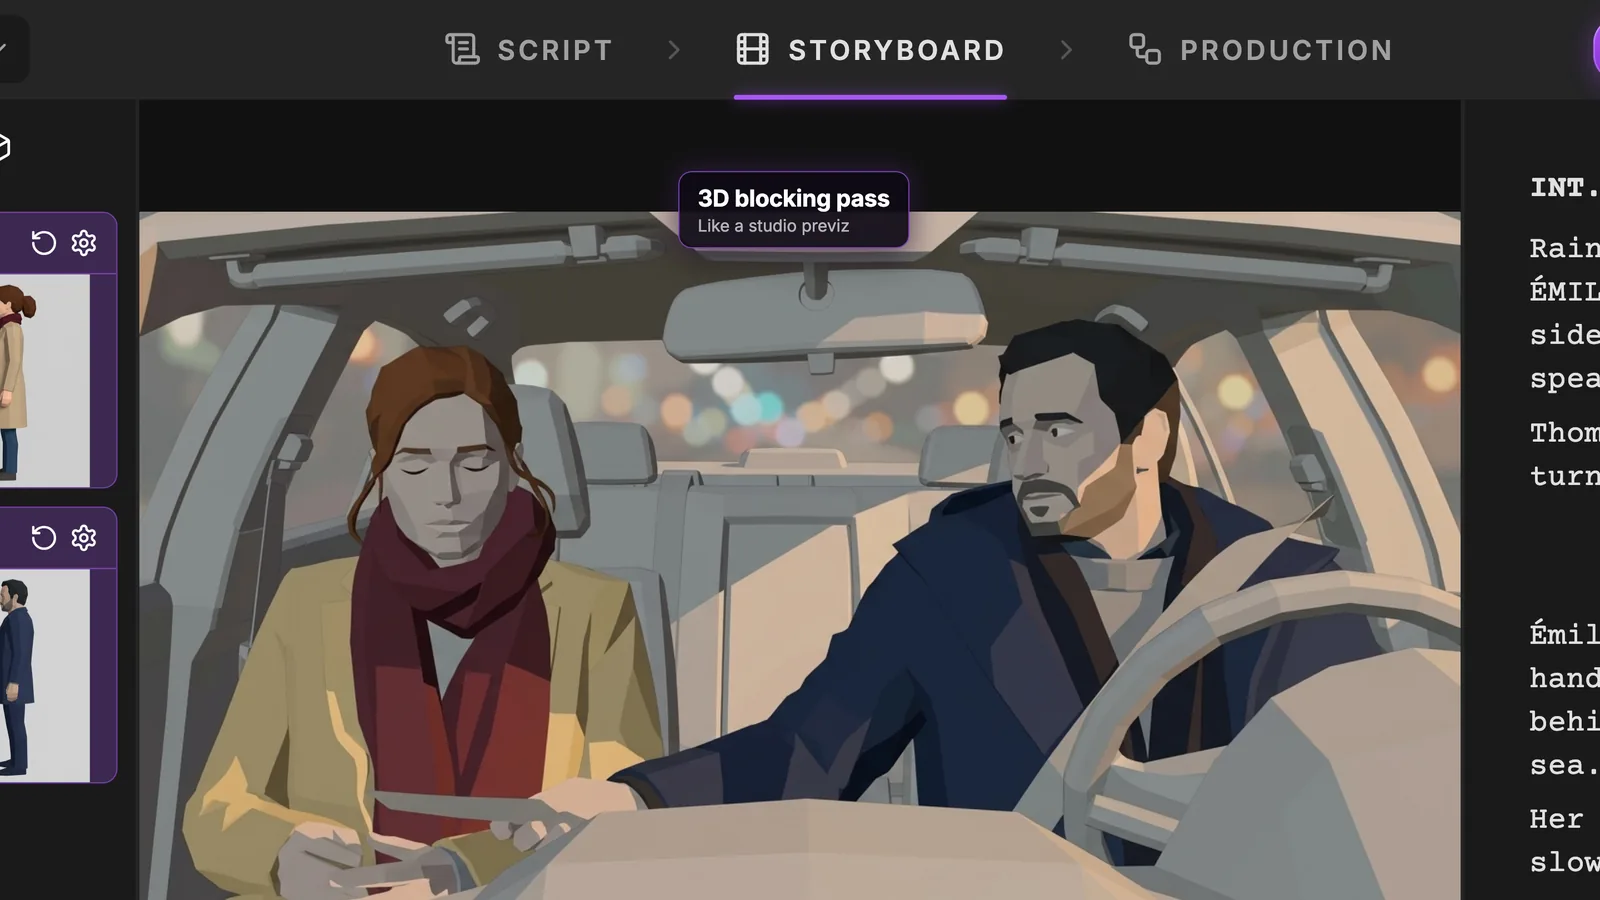
The previz locks framing, staging and lighting. It is deliberately not the final style: that comes later, in Production. Press Play and the storyboard runs as an animatic with the script following along (no audio, no video or PDF export of the board). Then direct each shot: shot value, camera movement, action with @ mentions, duration, order, or regenerate it alone.
To see the generator itself in more detail, visit the AI storyboard generator page.
Full guide: AI previz: turn a script into a 3D blocking storyboard
4. Edit with AI: fix a panel without redoing the shot
A panel is almost right, but the camera should be a little to the side. Instead of regenerating, open Edit with AI on the panel.
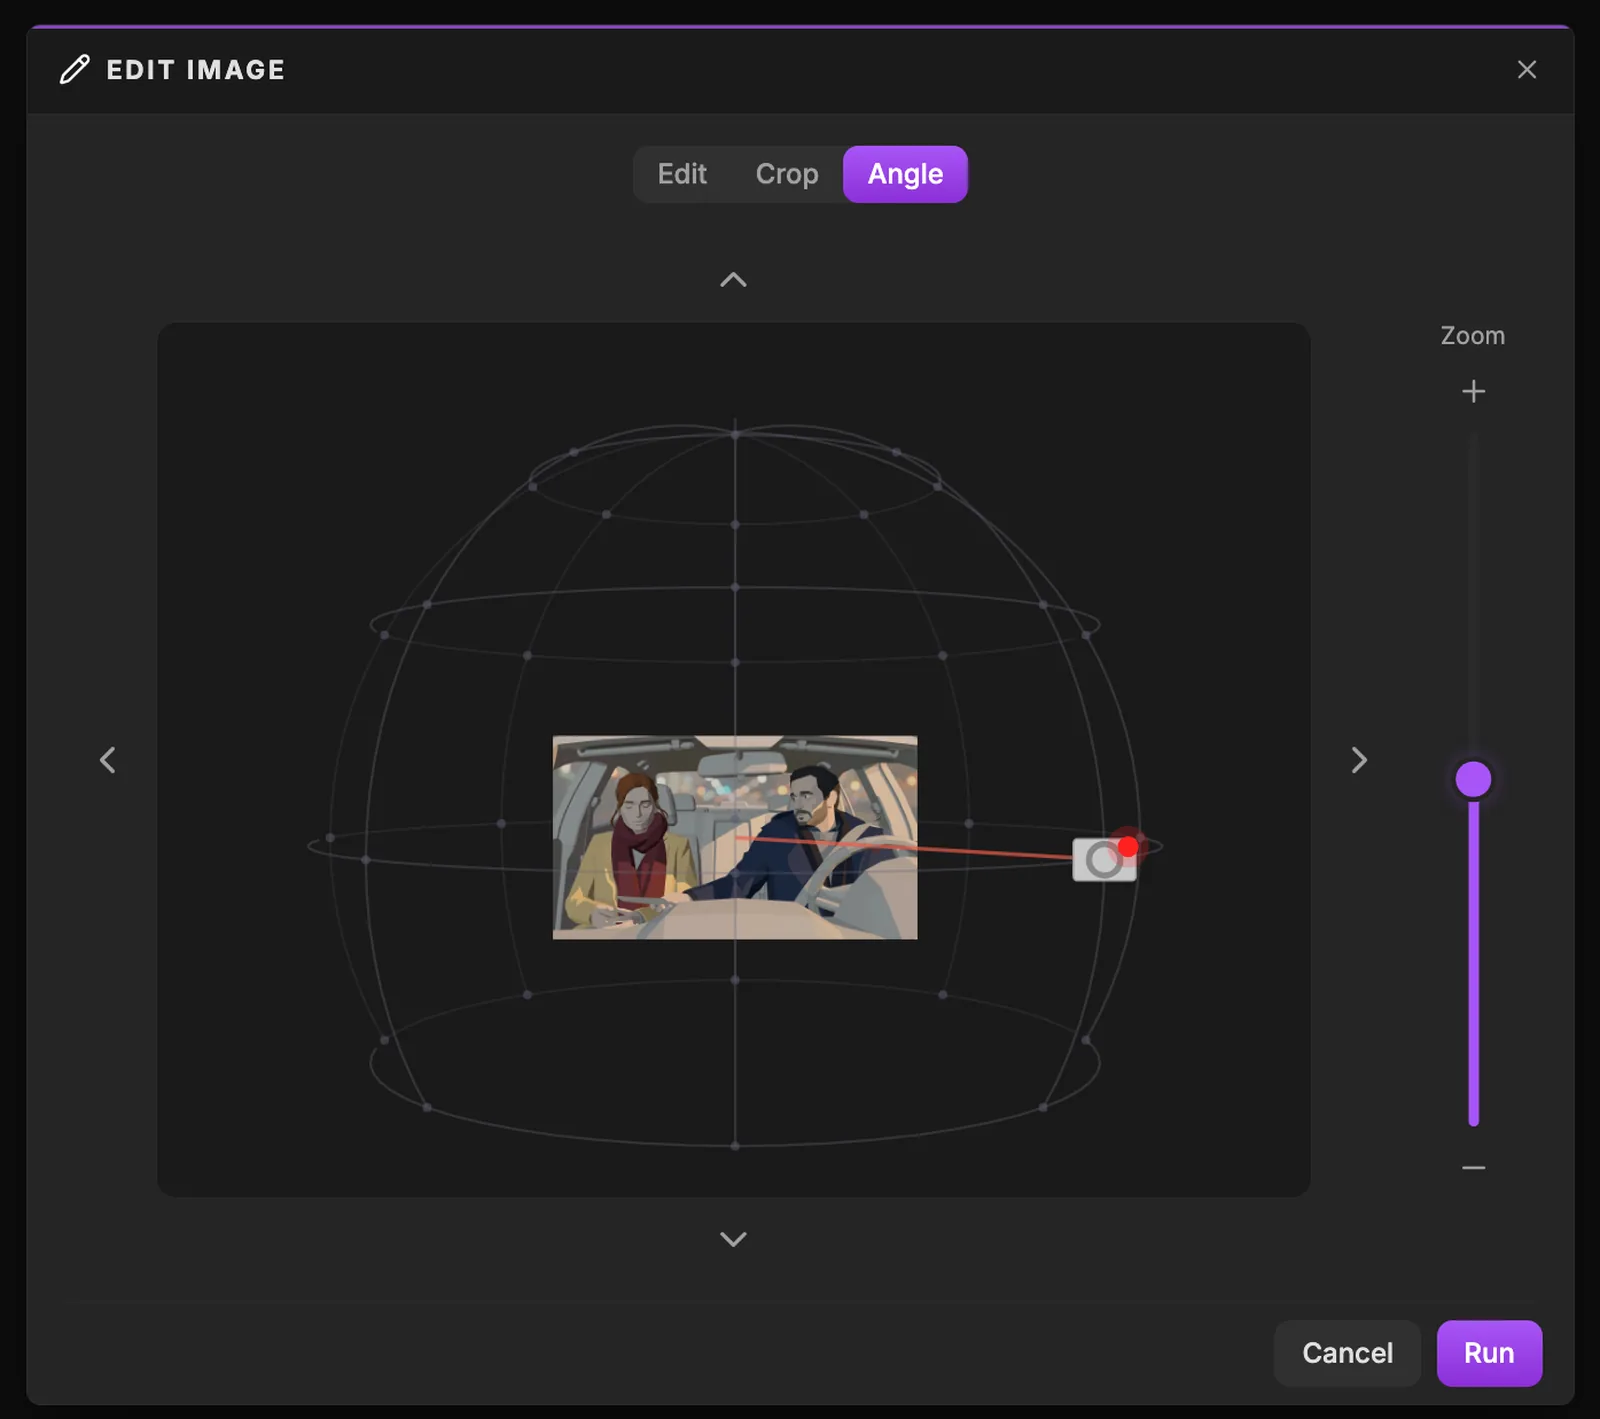
The window has three tabs. Edit lets you paint an area with a brush and describe the change (inpainting). Crop reframes the image to a free or fixed ratio. Angle moves the camera around the subject in 45 degree steps, changes its height and its distance (wide, medium or close), without redoing the shot. Small moves work best: in a cramped set like a car interior, a big change of angle can fail, and each run costs credits.
Full guide: how to change the camera angle of an AI image without redoing it
5. Production: the node canvas built from your storyboard
Node canvases are powerful, but they usually open empty. In ScreenWeaver, the Production tab is built from your storyboard, already wired.
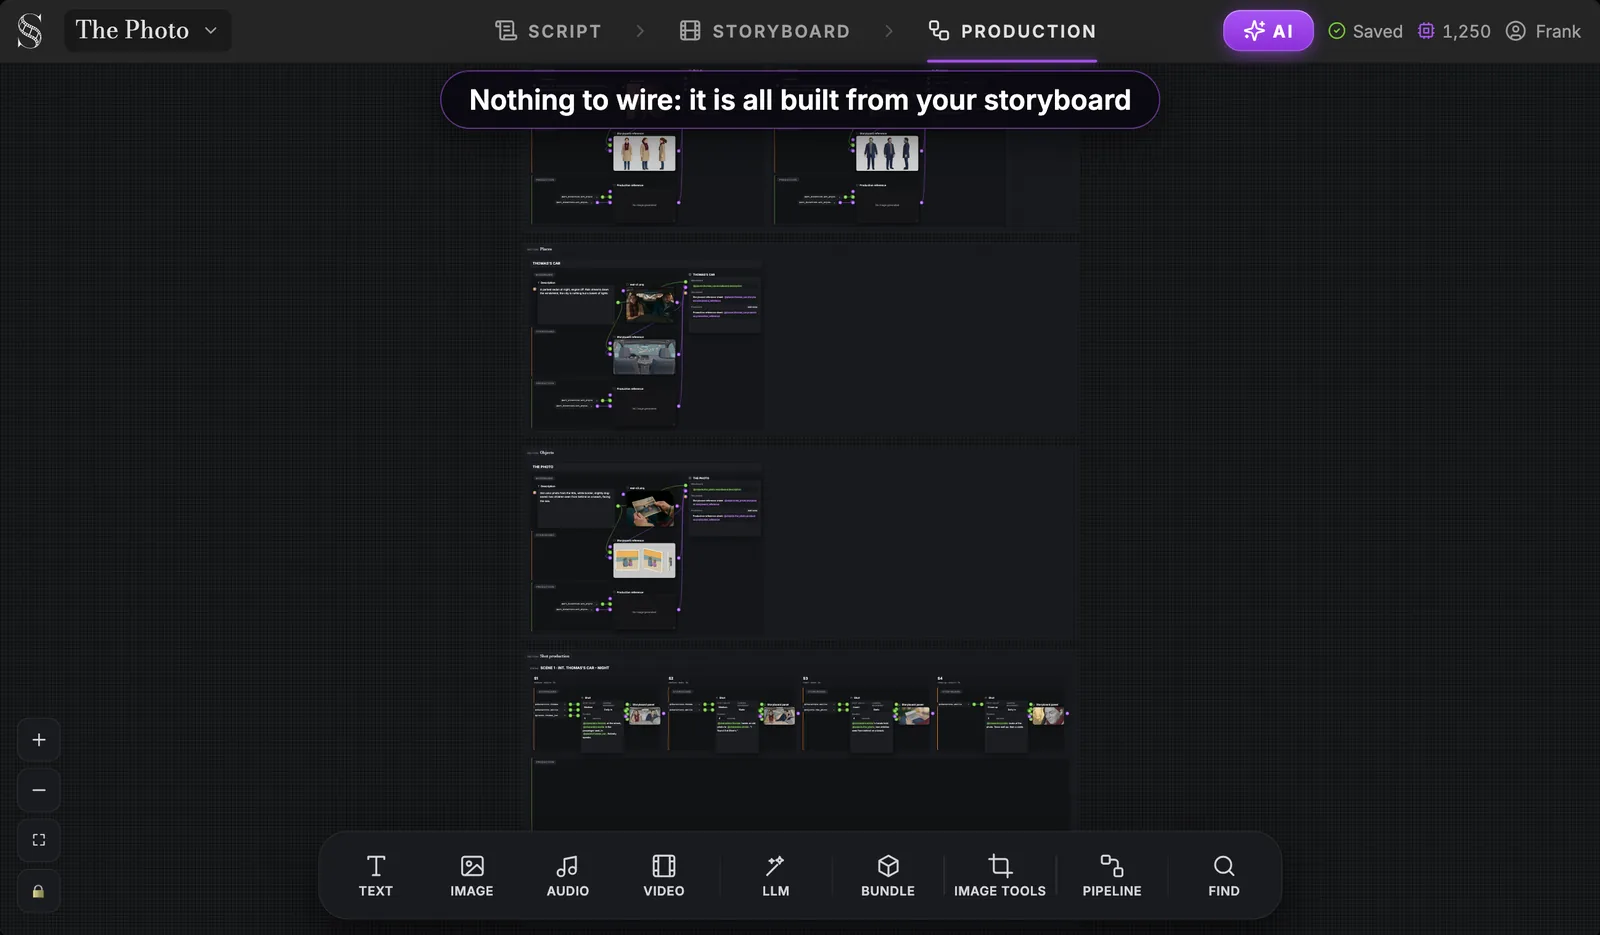
From top to bottom: Artistic direction (an Art Style text and an Art Style image, the single source of the look of your film: change it and every shot follows), then Characters, Places and Objects, each with its Production reference linked to its description, then Shot production, organized by scene. The toolbar at the bottom adds nodes by hand: Text, Image, Audio, Video, LLM, Bundle, Image tools, Pipeline, and Find to locate one.
Zoom into a scene and each shot keeps its storyboard group.
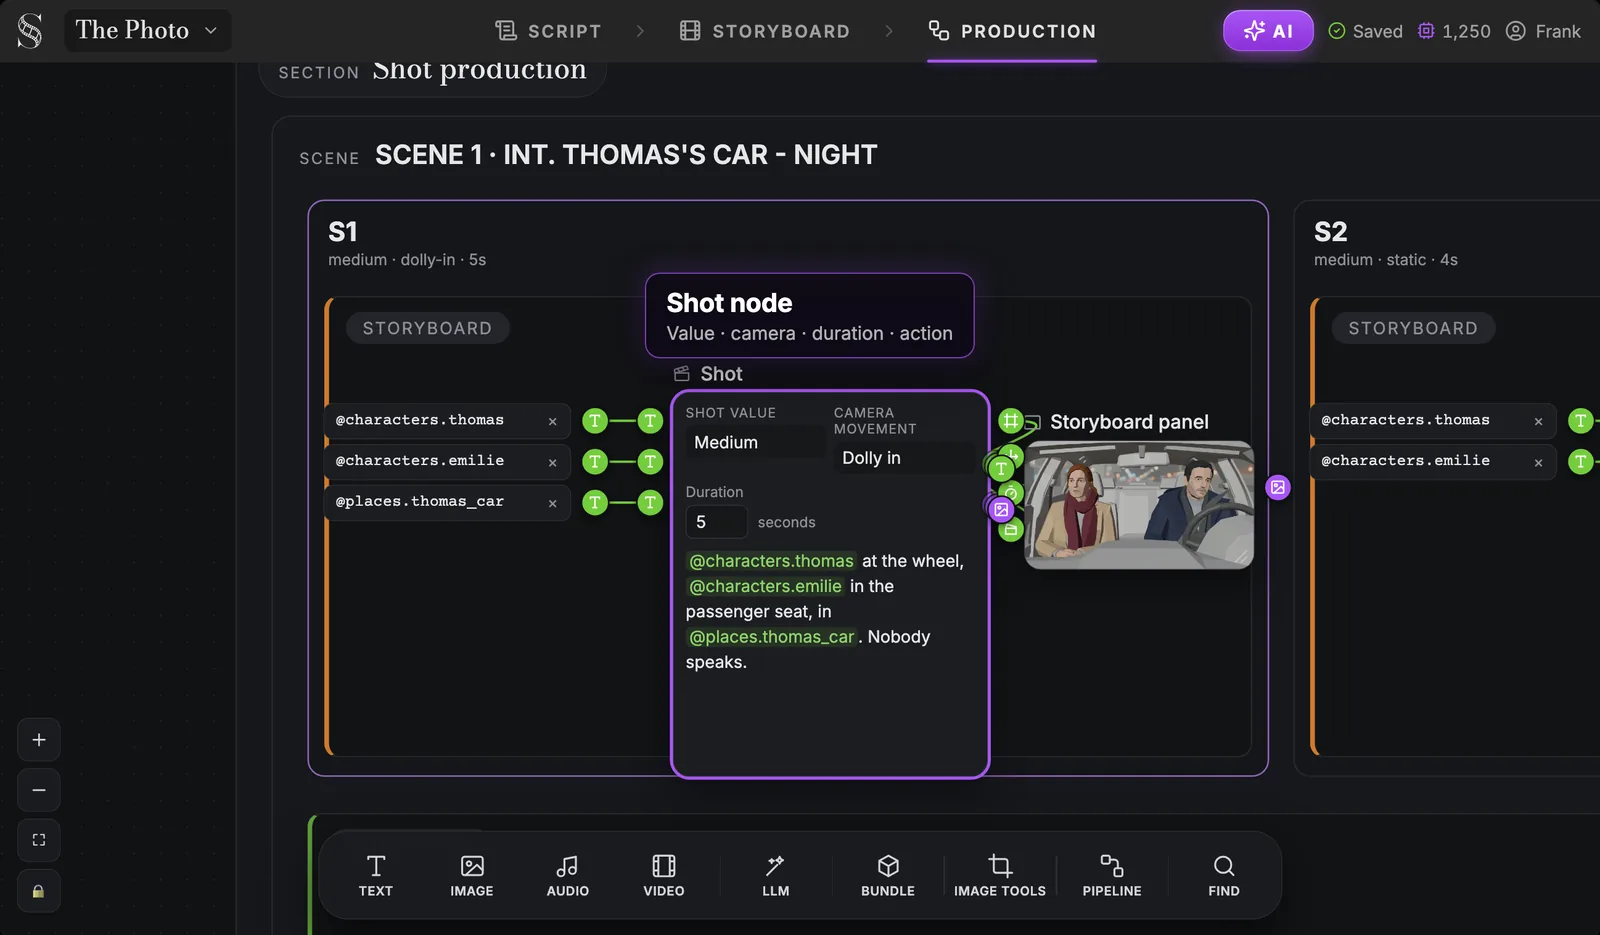
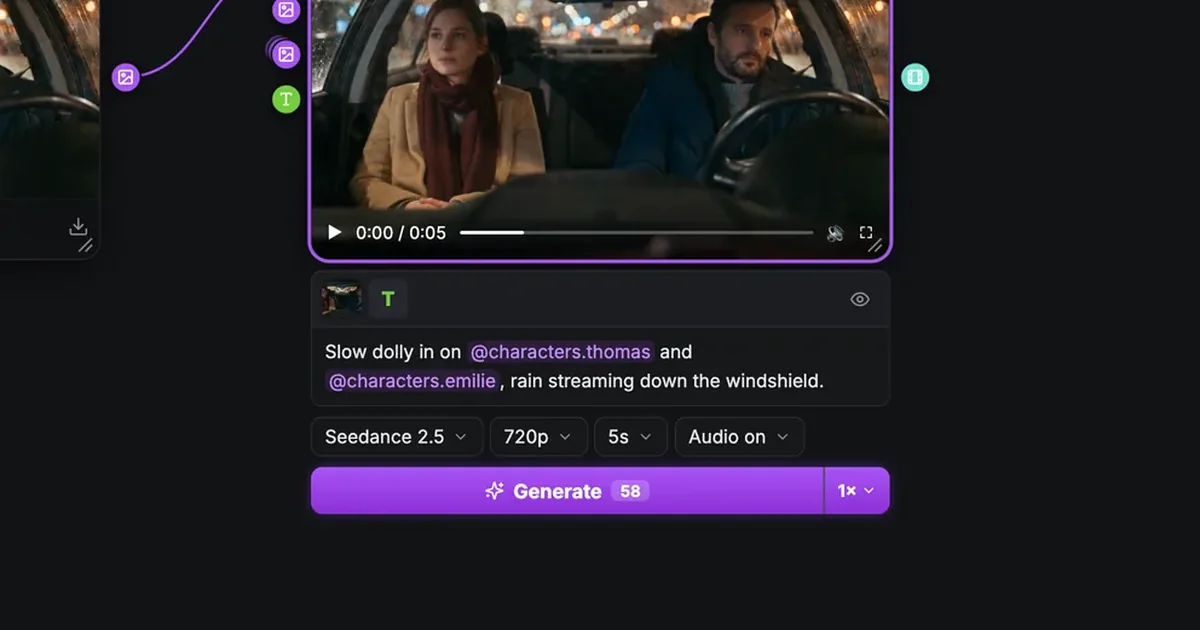
The Shot node carries the shot value, camera movement, duration and action, and the characters, places and objects of the shot are already plugged in as references, next to the storyboard panel. Below the shots, each scene has a Production group where video is made. Image nodes default to GPT Image 2.5 Sunburst, video nodes to Seedance 2.5 (clips from 4 to 30 seconds, up to 1080p), with other models one menu away. Every node keeps the history of its takes, so you compare and keep the best. More on the default model on our Seedance 2 page.
Full guide: node-based AI video production: the canvas, explained
6. Pipelines: a whole scene in one clip
Shot by shot, faces can drift and the light can change between clips. Pipelines let a video model shoot several shots in a single generation: in a scene's Production group, click Add pipeline, pick a pipeline, then the shots.
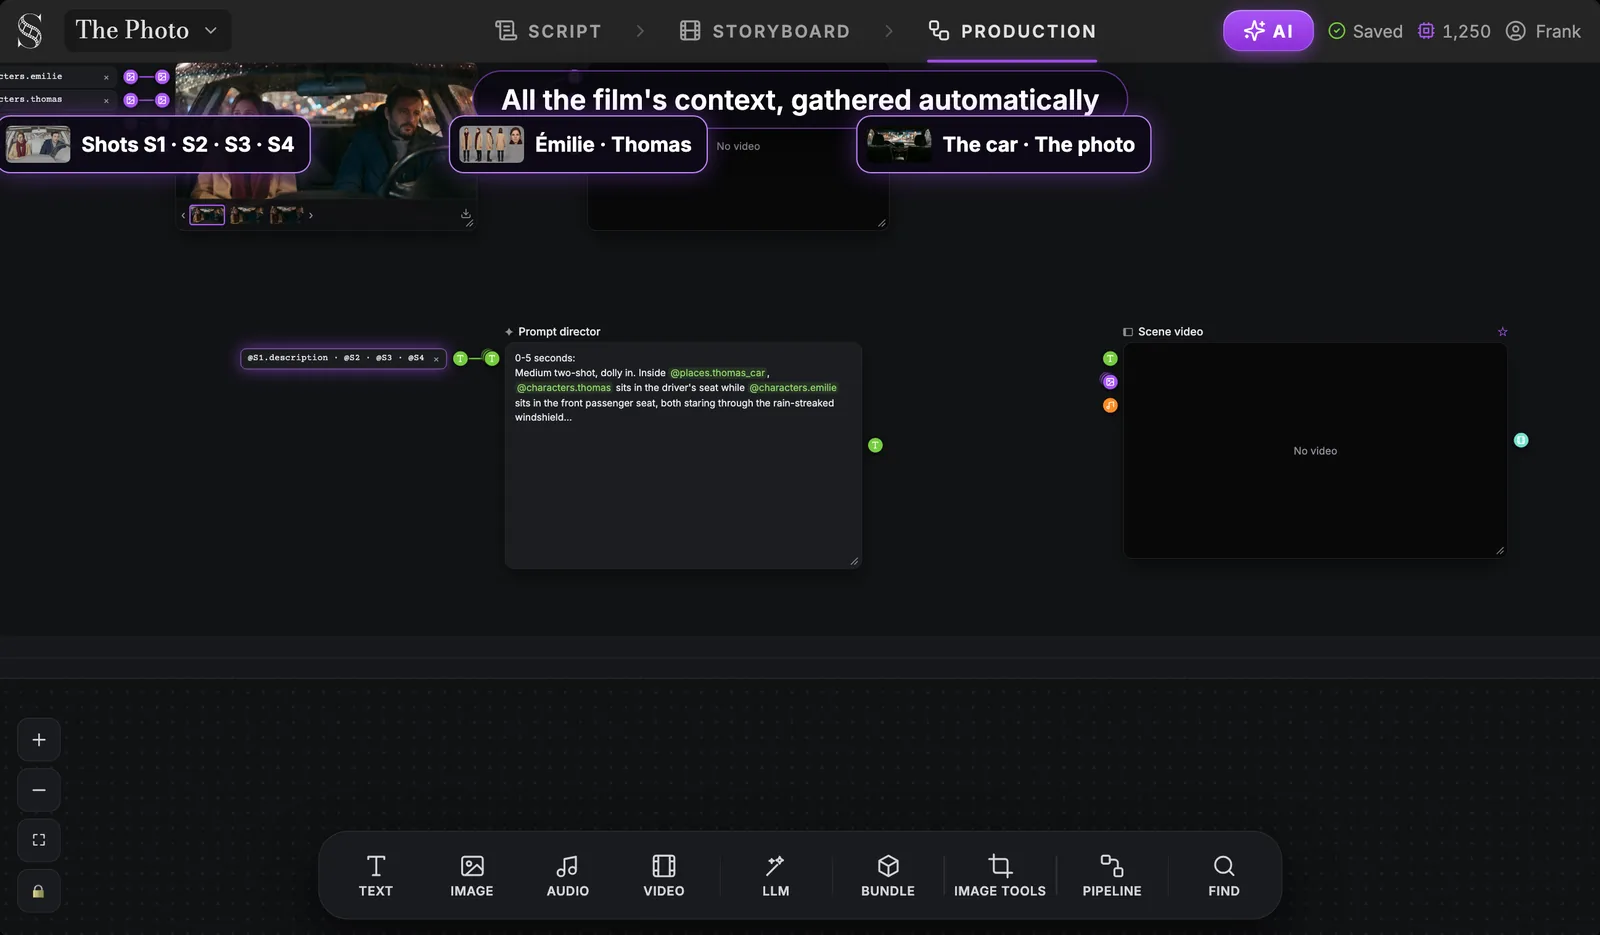
There are two pipelines. Reference to video: a Prompt director writes the full staging from the action of each selected shot, the characters, places and objects you cited become references bound at the video node, and a single Scene video node shoots the whole scene as one coherent clip. Storyboard panels to video: the shots' panels are first assembled into a grid of storyboard panels (up to 14), which goes to the video node with the art direction and the Prompt director's staging, so the model follows your breakdown shot by shot, in order.
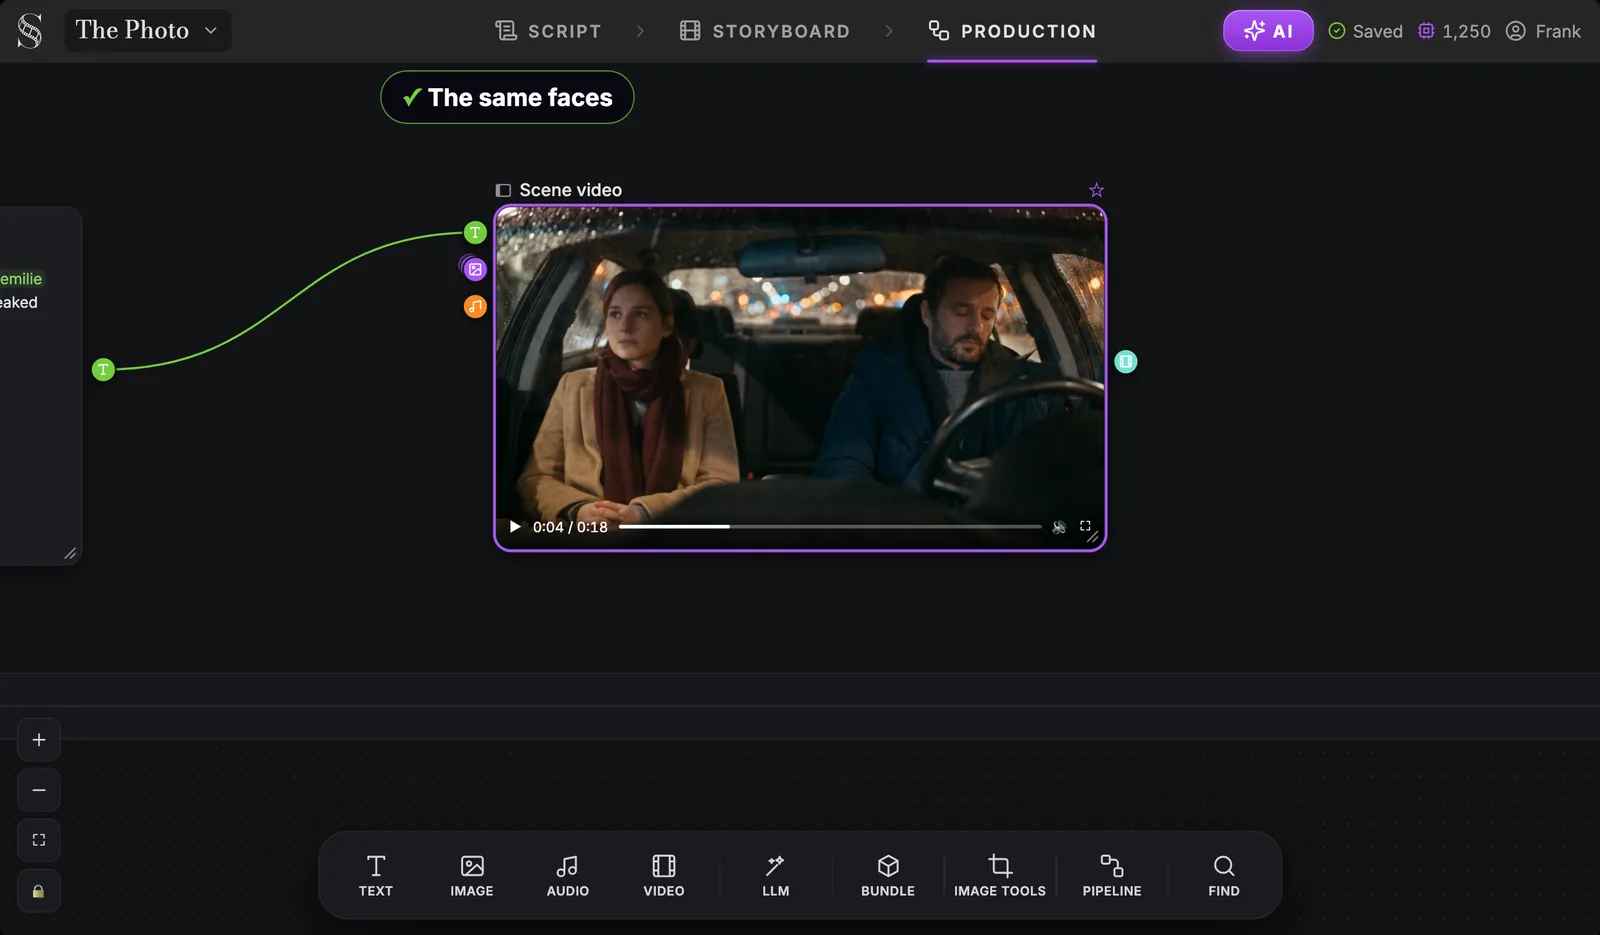
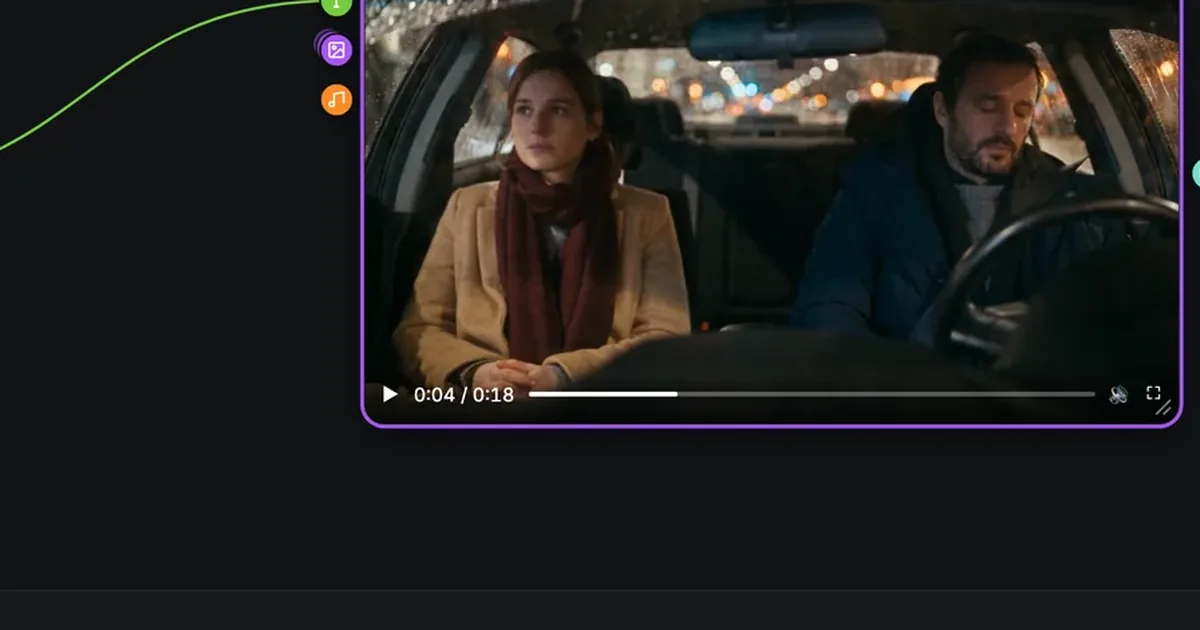
The result is one clip for the scene, here 18 seconds for our four shots. You then cut it in your editor like any other rush.
Full guide: multi-shot AI video: generate a whole scene in one clip
Try it free
Try Screenweaver for free on your script
It is free. Import your existing project, get a clearer view of your outline, and regain control of your story structure in minutes.
Start Free7. AI Center and credits
Everything you launch appears in one list.
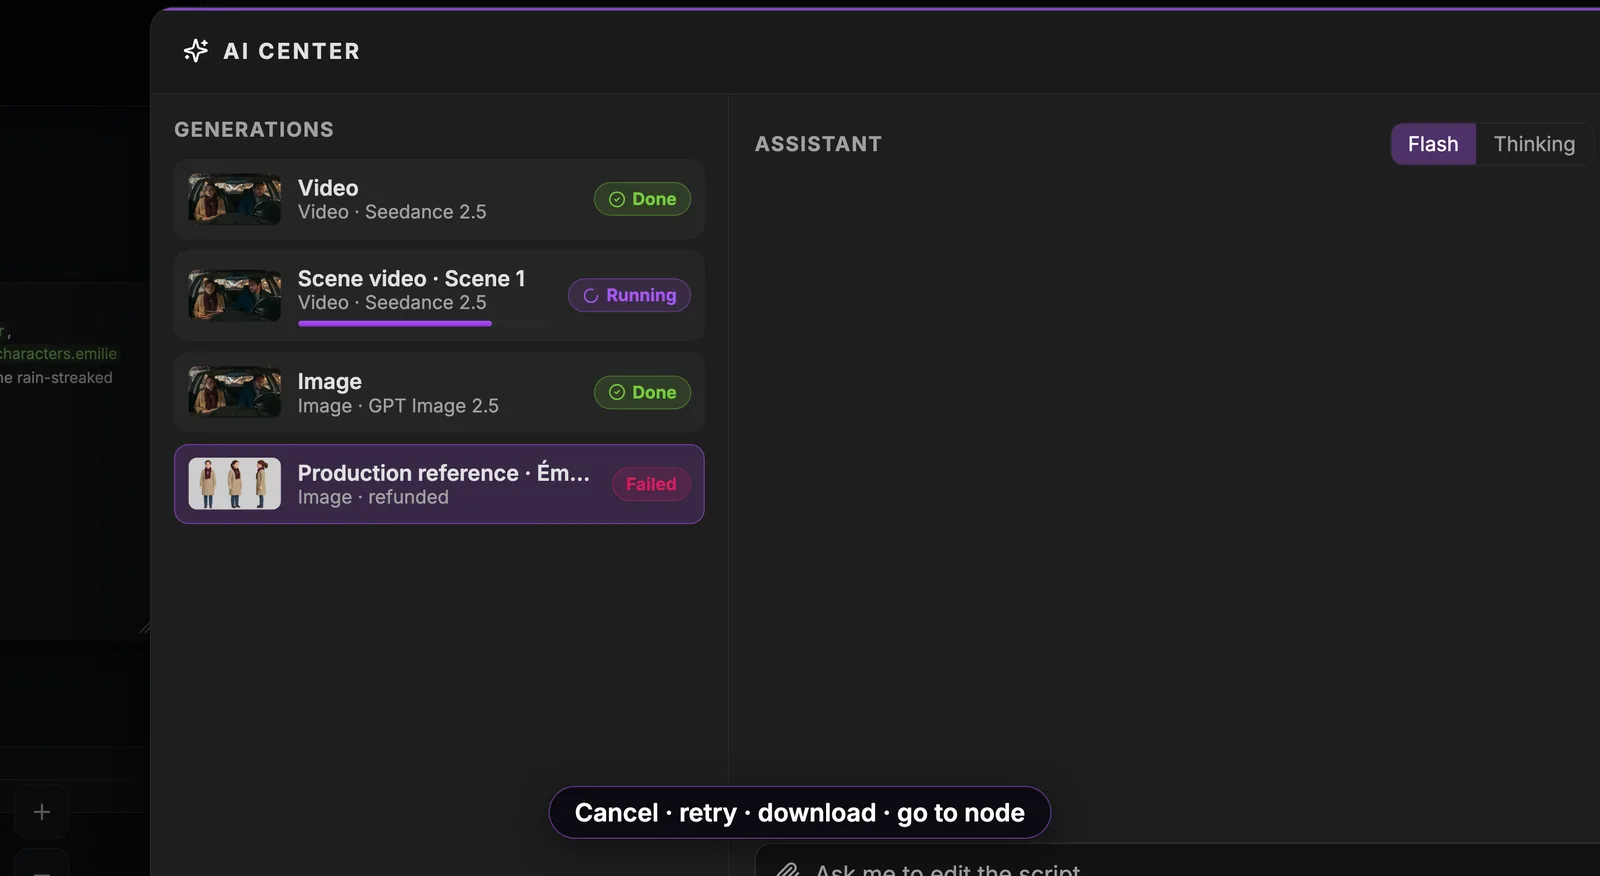
The AI Center lists every generation with its status (running, done, failed). From there you can cancel, retry, download, or go to the node that produced it. Failed generations are refunded. The same window holds the AI assistant, in Flash or Thinking mode.
Your credit balance sits in the header at all times. The account menu opens Billing & credits.
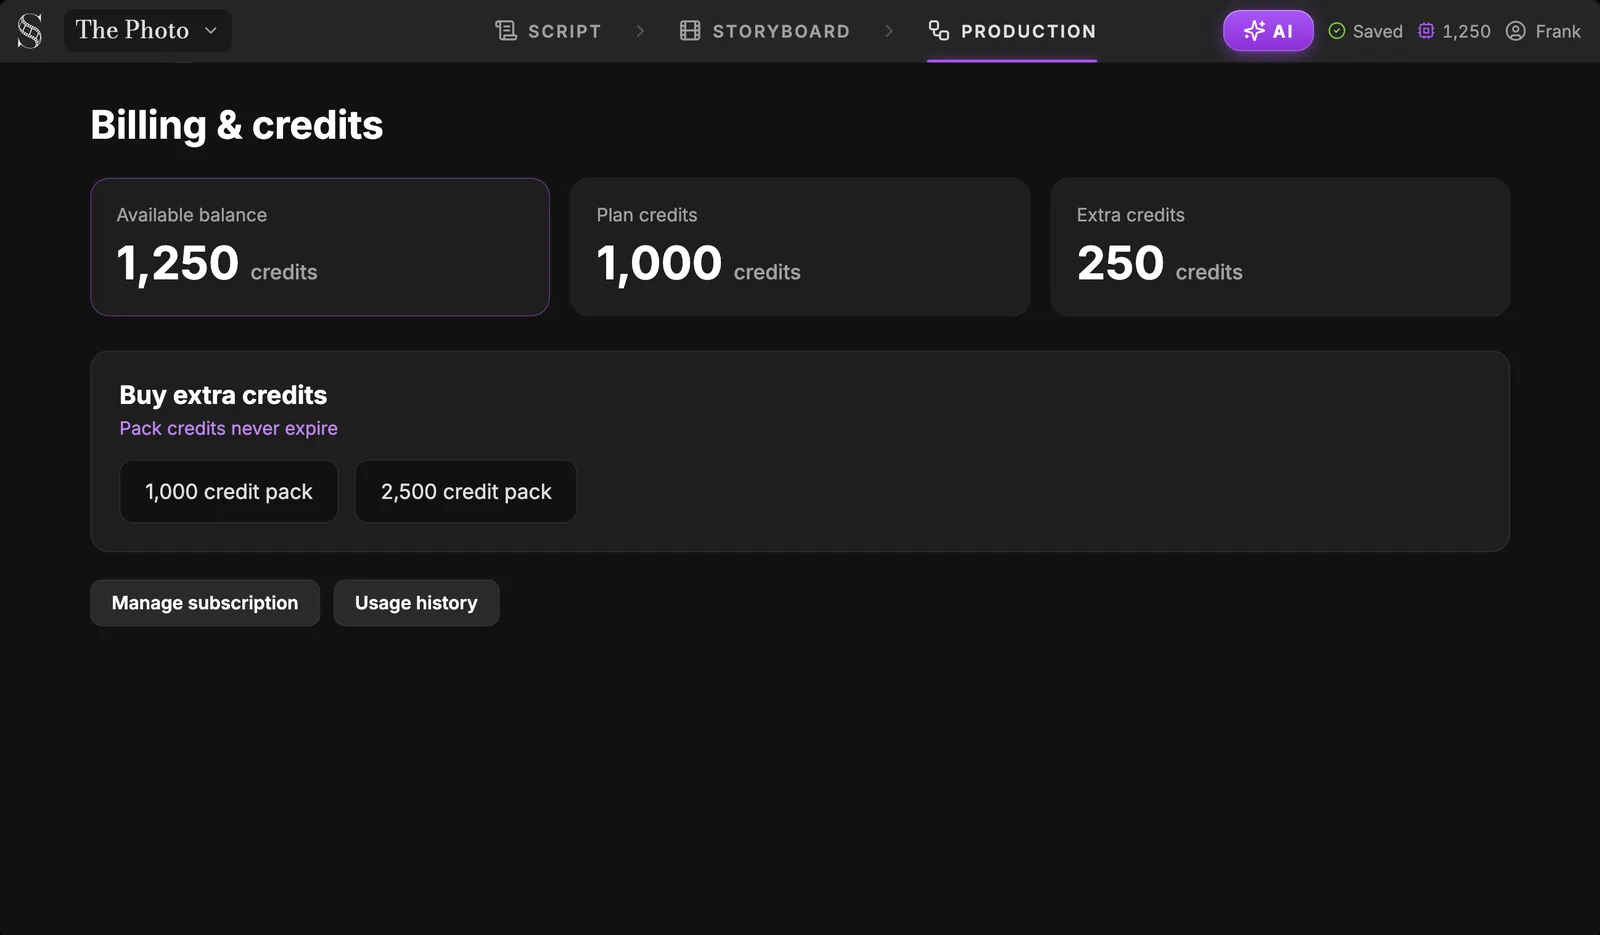
Your available balance is your plan credits plus any extra credits. Extra credit packs never expire.
8. Export: what leaves ScreenWeaver
Two things leave the app: your script and your rushes. The script exports from the Import / Export panel.
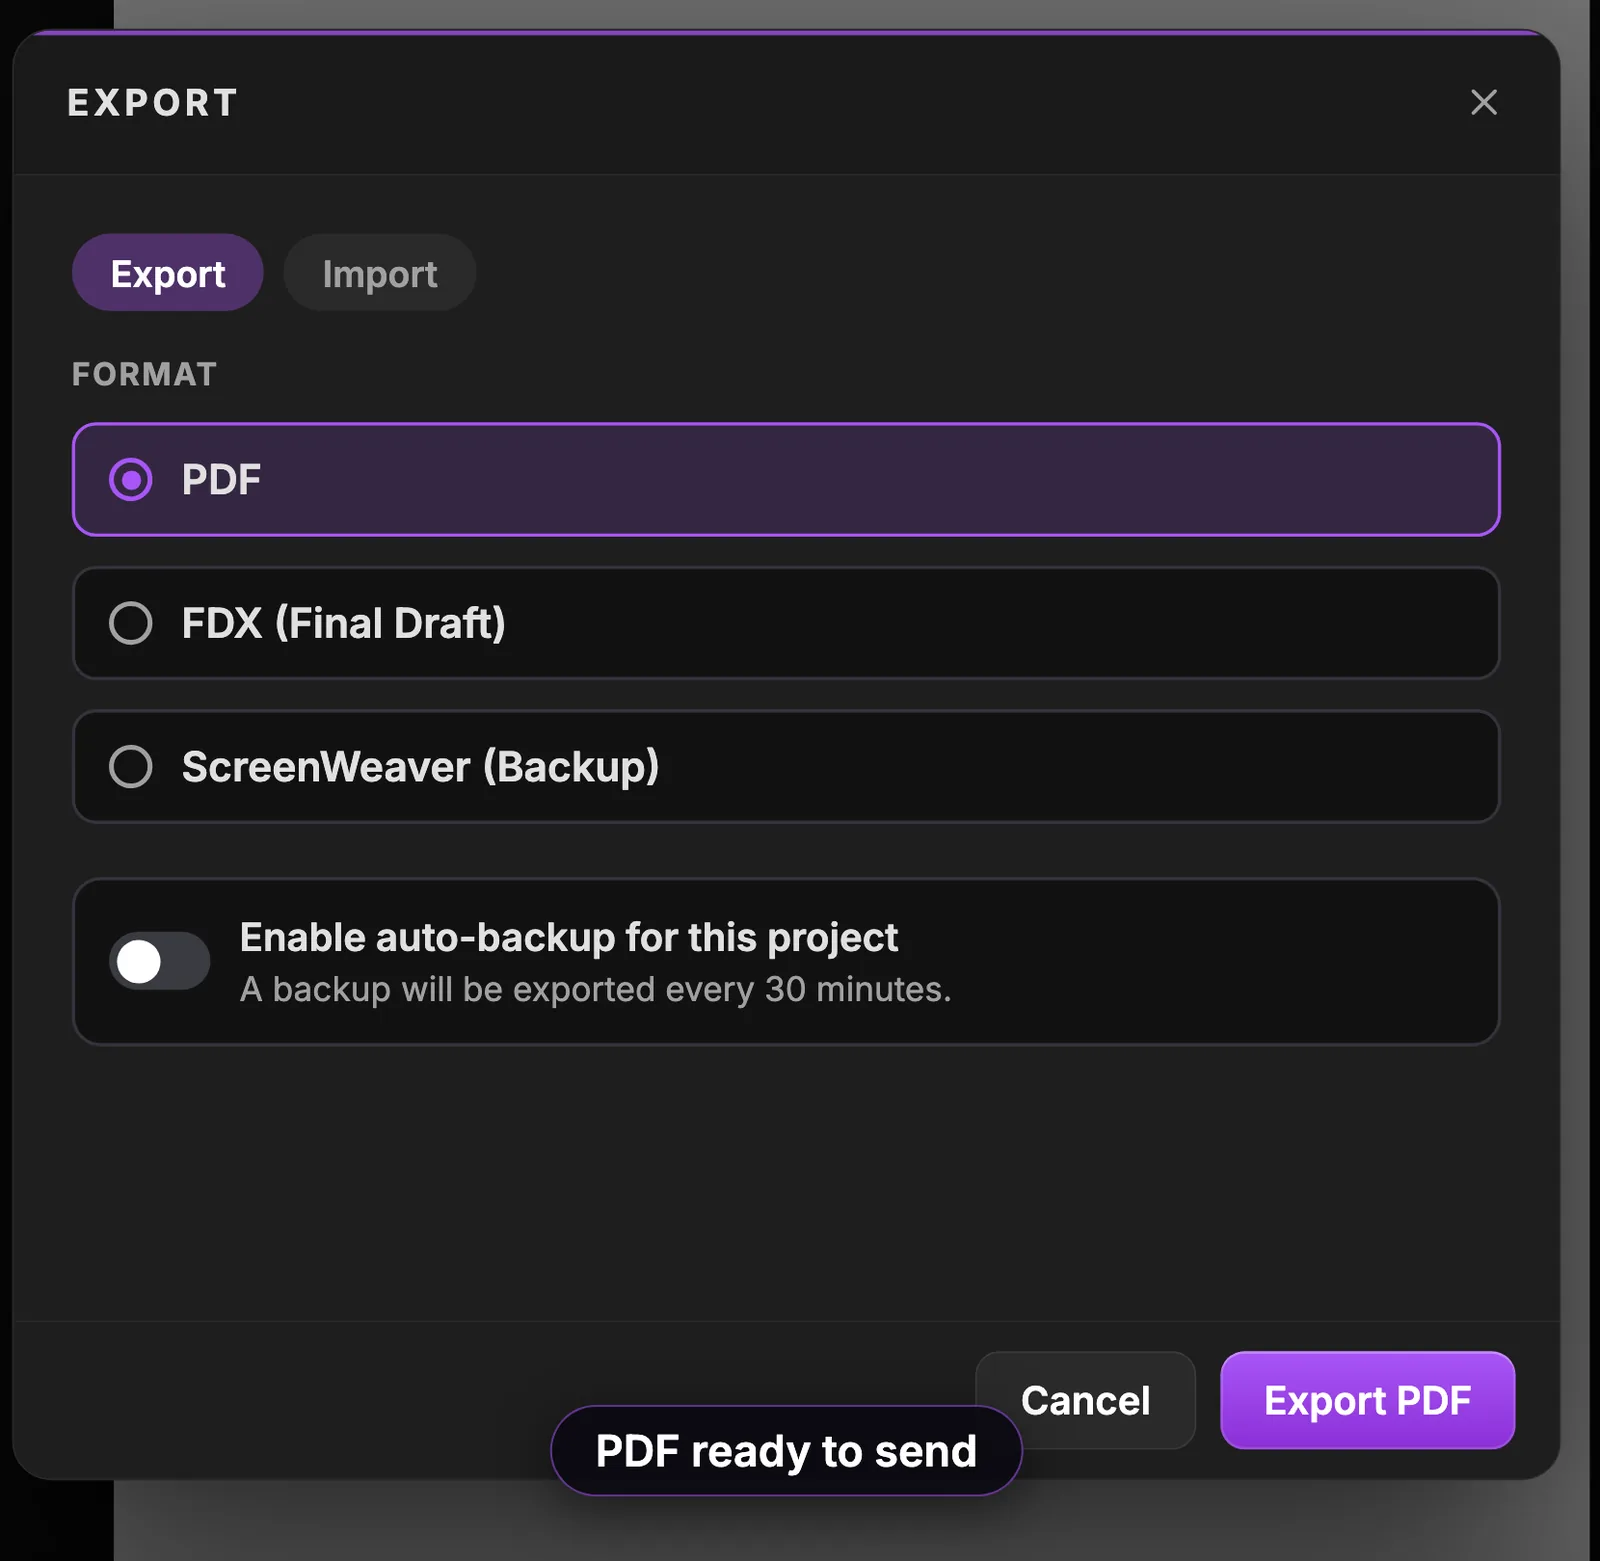
Choose PDF to send it, FDX to open it in Final Draft, or a ScreenWeaver backup (JSON). You can also switch on an automatic backup every 30 minutes.
For the images and videos, drop a Bundle node on the canvas and wire your takes into it.
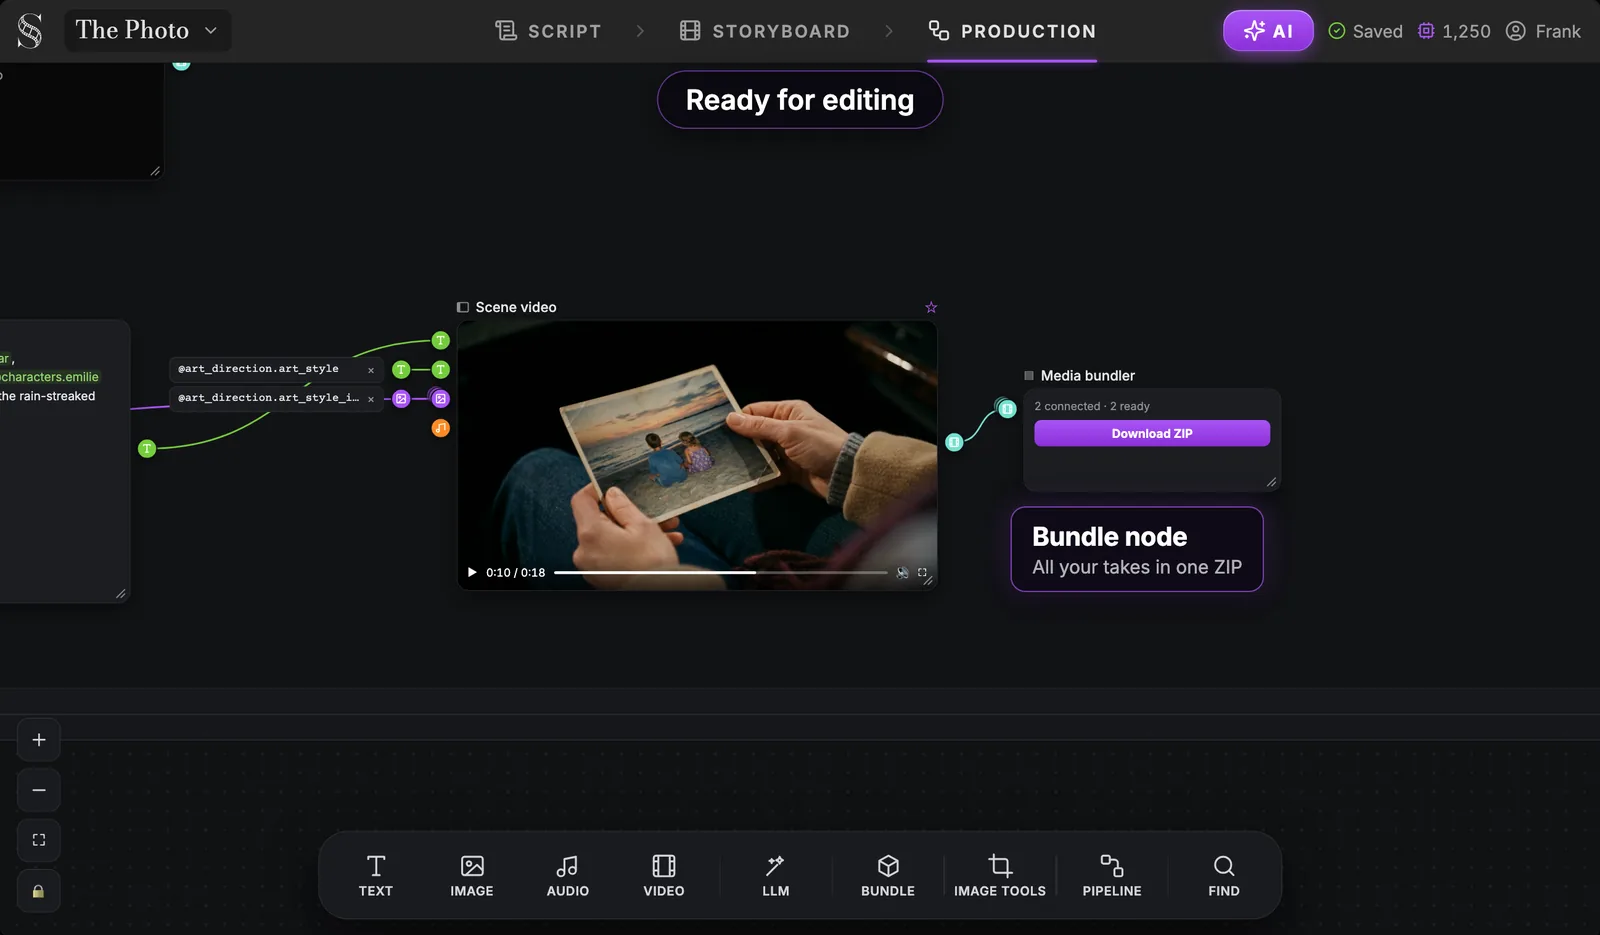
Download ZIP gives you every take in one archive, ready for DaVinci Resolve, Premiere Pro or whatever editor you use.
What ScreenWeaver does not do (yet)
A clear list, so you can plan the rest of your pipeline:
- No voice-over or text-to-speech generation. Add voice attaches an existing audio reference to a character; it does not create a voice.
- No music generation. License, commission or compose your score.
- No lip sync tool.
- No final edit inside the app. There is no timeline and no film export: you gather your rushes with the Bundle node and cut in your editor.
- No PDF export of the storyboard, and no audio in the animatic.
- No expression sheet for characters.
Plans and prices
Prices as of 9 October 2026:
| Plan | Price | What you get |
|---|---|---|
| Screenwriter | $0, forever | Script editor, outline, moodboards, import, unlimited projects |
| Auteur | $39.99/month | 6,000 credits; storyboard and AI video production |
| Studio | $149.99/month | 25,000 credits; collaboration, unlimited seats, lowest rates |
Writing costs nothing. Credits pay for generation: sheets, panels, images and video.
Proof: Lost Garden
Lost Garden is a dark fantasy anime series made by one person in ScreenWeaver. Its first episode runs 17 minutes 12 seconds. The creator tells the whole story, from script to final cut, in how I made a Japanese-style anime with AI. For more lessons on the method, browse the ScreenWeaver Academy.
FAQ
What is ScreenWeaver?
ScreenWeaver is an online AI filmmaking app that runs one project from script to shots: a screenplay editor, story elements with reference sheets, a 3D previz storyboard and a node canvas for image and video generation.
How do I use ScreenWeaver?
Follow the three tabs in order. Write or import your script, run Auto-generate in Storyboard to get reference sheets and a panel for every shot, then generate images and video in Production, shot by shot or a whole scene with a pipeline.
Is ScreenWeaver free?
The Screenwriter plan is free forever: script editor, outline, moodboards, import and unlimited projects. Storyboard and video generation need credits, which come with the Auteur plan ($39.99/month, 6,000 credits) or the Studio plan ($149.99/month, 25,000 credits).
Can ScreenWeaver turn a script into a storyboard and video automatically?
Mostly, yes. Auto-generate builds the sheets, the shot breakdown and a panel per shot from your script, and the Production canvas is built from that storyboard. You still choose the takes, direct the shots and cut the film.
Can I import my existing screenplay?
Yes. Attach a PDF or Final Draft (.fdx) file in the AI Center and ask the assistant to import it; WriterDuet JSON and plain text work too. It rebuilds the scenes and structure, and creates your characters and places.
Which AI video models does ScreenWeaver use?
Seedance 2.5 is the default and our recommendation, with clips from 4 to 30 seconds up to 1080p. Veo 3.1, Seedance 2.0, Kling v3.0, MiniMax H3 and Grok Imagine Video 1.5 are also available in the Video node.
Does ScreenWeaver edit the final film?
No. ScreenWeaver produces the shots and scene clips; the Bundle node gathers them into a ZIP and you edit, add voices and music, and export in your own editing software.
Start your film
Write your first scene today. The script editor is free, and your characters and places are created as you write: open ScreenWeaver.
Final Step
Build your next script with Screenweaver
Move from ideas to production-ready pages faster with timeline-native writing and AI-assisted story flow.
Try Screenweaver