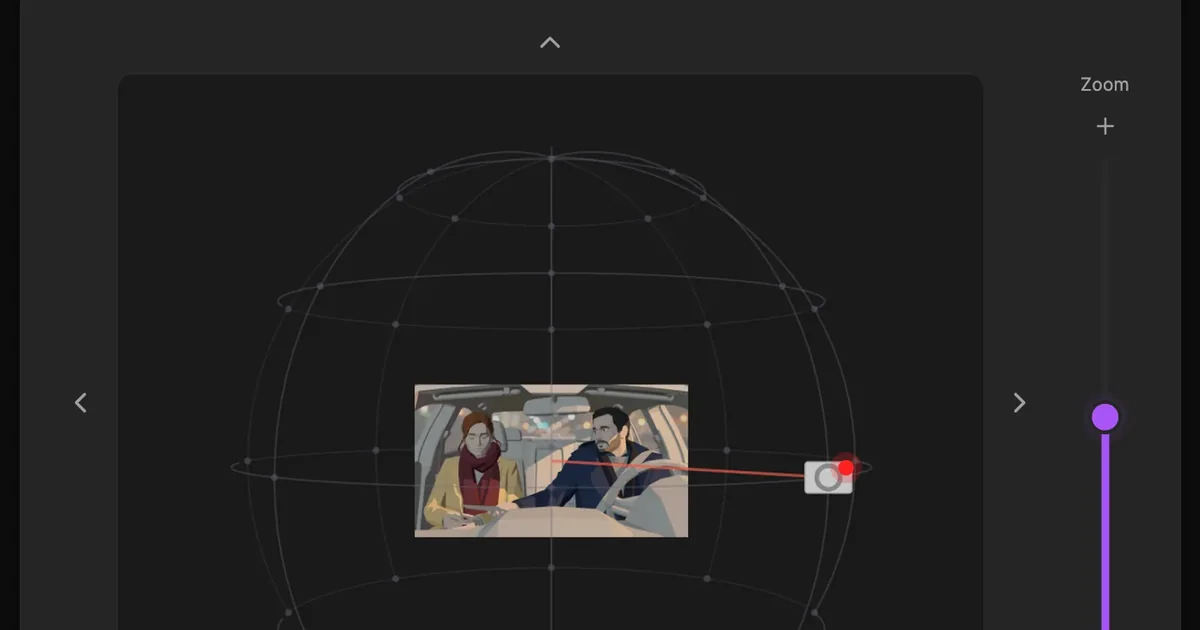
The short answer: open the image in ScreenWeaver's Edit with AI window, switch to the Angle tab, move the camera around the subject on the orbit sphere (45 degree steps, four heights, wide, medium or close) and click Run. The model redraws the same scene from the new viewpoint and saves it as a new version of the image, so the original stays. Small moves work best; big moves inside tight sets can fail.
You generated a frame you like. The faces are right, the staging is right, the light is right. Only the camera is in the wrong place: you wanted to be beside the characters, or closer to them. Rerolling the whole image is a gamble, because the new take can lose exactly what you liked about the old one.
This guide covers the three tools that fix a frame without starting over, all in the same window:
- Edit: paint an area and describe the change (inpainting).
- Crop: reframe inside the image you already have.
- Angle: move the camera around the subject.
We use one real panel from the demo project The Photo, shot S2: Thomas and his sister Émilie in his parked car at night, just before he hands her an old photo. You will see what worked, what failed, and when to skip the editor and regenerate the shot instead.
Where the image tools are
Everything starts on a storyboard panel. In the Storyboard tab, select a shot and its panel opens in the center, above its settings.
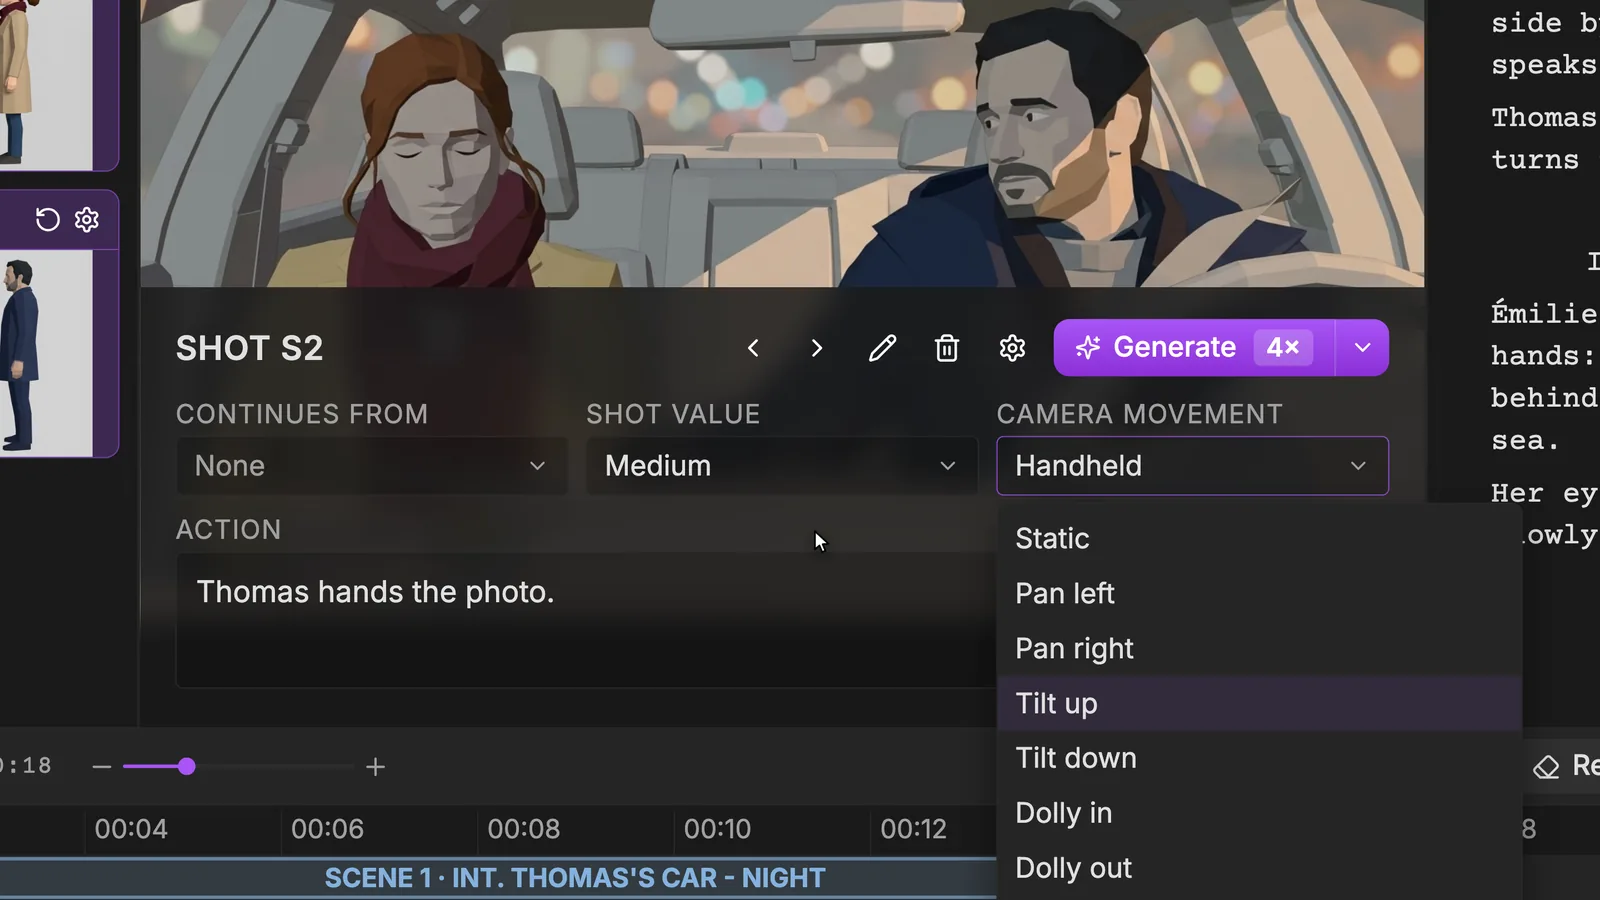
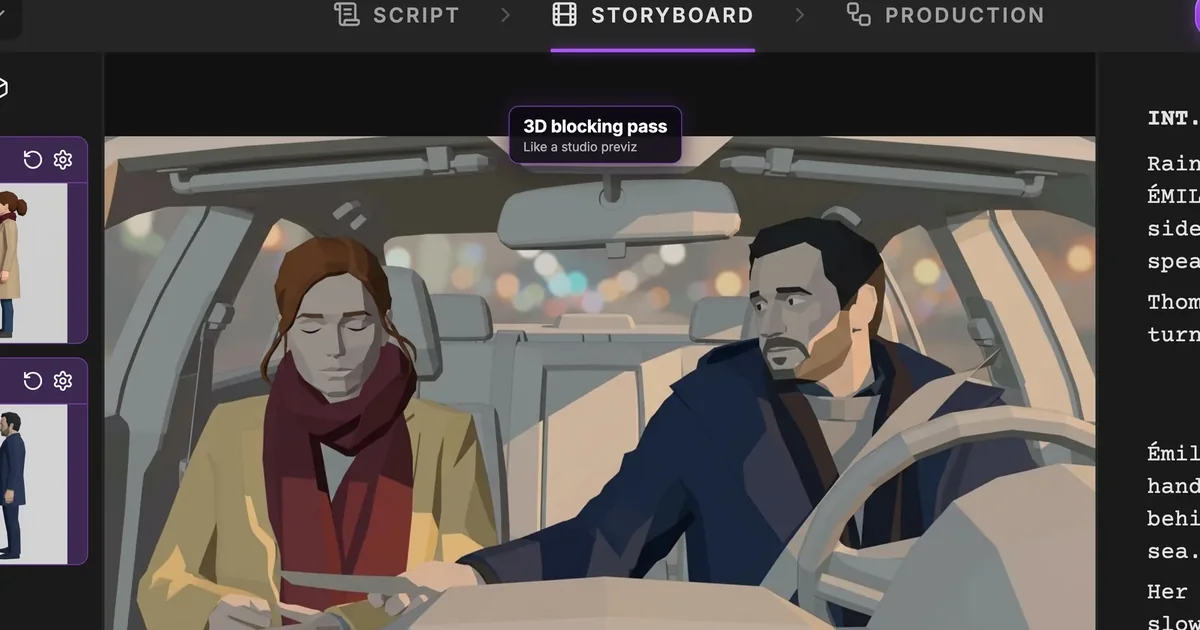
This is shot S2: a Medium, the action line "Thomas hands the photo." The panel is a 3D blocking pass, a greybox previz that locks the framing, the staging and the light, not the final look of the film. That matters here: every change of angle you make on a panel is a change of staging, decided before you spend anything on video. If you are new to the storyboard step, start with our guide to AI previz from a script.
From a panel, Edit with AI opens the image editor. It has three tabs: Edit, Crop and Angle. The same tools exist later as nodes on the Production canvas, covered at the end of this guide.
Tool 1: Edit, to change one part of the image
The Edit tab is inpainting: you mark the part of the image that should change, you describe the change, and the rest of the frame stays as it is.
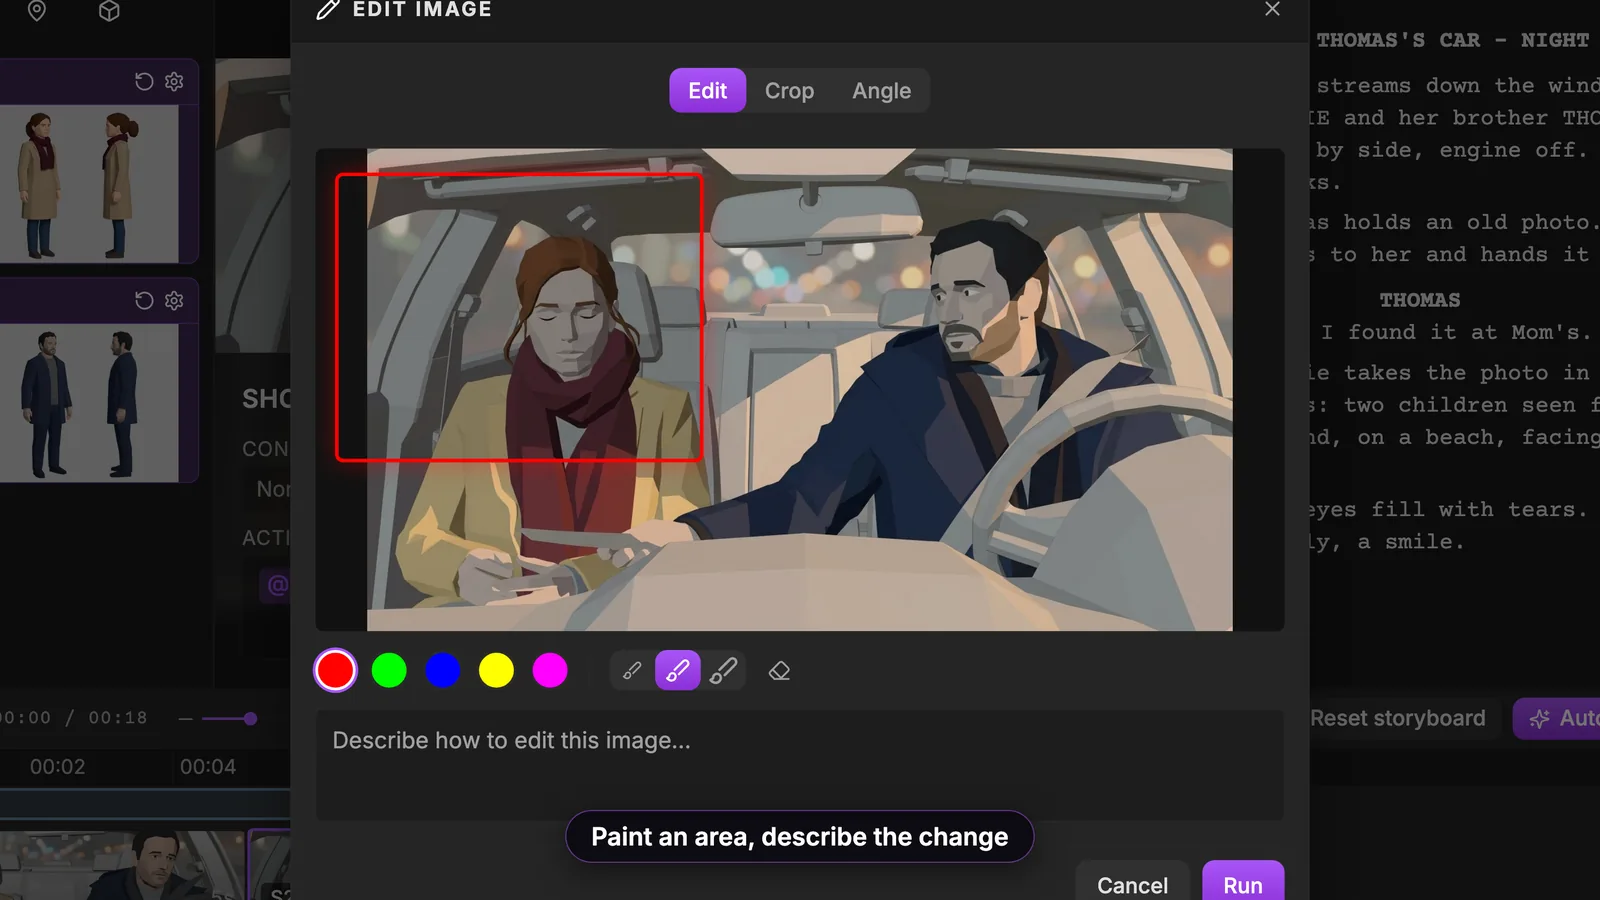
Here is what you are looking at:
- The brush. Pick one of the five colors (red, green, blue, yellow, magenta), whichever stands out best against your image, and one of the three brush sizes.
- The painted area. In the still, a red box surrounds Émilie. Paint only what should change. The tighter the area, the more of your frame survives.
- The prompt. In "Describe how to edit this image…", write the change in plain words: what should be there, not what is wrong.
- Run. Only the painted area is meant to change; check the rest of the frame when the result comes back.
Use Edit when the camera is right and one element is wrong: a prop, a gesture, a piece of costume. If the problem is where the camera stands, Edit is the wrong tool, and Angle is next.
Tool 2: Crop, to reframe what you already have
Sometimes the angle is right and the frame is simply too loose. Crop keeps a part of the image instead of inventing a new one.
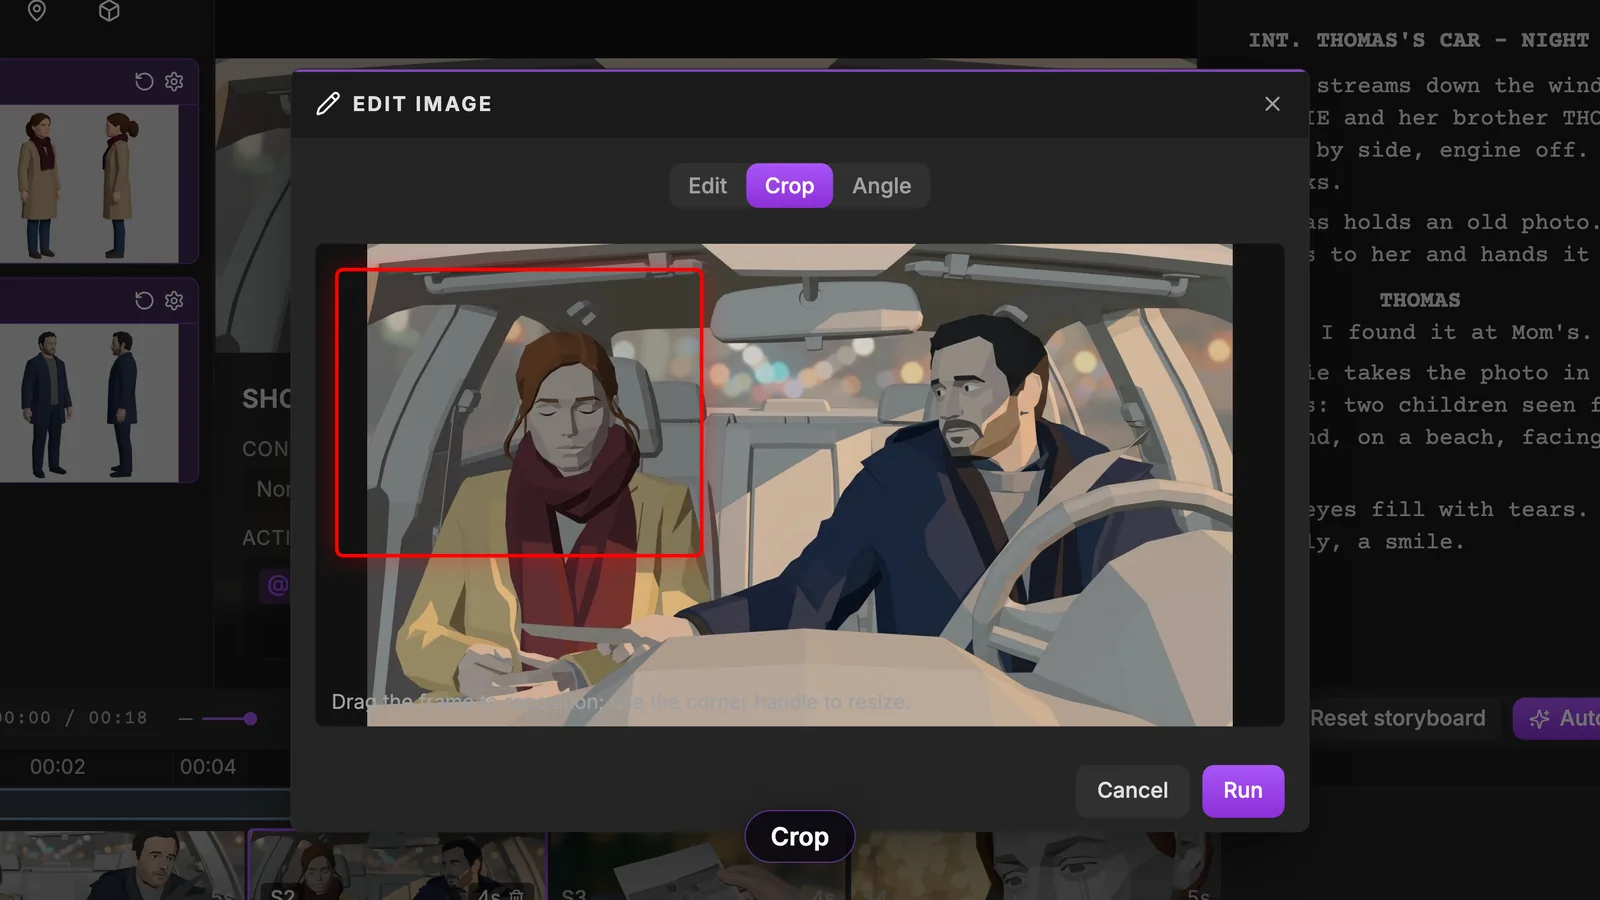
Drag the frame to move it, pull the corner handle to resize it. The ratio presets are Free, Source, Project, 16:9, 9:16, 1:1, 4:3 and 2.39:1. Project is the useful one on a storyboard, since it keeps the panel in your project's aspect ratio.
Crop is how you turn a medium two-shot into a single on one character when the resolution allows it. It cannot show what the camera never saw: if you need the other side of the face, you need Angle.
Tool 3: Angle, to move the camera around the subject
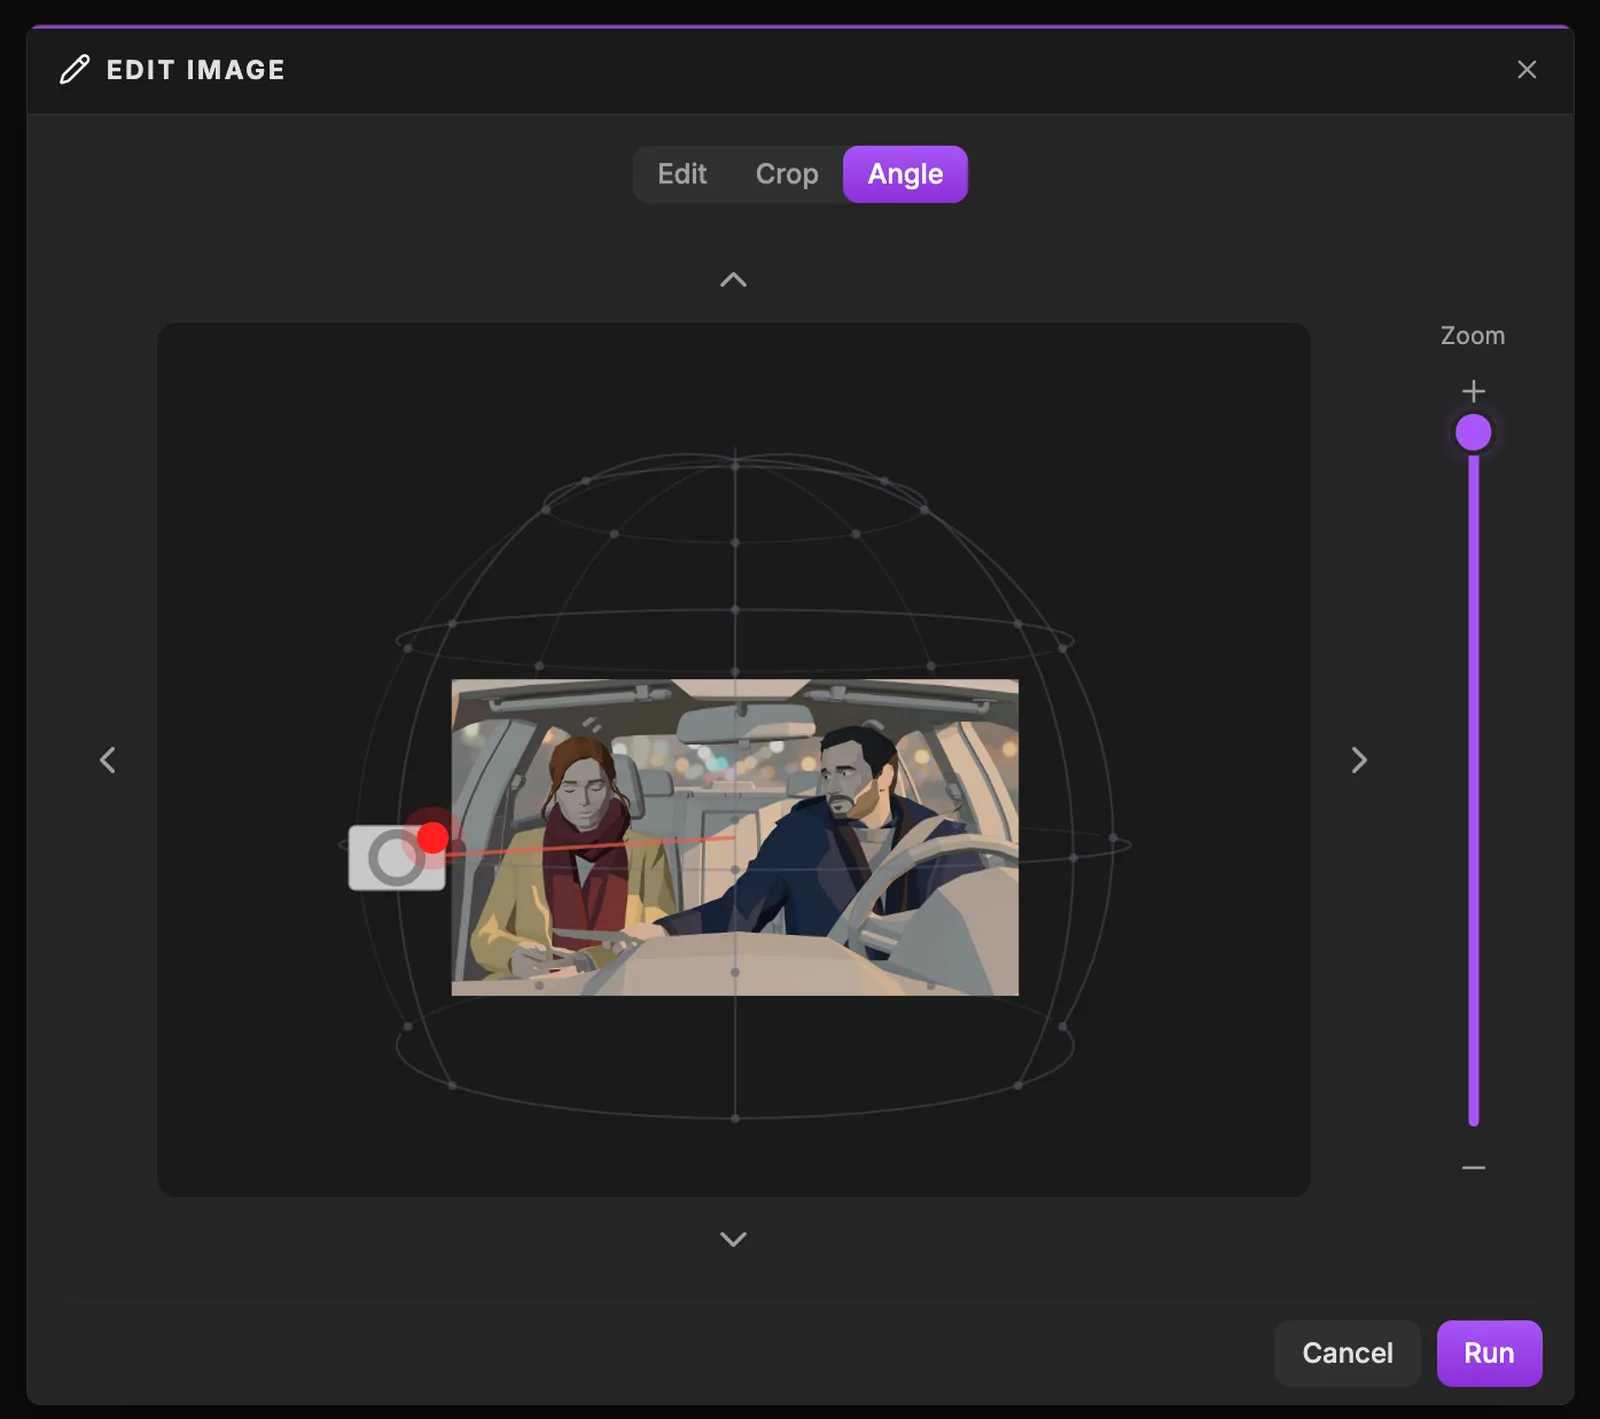
The Angle tab is the one this guide is named after. It runs a dedicated multi-angle image model (qwen-image-edit-2511-multiple-angles) that redraws the same scene from another viewpoint, starting from your image so the characters, the set and the light carry over.
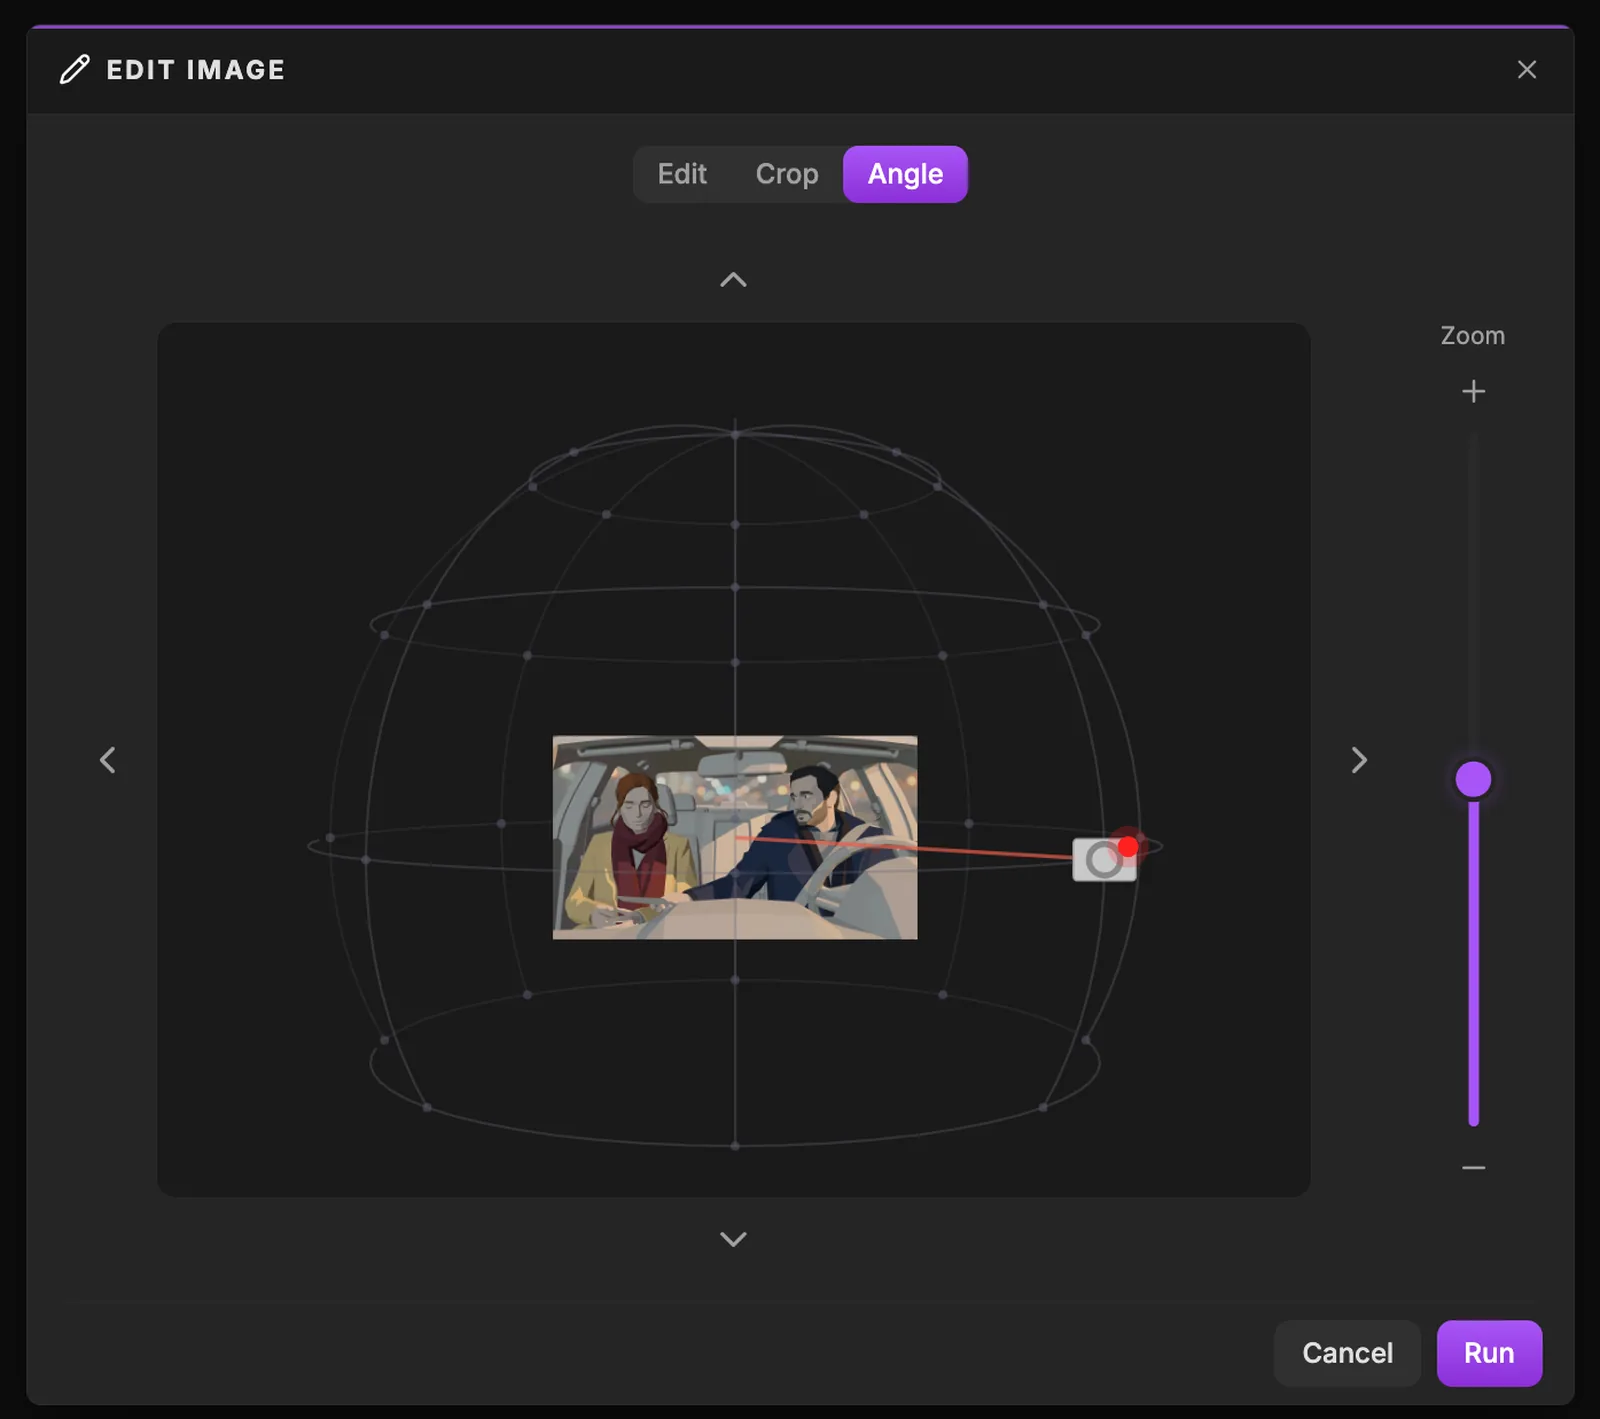
The image sits in the middle of a sphere. The small silver camera shows where the new viewpoint will be, and the red line shows where it looks. You control three things:
- Around the subject (azimuth). The left and right arrows orbit the camera in 45 degree steps, from 0 to 315 degrees: eight positions all the way around.
- Height (elevation). The up and down arrows move the camera between four heights: -30 degrees (below eye level, a low angle), 0 (eye level), +30 and +60 degrees (looking down, a high angle).
- Distance (Zoom). The vertical slider on the right sets wide, medium or close.
Those positions snap, so every run lands on a clean, repeatable viewpoint. A "Free angle (disable snap)" option turns the snap off if you need an in-between position.
Click Run, and the result is saved as a new version of this image. The original panel is still there, so trying an angle never destroys the shot you had. For the vocabulary of these positions, our film technique pages on the three-quarter angle, the high angle and the low angle show what each one does to a scene.
Real result 1: 45 degrees, eye level, medium
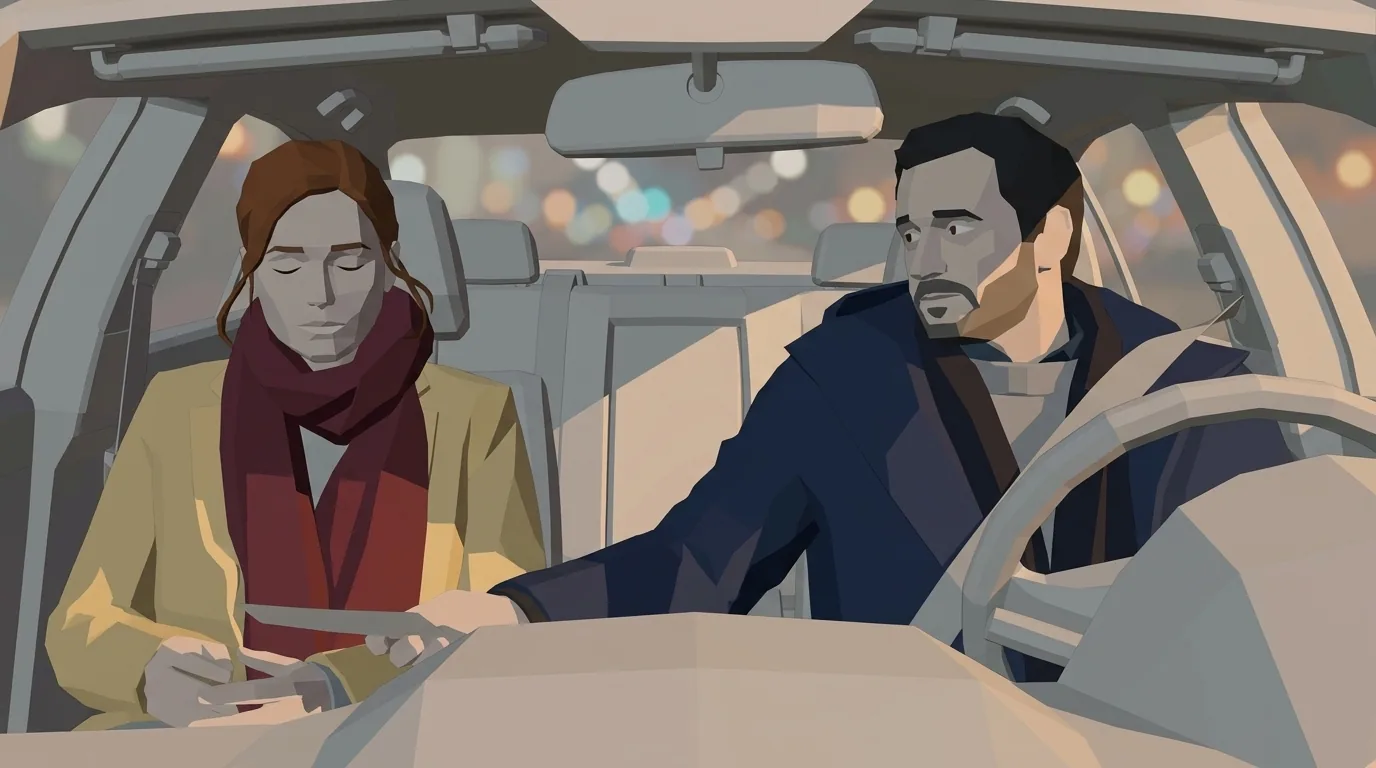
Here is the source panel, before any change: Émilie on the passenger side, Thomas at the wheel, the camera in front of the windshield.
We ran Angle with the camera at 45 degrees, eye level, medium distance, the setting shown in the previous screenshot. This is what came back.
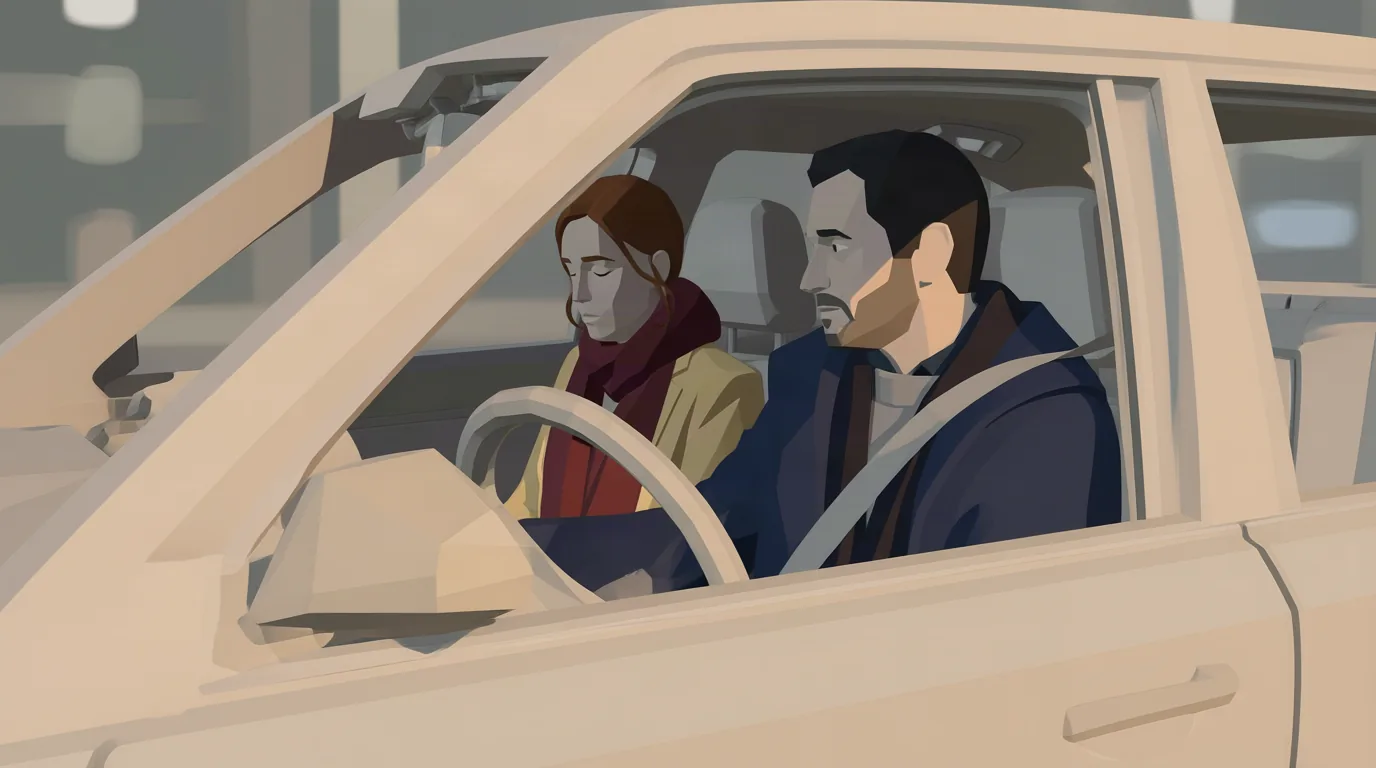
The camera is now outside the car, looking in through the driver's window. Thomas is in the foreground, Émilie behind him, and both still read as the same two people in the same coats, in the same previz style. That is a new shot for your breakdown, a side view that can cut against the frontal one.
Look closely and one thing is missing: the photo in Émilie's hands is no longer visible. A new viewpoint is a new drawing, and small props are the first thing to move or drop out. If an object carries the shot, check it is still there before you keep the result.
Real result 2: 315 degrees, close
Second try, on the same source panel: the camera goes the other way around, to 315 degrees, and the Zoom slider goes up to close.
The result is a tighter frame on the two of them, seen from Émilie's side.
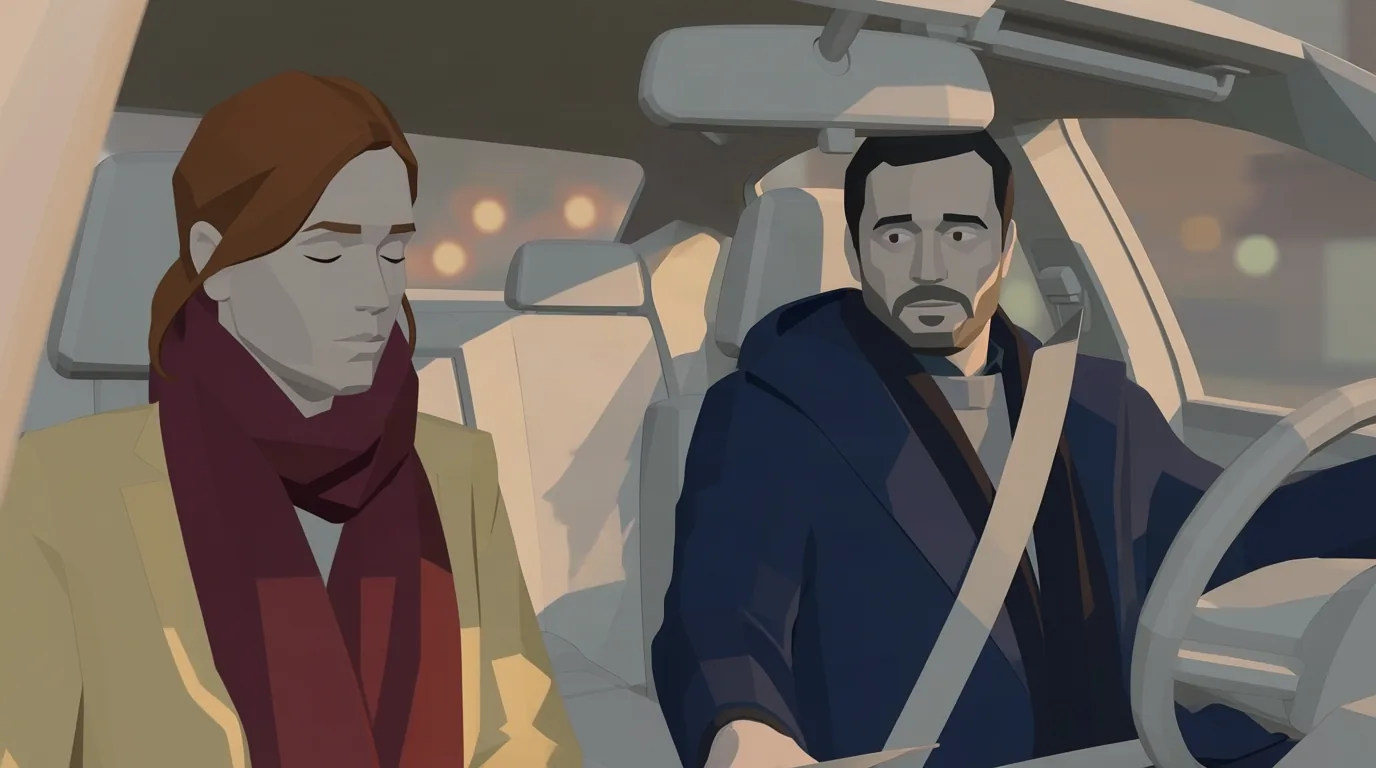
This is a closer two-shot: Émilie in the foreground, Thomas behind the wheel turned toward her. It gives the moment before the line more weight than the original medium. Here too, the photo is out of frame, which is fine for a shot about her face and not fine for a shot about the photo.
Try it free
Try Screenweaver for free on your script
It is free. Import your existing project, get a clearer view of your outline, and regain control of your story structure in minutes.
Start FreeWhat failed, honestly
Two of our tries on this panel did not work, and they are worth knowing before you spend credits.
- 45 degrees at +30 (higher, looking down): the result sliced through the car roof. The model had to place a camera above the characters in a closed car, and it cut the set to get there.
- 0 degrees at -30 (low angle): the low angle inside the car went wrong. There is no room under a dashboard for a camera, and the model could not make a believable picture of it.
Both were thrown away. The pattern is simple: tight interiors resist big moves, small moves work best. A car, a lift, a phone booth leave the camera very few real places to stand. A move of 45 degrees around the subject at eye level held up; a change of height in the same car did not.
Three rules follow from that:
- Move one setting at a time. Change the orbit or the height, not both, then judge.
- Each run costs credits. If two tries at an angle fail, the third rarely saves it. Pick another angle, or regenerate the shot. Our list of mistakes that burn AI video credits has more of these traps.
- Nothing is lost. Every result is a new version of the image, so a failed angle never replaces the panel you had.
Angle, regenerate, or change the Shot value?
Angle is one of three ways to get a different shot. Pick by what is wrong.
| What is wrong | Best fix | Why |
|---|---|---|
| The frame is right, one detail is wrong | Edit (inpainting) | Changes only the painted area |
| The frame is right but too loose | Crop | Keeps the pixels you have |
| You like the image, you want another viewpoint on it | Angle | Same characters, set and light, new camera position |
| The shot size is wrong (a Medium that should be a Close-up) | Change Shot value, then regenerate | The breakdown itself changes |
| The staging is wrong (who is where, what they do) | Rewrite the Action, then regenerate | Angle cannot change what happens |
For the last two rows, you stay on the shot panel.
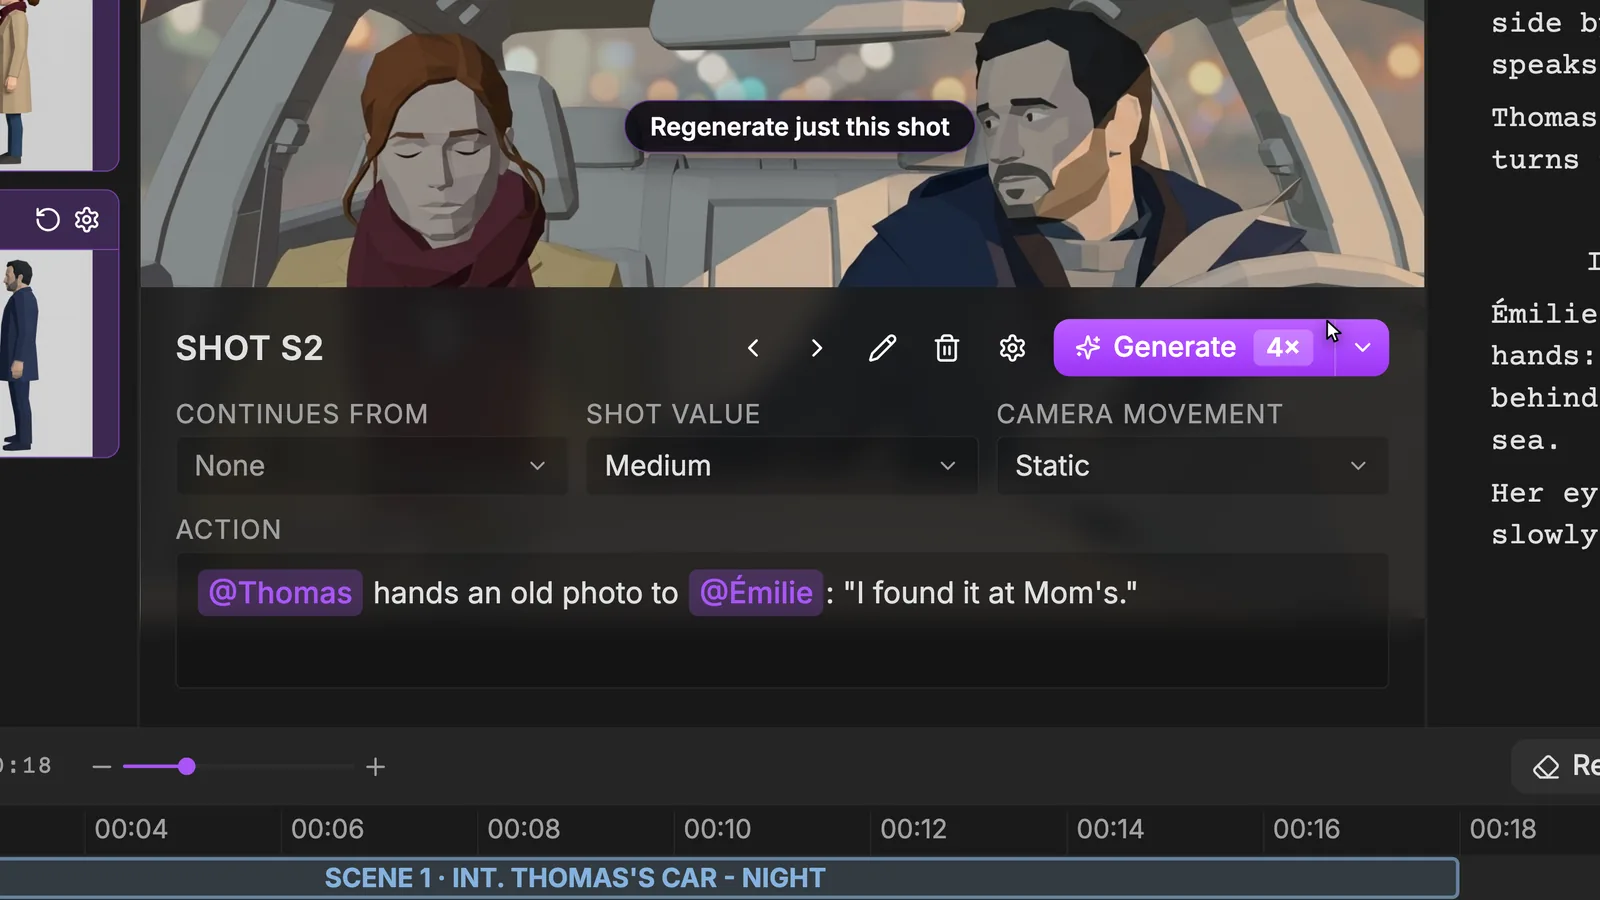
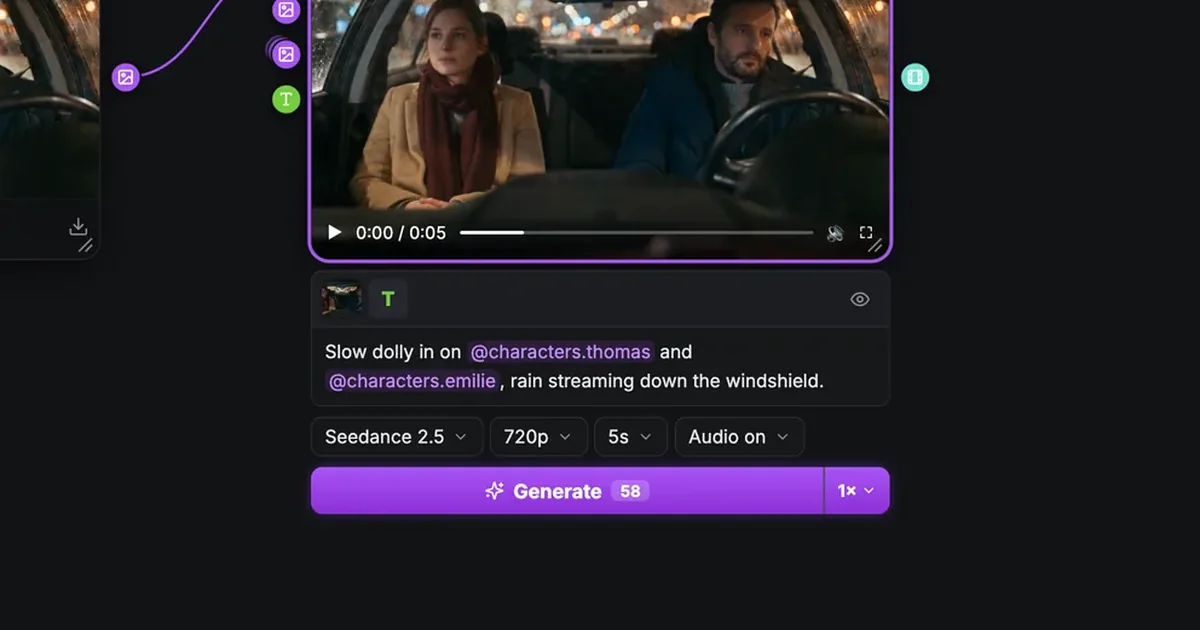
Change the Shot value or the Action, then use Generate to regenerate this shot alone: the rest of the storyboard does not move. The @ mentions in the Action field keep Émilie's and Thomas's reference sheets attached, so the new panel keeps the same faces. If you are unsure which shot size a moment calls for, our guide to storyboard shot types goes through them one by one.
One special case: the reverse angle. In a dialogue scene, the reverse is usually its own shot in the breakdown, with its own action line, so treat it as a shot to plan rather than an orbit of 180 degrees on an existing panel. In a car, a 180 degree orbit would also put the camera in the back seat, the kind of cramped position where our tests failed.
The same tools on the Production canvas
The image tools are not limited to the storyboard. On the Production tab, where the film's images and videos are made, they also exist as nodes.
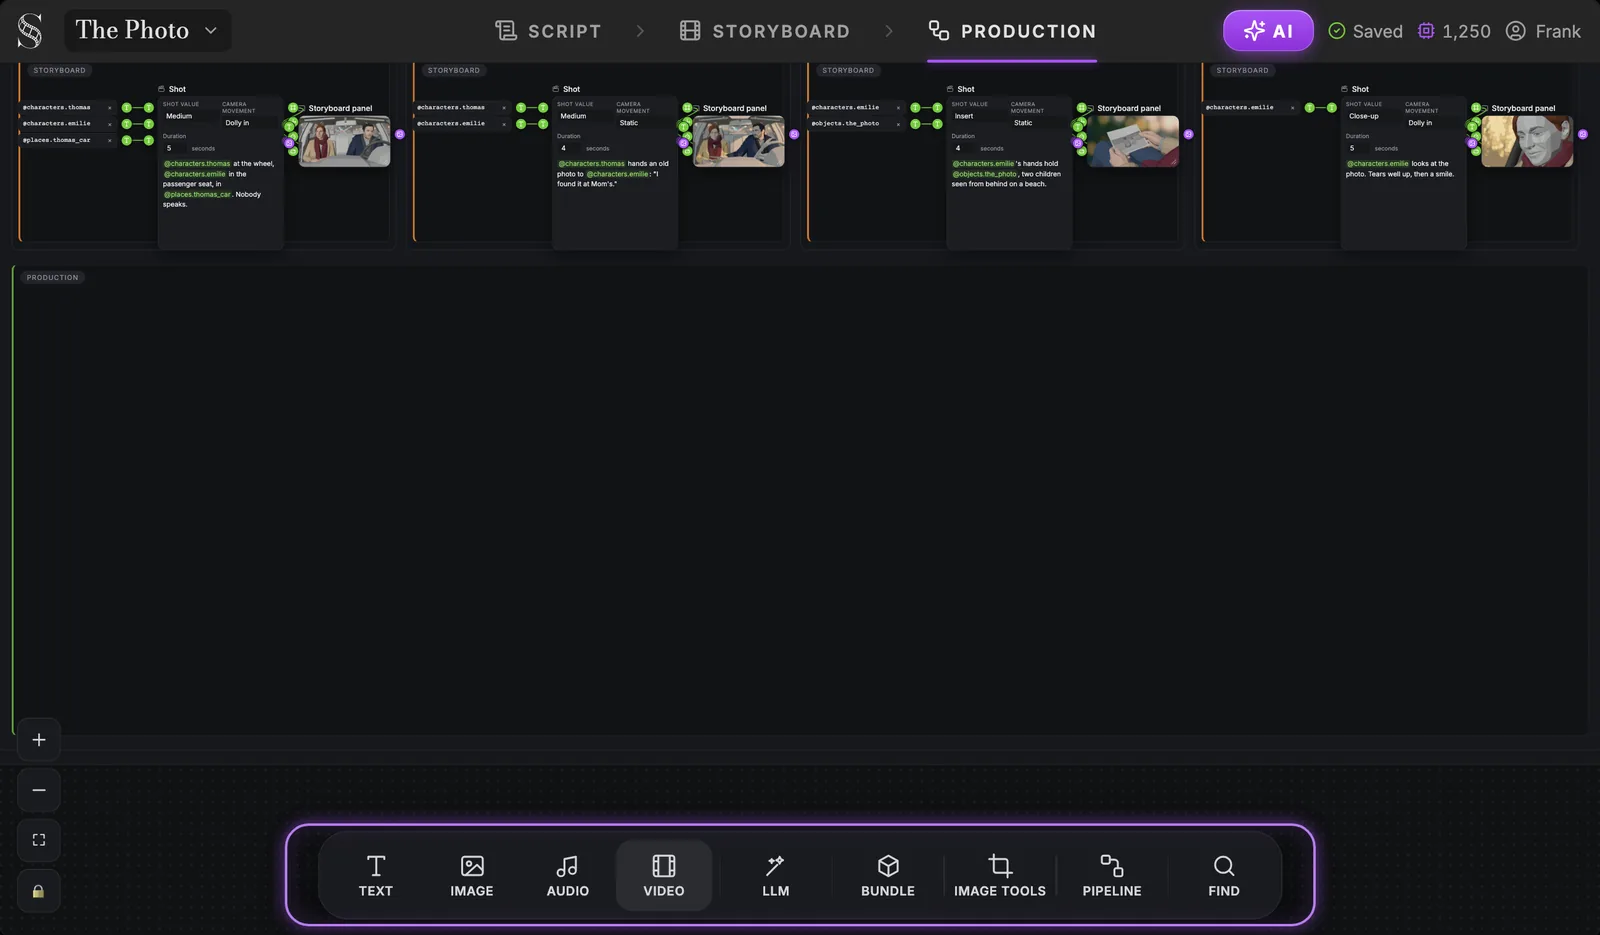
Click the Image tools tile, then click inside a group to place a node, Crop and Camera angle among them. Wire an image into it, and you can reframe or re-angle a production image the same way you did a panel, without leaving the canvas. Our guide to the AI video production node canvas explains how nodes, wires and takes work there.
A good habit: settle your angles on the storyboard, where panels are previz, and keep the production tools for small corrections on final images. A camera position decided on the board flows into the rest of the project.
FAQ
Can AI change the camera angle of an existing image?
Yes. In ScreenWeaver, the Angle tab of Edit with AI redraws the same image from a new viewpoint: around the subject in 45 degree steps, at four heights and at three distances. It works best for moderate moves. In tight sets such as a car interior, big changes of height can fail.
How do I rotate the camera around a subject with AI?
Open the image in Edit with AI, go to the Angle tab and use the left and right arrows to orbit the camera from 0 to 315 degrees. The red line shows where the camera looks. Click Run, and the result is saved as a new version of the image.
How do I change the perspective of an image with AI without losing the characters?
Use a multi-angle edit on the image you have instead of a new generation from a prompt. The model starts from your picture, so the faces, costumes and set carry over. Check small props afterwards: in our tests, the photo in the character's hands dropped out of frame in both results.
How do I edit only part of an AI image?
Use inpainting: in the Edit tab, paint the area to change with the brush, describe the change in the prompt field and click Run. Only the painted area is redrawn, so the rest of the frame stays as it was.
Why did my new camera angle come out broken?
Usually because the camera has nowhere real to stand. A low angle or a high angle inside a cramped set, like our car, forces the model to invent space that does not exist, and you get a sliced roof or a confused interior. Try a smaller move, change only one setting, or regenerate the shot with a different Shot value.
Is it better to change the angle or regenerate the shot?
Change the angle when you like the image and only want another viewpoint on it. Regenerate when the shot size or the staging is wrong: change the Shot value or the Action and regenerate just that shot. Angle keeps what you have; regenerating rethinks it.
Does changing the angle overwrite my original image?
No. Every Angle result is saved as a new version of the image. The original stays available, so you can try an angle, compare and go back.
Try it on your own panel
Write a scene, let the storyboard break it into shots, then move the camera where the scene needs it. Start with the full ScreenWeaver guide, or open ScreenWeaver and create your first project.
Final Step
Build your next script with Screenweaver
Move from ideas to production-ready pages faster with timeline-native writing and AI-assisted story flow.
Try Screenweaver