Story elements in ScreenWeaver: characters, places and objects that stay the same in every shot
Turn the characters, places and props of your script into story elements with descriptions a camera can film, the base of every consistent shot.
Chapters (6)
Video: lesson 6.1 of the free Screenwriting Course.
What a story element is, and why it matters
A story element is anything the camera has to show the same way twice: a character, a place, an object. Each one has a name, a description and reference images, and every shot that mentions it reuses all of that. A video model has no memory between two generations. The story element is that memory.
You build an element once and it follows you through the three tabs: "Story elements" in the Script tab sidebar opens the entity canvas, the Storyboard tab lists elements in its left panel under "Characters", "Places" and "Objects", and the Production tab has sections with the same names.
Four ways an element is born
- 1Autocomplete while you type. In a character cue, ScreenWeaver suggests your existing characters plus "Create "{name}"". In a scene heading, after INT. or EXT., it does the same for places.
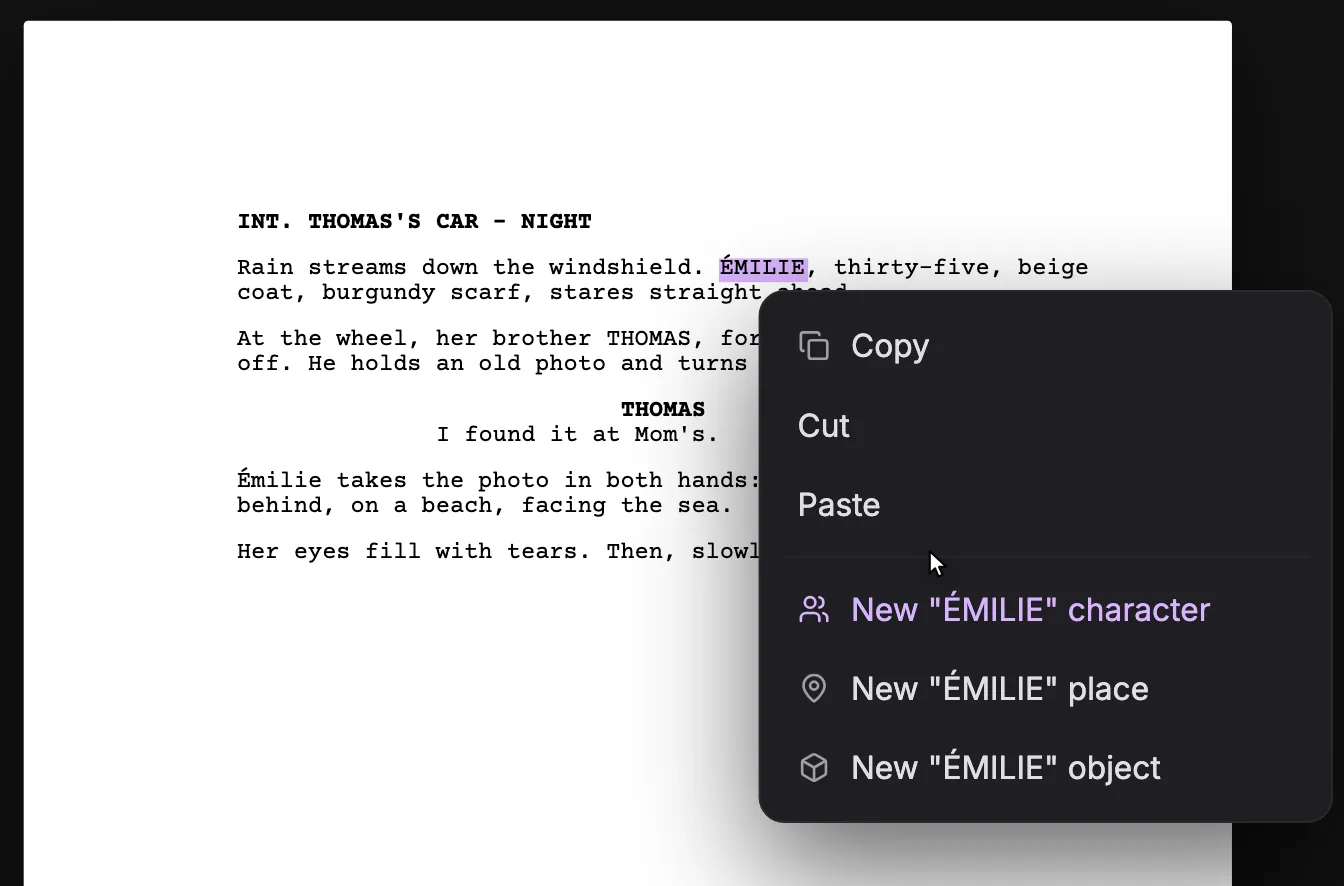
- 2Right-click a word in the script and choose "New "{name}" character", "New "{name}" place" or "New "{name}" object". If it already exists, the menu says so, for example ""{name}" character exists".
- 3On the entity canvas, use "Add character", "Add place" or "Add object" in the toolbar.
- 4Import a script through the AI assistant: characters are created from the character cues, places from the scene headings.
Swipe sideways to see the whole screen.
- 1Selected name. The text you selected before right-clicking. It becomes the entity's name, so select exactly the name, without the punctuation around it.
- 2Copy, Cut, Paste. The usual clipboard actions on the selection.
- 3New character. Creates a character named after the selection ("New "{name}" character"). If it already exists, the line reads ""{name}" character exists" instead, so you never create a duplicate.
- 4New place. Creates a place with that name ("New "{name}" place"). Places also come from scene headings, where autocomplete offers "Create "{name}"" after the INT. or EXT. prefix.
- 5New object. Creates an object, a prop that matters to the story ("New "{name}" object"). This menu is how you create one from the page: action-line autocomplete only suggests existing objects, with no Create option.
The entity canvas: one group, three stages
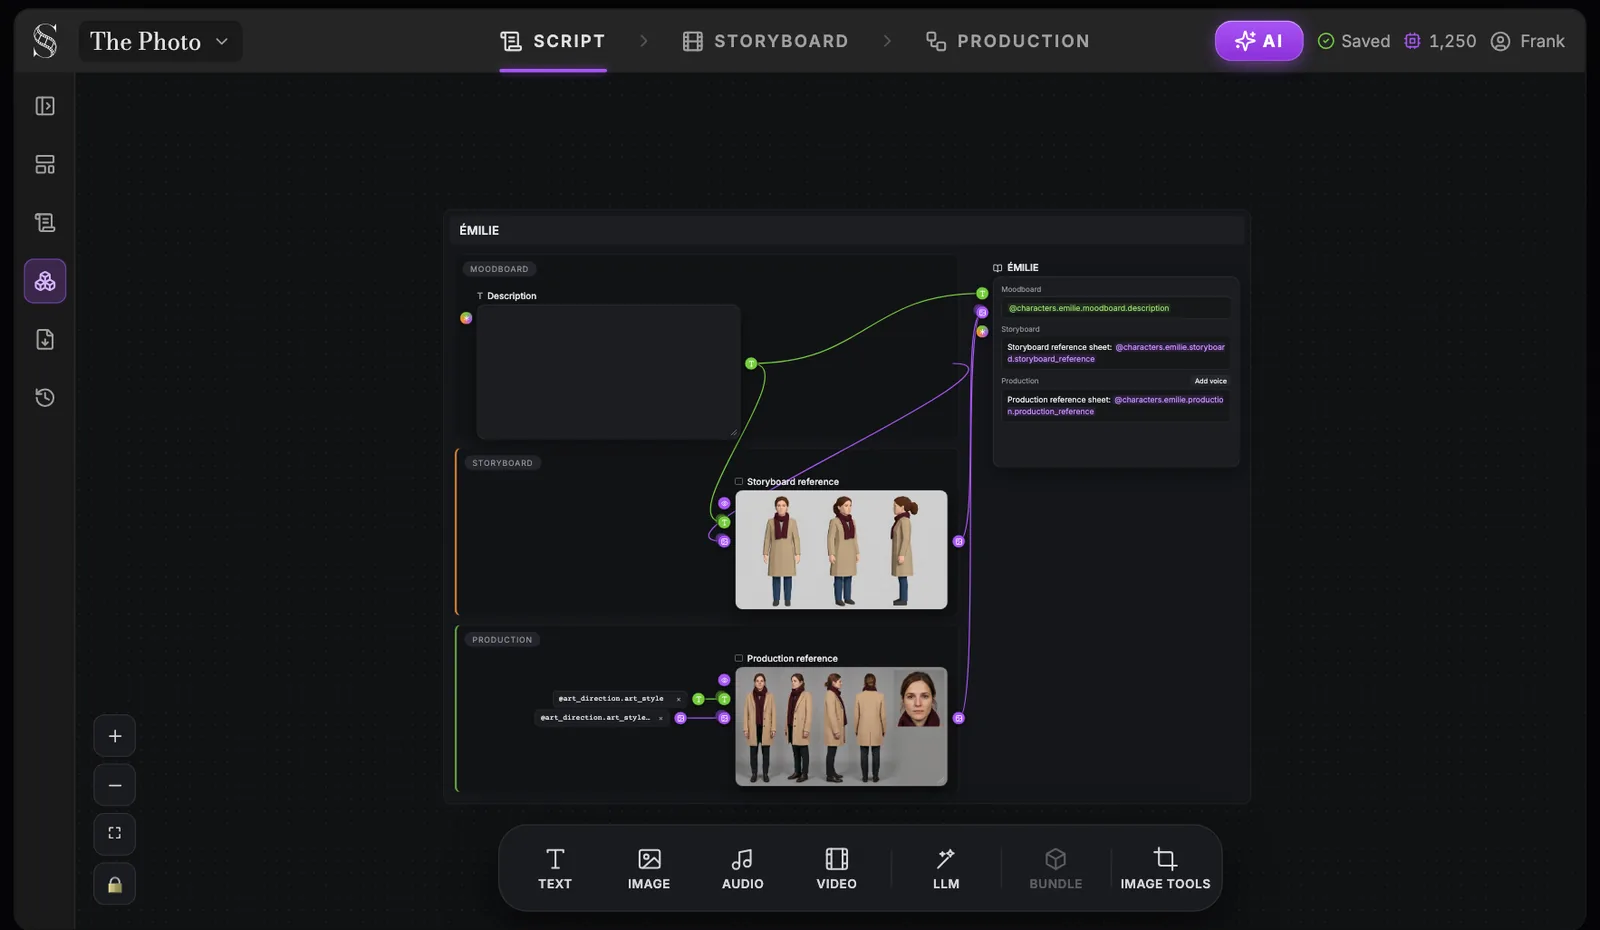
Each element is a group, and every group has the same three stages stacked from top to bottom. Learn one and you know them all, whether it holds a person, a car or a photograph.
Swipe sideways to see the whole screen.
- 1Story elements. The sidebar entry that opens this canvas. The same entities appear in the Storyboard entities panel and in the Characters, Places and Objects sections of Production.
- 2Entity group. The group of one entity, here ÉMILIE. Its actions are "Open as sub-canvas", "Edit name" and "Delete entity"; deletion is blocked while the script still uses the entity.
- 3Moodboard stage. The first stage: the written description and any mood material. Text nodes here accept @handles to reference other entity sheets.
- 4Description. The pinned "Description" text node: what the entity looks like, wears or contains. It feeds the reference sheets, so it is the single most important text for consistency.
- 5Storyboard stage. The previs stage. It holds the "Storyboard reference" used by every storyboard panel where this entity appears.
- 6Storyboard reference. A "Clean 3D Animated Film Previs reference sheet" (for a character: four views plus a face close-up). Generate or regenerate it here or from the Storyboard entities panel.
- 7Production stage. The final-look stage. Its reference follows the project's artistic direction, so the entity looks the same in every production image and video.
- 8Production reference. The "Production reference" image: the same entity rendered in your art style. Production image and video nodes reference it, which keeps faces and costumes stable from shot to shot.
- 9Art direction input. Handles such as @art_direction.art_style, coming from the "Artistic direction" section of Production. Change the art style there, then regenerate this reference so it follows.
- 10Story element node. The node that cannot be deleted. It shows the three stages with their handles (for example @characters.emilie.moodboard.description); stages owned by another canvas are read-only with "Edit on the {stage} canvas".
- 11Add voice. Adds an audio node named "Voice" to the Production stage and links it to the entity. The button shows only on the Production stage while no audio is linked yet.
- 12Zoom and fit. + and - zoom, the frame icon fits the whole canvas on screen, and the padlock locks the canvas against accidental moves. Scrolling pans, pinch or Cmd/Ctrl + scroll zooms, and holding Space while dragging pans too.
- "Moodboard" answers "what does it look like?". It holds a pinned "Description" text node and anything you drop on it: images, text, audio. You cannot generate images here; it is for your words and your references.
- "Storyboard" holds the "Storyboard reference", a clean previz model sheet used by every storyboard panel.
- "Production" holds the "Production reference", the same element in the final look of the film, driven by the artistic direction.
The "Story element" node on the right gathers the three stages and cannot be deleted. Stages owned by another canvas are read-only there, with "Edit on the {stage} canvas". "Add voice" attaches an audio reference to the element; it does not generate speech. The group also offers "Open as sub-canvas", "Edit name" and "Delete entity".
Write a description a camera can film
The pinned Description is the most important text you will write after the script. The reference sheets are drawn from it and every shot reuses those sheets. A vague description gives you a different Émilie in every shot; a precise one gives you the same woman from the first frame to the last.
Swipe sideways to see the whole screen.
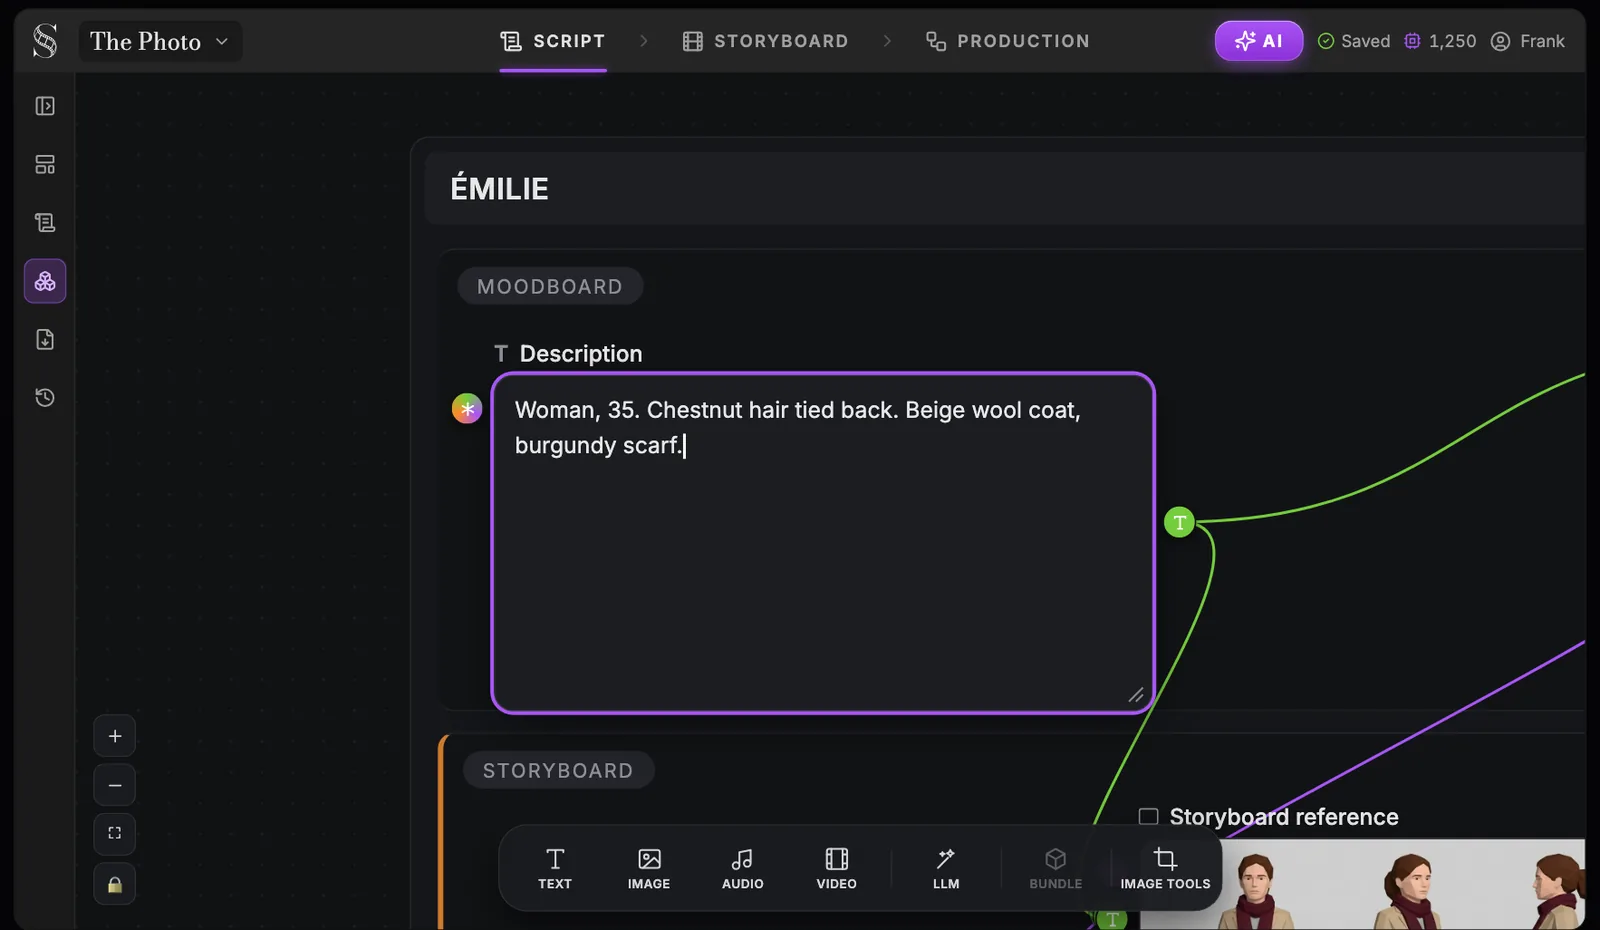
- 1Entity group. The entity whose stages you are editing, here ÉMILIE. "Edit name" renames it and "Open as sub-canvas" opens it on its own.
- 2Moodboard stage. The stage that holds the written description and any reference material for the look. Everything here is input for the sheets below.
- 3Description. Write what a camera sees: age, build, hair, face, costume, key props (placeholder "Type here. Use @handle to reference entity sheets…"). Keep it visual: the sheet generation reads it literally.
- 4Auto-fill from the script. Its tooltip says "Auto-fill description from the script (AI). Overwrites current text." Run it first to draft from the script, then refine by hand, never after your own edits. It costs credits.
- 5Output port. The description's output. The wires carry it to the Storyboard reference and the Production reference, so after a change, regenerate the sheets that read it.
- 6Storyboard stage. The next stage down, where the previs sheet is generated from this description.
- 7Storyboard reference. The sheet generated from the description. With no description, the Storyboard entities panel warns "{name}: no description" and offers "Generate anyway": write the description first.
- 1Click into the "Description" node of the element.
- 2Character: age, build, face, hair, costume and one distinctive detail.
- 3Place: what it is, time of day, weather, where the light comes from, the materials and colours in frame.
- 4Object: what it is, its size compared to a hand, material, colour, era, condition, and what is on it.
- 5Cut what a camera cannot see: personality, backstory, feelings. The script shows those through action and dialogue.
Woman, 35. Chestnut hair tied back. Beige wool coat, burgundy scarf. Bare face, freckles.
A parked sedan at night, engine off. Rain streams down the windshield, the city is nothing but a bokeh of lights.
Old color photo from the 90s, white border, slightly dog-eared: two children seen from behind on a beach, facing the sea.
Handles: how a shot calls an element
Type @ in any prompt and pick an element from the list, grouped by Characters, Places, Objects, Shots and Others. In a storyboard shot, "@Thomas hands an old photo to @Émilie" attaches both reference sheets to that shot. On the canvases the same handles read like @characters.emilie or @places.thomas_car.
Why you cannot delete an element the script still uses
ScreenWeaver blocks the deletion of an element in use: "Cannot delete character. They have N lines of dialogue in the script…". A place is blocked while it appears in a scene heading, an object while the script still mentions it. Deleting anyway would leave dialogue and headings pointing at nothing. So remove or rename those uses in the script first, then use "Delete entity". That is also how you merge a duplicate.
Pro habits for places and props
- Give every recurring place its own element. A set described in words in four prompts becomes four different sets.
- Choose props that read at a glance and stay in view. Video models struggle with an object coming out of a pocket or an envelope, so start the shot with the prop already in hand.
- Drop your own references into the moodboard, like a location scout photo. Keep the description accurate anyway: it drives the sheet.
- Never build a character from a real person's photo without their consent.
Go deeper with how to make an AI character sheet and consistent locations and props in AI video, or see every marker in the interface reference.
Do it now
Practice in ScreenWeaver
- 1Open "Story elements" and check that every character and place exists exactly once. Merge duplicates: rename in the script, then delete the extra element.
- 2Right-click your key prop in an action line and create it as an object.
- 3Write a camera-ready description for every element.
- 4Drop one reference image into your lead character's moodboard, then continue with reference sheets.
Watch the video lessons
Questions about this step
A character is missing from Story elements. How do I add them?
Select the name in the script, right-click it and choose "New "{name}" character". You can also accept "Create" in the character autocomplete, or click "Add character" on the entity canvas.
Does ScreenWeaver create objects automatically from my script?
No. Characters and places can come from the script and from an import, but objects are always added by hand, with the right-click menu or "Add object".
Why can't I delete a character?
Because the script still uses them. Remove or rename their dialogue (or, for a place, the scene headings; for an object, the mentions), then use "Delete entity".
What should a character description contain?
Only what a camera can see: age, build, face, hair, costume and one distinctive detail. Personality belongs in the script, style in the artistic direction.
Can I generate images in the moodboard?
No. The moodboard holds your description and what you drop on it. Generated images start with the reference sheets, covered in the next module.
Does "Add voice" generate a voice for my character?
No. It attaches an audio reference to the element; it is not a text-to-speech feature.
More answers in the Academy FAQ and the button-by-button interface guide.