The ScreenWeaver production canvas: art direction, references, shots and the toolbar
Find your way around the Production tab, the node canvas where your storyboard becomes final frames and video.
Chapters (8)
Video: lesson 5.6 of the free AI Filmmaking Course.
What the Production tab is for
The storyboard locked your framing and staging in a neutral previz style. The Production tab is where that plan becomes the film: final-style frames, video clips and whole scenes. It is a node canvas, but not an empty one: ScreenWeaver builds it from your storyboard, so everything you defined upstream arrives already wired.
If you have not picked a frame shape yet, the "Choose project aspect ratio" window opens on your first visit. There is no guided tour for this tab.
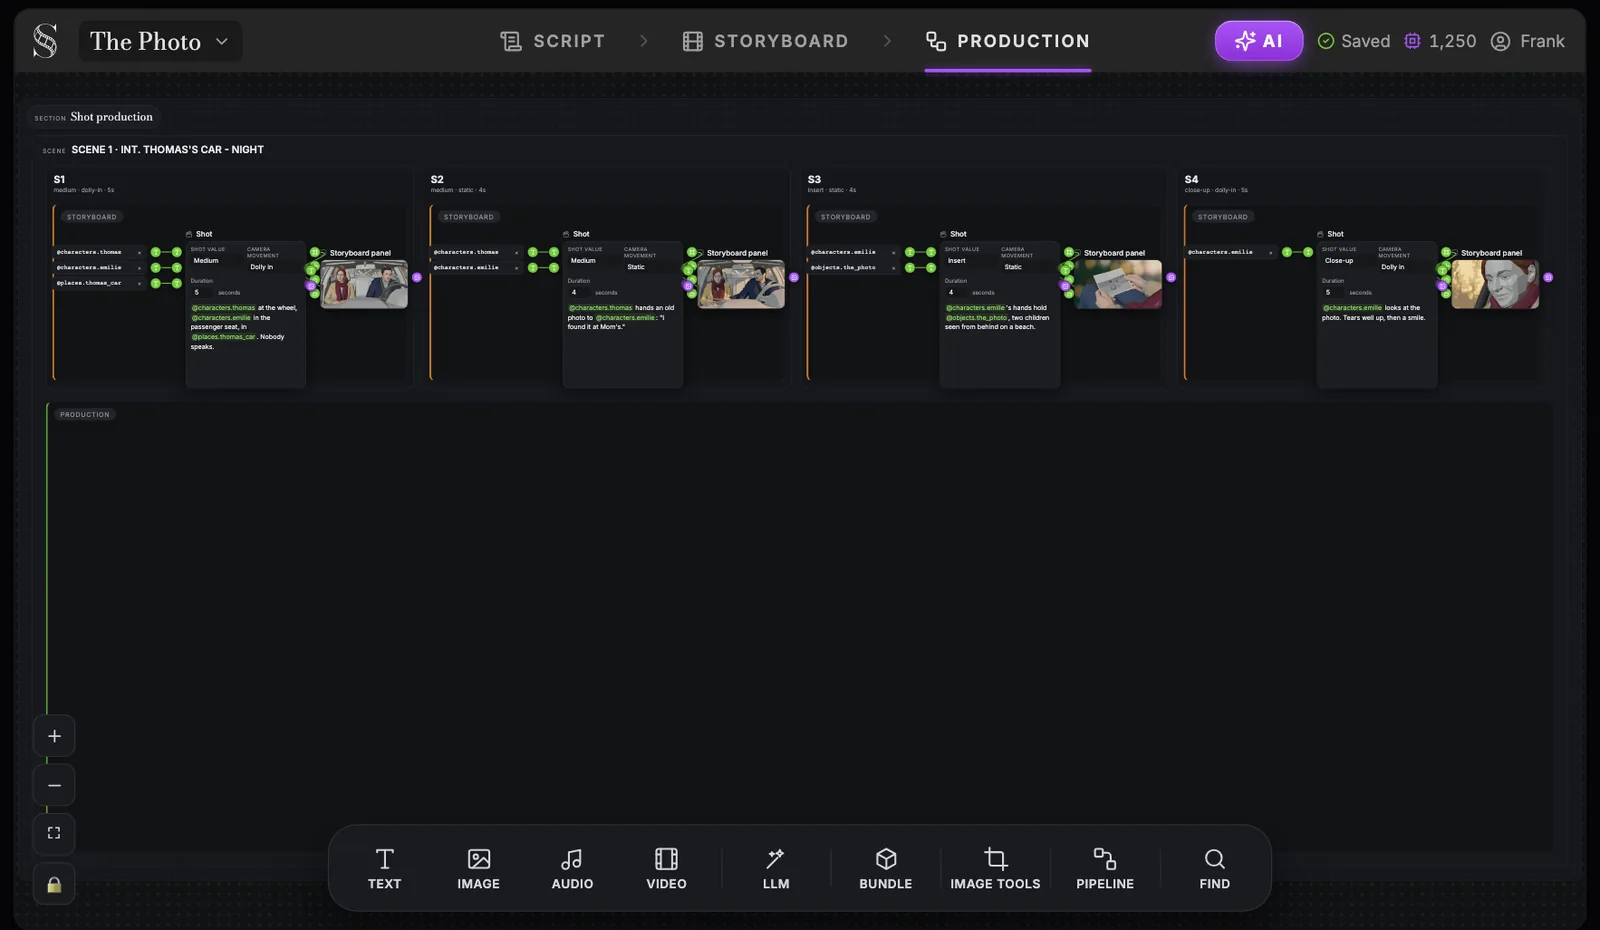
Swipe sideways to see the whole screen.
- 1Production tab. Opens this canvas. There is no guided tour here, so this reference is your map.
- 2Section. The top-level blocks of the canvas: "Artistic direction", "Characters", "Places", "Objects" and "Shot production". This one is Shot production.
- 3Scene group. One group per scene, named after its heading. Pipelines go here: "Pipelines can only be added to a scene's production group."
- 4Shot group. One group per shot ("Shot S{n}"), with a summary of shot value, camera movement and duration under its label.
- 5Entity references. Chips such as @characters.thomas that bring each entity's reference into the shot.
- 6Shot node. The shot's Shot value, Camera movement, Duration and Action, the data you composed in Storyboard.
- 7Storyboard panel. The storyboard image of the shot, brought over from the Storyboard tab.
- 8Production group. The production stage of the scene, where the "Shot production" image nodes and your video nodes live. This is where final frames are made.
- 9Text. Adds a text node, for notes, descriptions or prompt pieces you cite with @handles.
- 10Image. "Add image node": upload a picture or generate one with an image model.
- 11Audio. Adds an audio node, for a voice or a sound you want next to the shots.
- 12Video. "Add video node": generates a clip from a prompt, a start frame, an end frame or reference images.
- 13LLM. "Add LLM node": Gemini 3.8 Flash or Mistral Large 4, with a thinking level (Minimal, Low, Medium, High) and references sent as "Attach media" or "Names only". Use it to write or rewrite prompts from other nodes.
- 14Bundle. "Add media bundler": gathers media so you can get them all at once with "Download ZIP".
- 15Image tools. "Image tools" adds Crop and Camera angle as canvas nodes. The Tools group also has "Video tools" with Upscale (Topaz models, 1080p or 4k).
- 16Pipeline. "Add pipeline": adds "Reference to video" or "Storyboard panels to video" to a scene, built for the shots you choose.
- 17Find. Searches the canvas groups so you can jump to a scene or a shot on a big project.
- 18Zoom, fit and lock. + and - zoom, the frame icon fits everything in view, and the padlock locks the canvas against accidental edits. Scrolling pans, pinch or Cmd/Ctrl + scroll zooms, Space + drag pans, and Shift, Cmd or Ctrl + click selects several nodes.
Zoom out and read from top to bottom. The sections follow the order of the work: "Artistic direction", then "Characters", "Places" and "Objects", then "Shot production", organised by scene. Respect that order and most consistency problems never happen.
Artistic direction: one source for the look
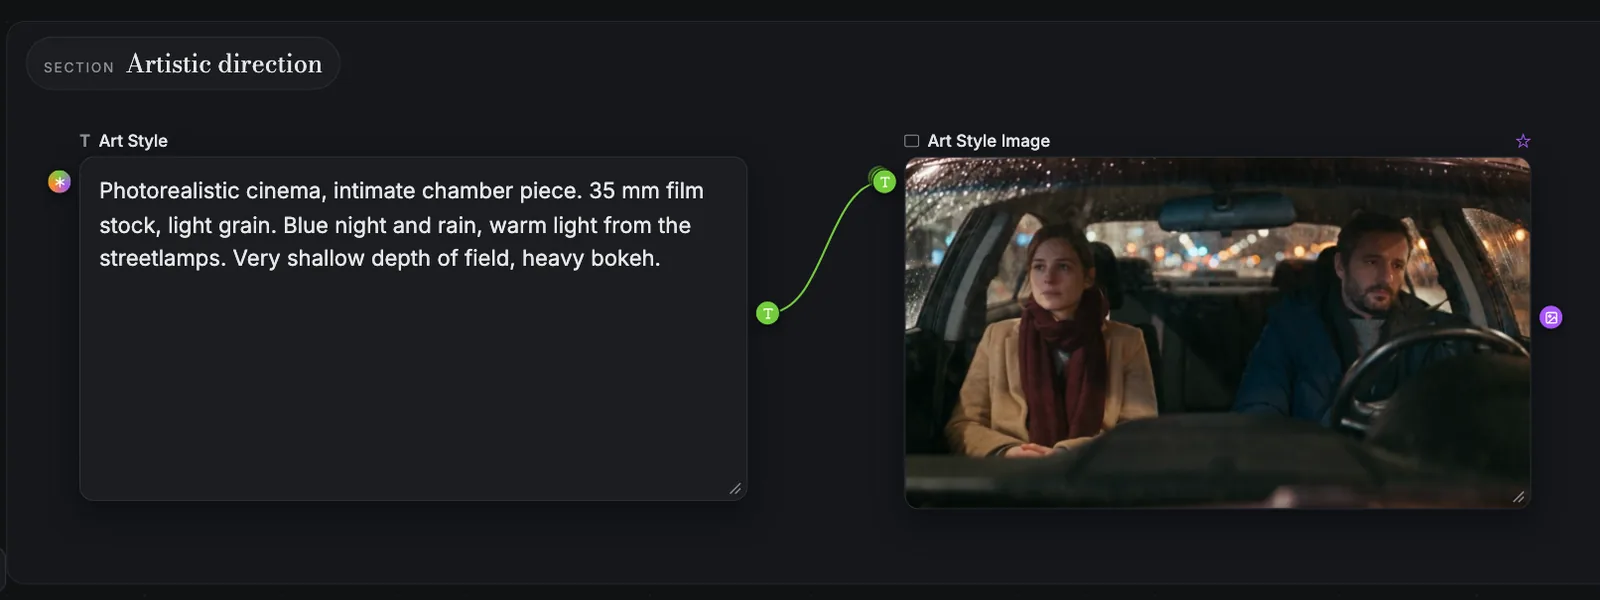
The "Artistic direction" section holds two nodes. "Art Style" is a text node that describes the look of the film in words; a new project starts with "Photorealistic standard cinema movie…". "Art Style Image" is an image node fed by that text through a green wire. Together they are the single source of style: the production references of your characters, places and objects read them, and so does every shot that cites them. Change the art direction and the film follows.
Swipe sideways to see the whole screen.
- 1Artistic direction section. The section at the top of the production canvas. The production references of your characters, places and objects cite it through @art_direction handles.
- 2Art Style. The text that defines the look (default "Photorealistic standard cinema movie…"). Describe medium, film stock, palette, light and lens, as a cinematographer would.
- 3Art Style Image. An image that shows the look, generated from the Art Style text or uploaded. It shows the models the style, often more precisely than words.
- 4Connection. The wire that sends the Art Style text into the image. Change the text and the image warns "Inputs changed since last run" until you generate again.
- 5Output port. The image's output, cited in production prompts as @art_direction.art_style_image.
Write it like a note from a director of photography: medium, film stock or rendering, palette, light logic, depth of field. Every phrase should be checkable against a frame.
Photorealistic cinema, intimate chamber piece. 35 mm film stock, light grain. Blue night and rain, warm light from the streetlamps. Very shallow depth of field, heavy bokeh.
Characters, places and objects: the production references
Below the art direction, each story element has its group, with the same three stages you met in the Script tab: Moodboard, Storyboard and Production. The new piece here is the "Production reference": the same character, place or object re-rendered in the film's final style. It is already linked to the element's description, with the two art direction nodes plugged into it, so there is nothing to wire.
You generate each Production reference once. Every shot then calls it by its handle, like @characters.thomas, which keeps a face, a coat or a car identical from first shot to last. Both pipelines need these sheets, so this step is not optional. If a sheet looks wrong, fix the description first: see reference sheets for consistent characters.
Shot production: scene groups and shot groups
The "Shot production" section has one group per scene, titled with its scene heading. Inside, each shot from your storyboard has its own shot group, labelled like S1, with a summary line such as medium, dolly in, 5s.
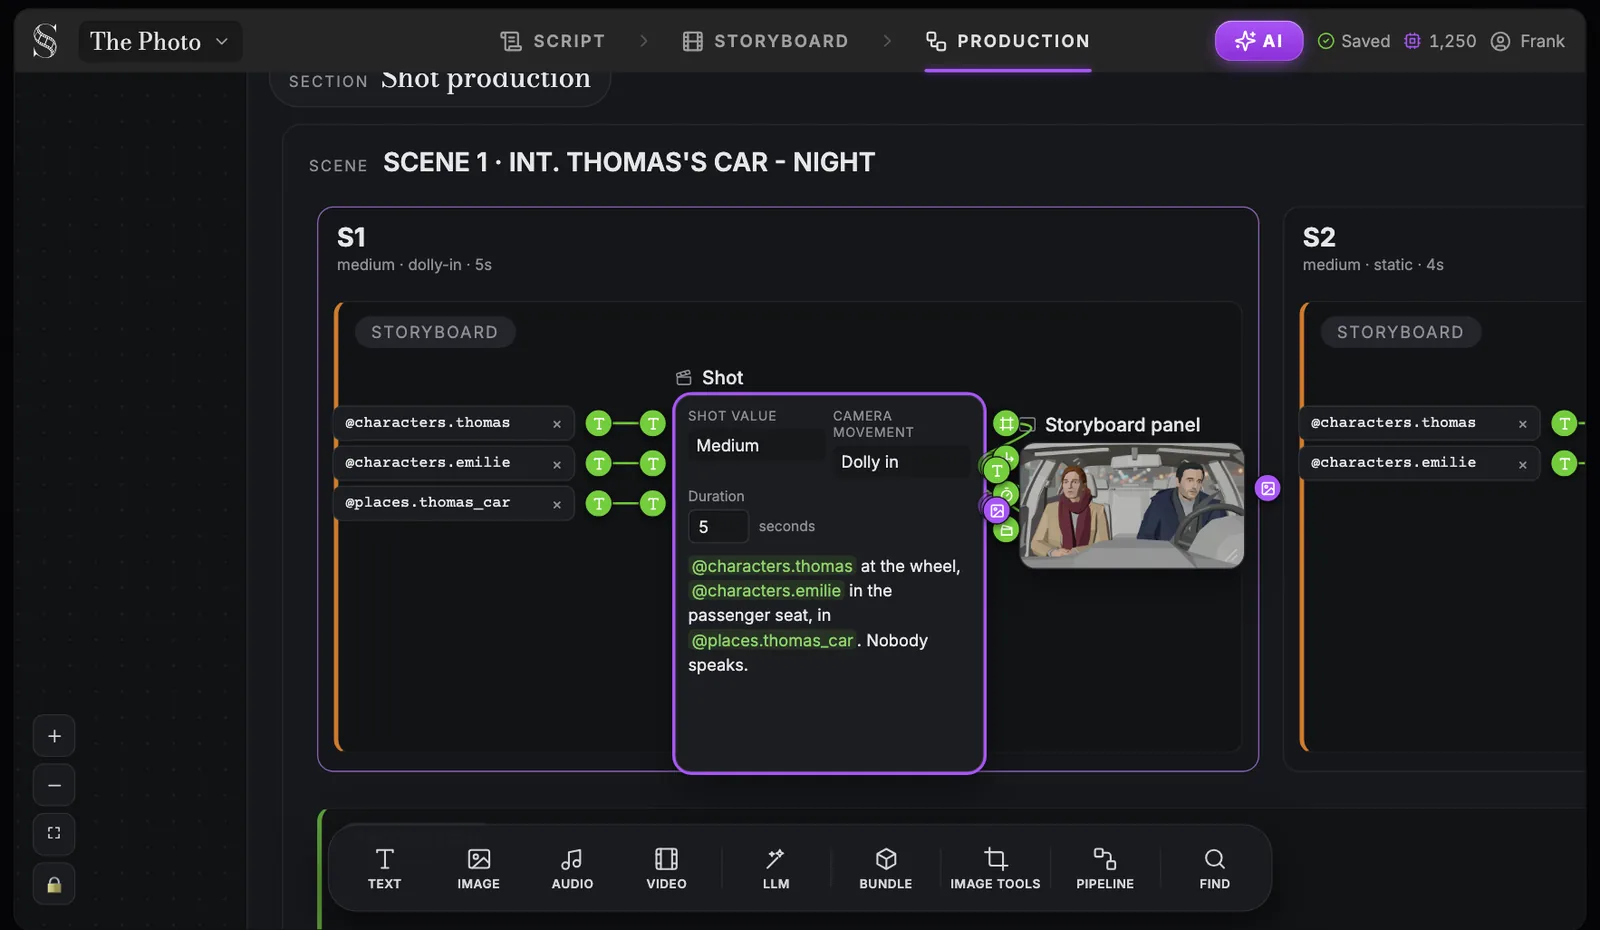
Swipe sideways to see the whole screen.
- 1Scene group. The scene this shot belongs to (Scene 1 · INT. THOMAS'S CAR - NIGHT). Scene-level pipelines are added on its production group.
- 2Shot group. The group of one shot, named "Shot S{n}". Everything that produces this shot stays inside it.
- 3Shot summary. Shot value, camera movement and duration at a glance, so you can read the scene's coverage without opening each node.
- 4Storyboard group. The storyboard stage of the shot, holding its references, the Shot node and the panel.
- 5Entity references. The characters, places and objects cited in the action, each as a chip wired into the shot.
- 6Shot node. The shot's data. Its tooltip says "Managed prompt: edit shot value, camera movement, or action.": the prompt is built from these fields, so you edit them rather than a raw prompt.
- 7Shot value. The framing chosen in the shot composer, from Extreme close-up (ECU) to Insert.
- 8Camera movement. The move of the shot, one of the 17 options from Static to Zoom out.
- 9Duration. The shot's length in seconds: 4 by default, from 0.5 to 60. It matches the duration you drag on the storyboard sequencer.
- 10Action. The action text with its @references (@characters.thomas, @places.thomas_car). Keep the @handles: they tell the generation which reference to use.
- 11Storyboard panel. The panel generated in the Storyboard tab, kept beside the shot as the composition reference for its production image.
- Entity references (marker 5): the characters, places and objects the shot cites, already wired in.
- The Shot node (marker 6): the "Shot value", "Camera movement", duration and "Action" you set in the Storyboard tab. Duration is in seconds, 4 by default, from 0.5 to 60.
- The Storyboard panel (marker 11): the previz frame that locked framing and staging. It is a guide for composition, never for the final look.
Below the shot groups, every scene has a Production group (marker 8 on the wide view). It starts empty, and it is where video gets made: by hand, node by node, or with a pipeline that builds the chain for you. Pipelines can only be added to a scene's production group.
The toolbar: every node you can add
To add a node, click its tile, then click inside a group to drop it there. Escape cancels the placement.
- Text: a prompt, a style note, a description. Its output plugs into any text port.
- Image ("Add image node"): generate from a prompt and references, or upload your own image.
- Audio: brings in an audio file you upload. It is an input, not a sound generator.
- Video ("Add video node"): its mode depends on what you wire into it.
- LLM ("Add LLM node"): text work with "Gemini 3.8 Flash" or "Mistral Large 4".
- Bundle ("Add media bundler"): gathers your takes and downloads them with "Download ZIP".
- "Image tools": Crop and Camera angle on an existing image. "Video tools": Upscale.
- Pipeline ("Add pipeline"): a ready-made chain for a whole scene.
- Find: search the groups of a large canvas.
The next two modules go deep on these: generate images and videos and scene pipelines.
Move around a big canvas
- Scroll pans the canvas. Hold Space and drag to pan as well.
- Pinch, or Cmd/Ctrl + scroll, zooms. The buttons at the bottom left zoom, fit the view and lock the canvas.
- Shift, Cmd or Ctrl + click selects several nodes. Dragging on empty space draws a selection box.
- Cmd/Ctrl + C, X and V copy, cut and paste nodes.
Safety nets before you spend credits
Change an upstream node, a description or the art direction, and every node whose inputs moved shows the orange banner "Inputs changed since last run". You decide what to regenerate instead of guessing which clips still match. Re-run upstream first: references, then images, then video.
LLM, Image and Video nodes also have "Show what the model receives". It swaps the editable prompt for the exact text and references the model gets; "Back to editable prompt" returns. Half of the strange results are explained right there.
Do it now
Practice in ScreenWeaver
- 1Open the Production tab of your project and zoom out until you see every section.
- 2Rewrite the Art Style text with filmable properties only, then generate the Art Style Image until you approve it.
- 3Generate the Production reference of each character, place and object used in your first scene.
- 4Open the first shot group of that scene and check its Shot node against your storyboard.
- 5Drop a Text node inside the scene's Production group to practise placement.
Watch the video lessons
Questions about this step
Do I have to wire the production canvas myself?
No. The Production tab is built from your storyboard, with the art direction, story elements and every shot already connected. You only add nodes by hand when you want to.
Where do I change the visual style of my whole film?
In the Artistic direction section, with the Art Style text and the Art Style Image. Production references and shots read them, and the nodes that need a new run show the "Inputs changed since last run" banner.
Why does my production image not look like my storyboard panel?
On purpose. The Storyboard panel only locks framing and staging; the look comes from the art direction and the production references.
Where do I generate the video of a scene?
In the scene's Production group, below its shot groups. Add Image and Video nodes by hand, or click Pipeline to build a whole-scene chain, as shown in scene pipelines.
Is there a tutorial for the Production tab?
The app's guided tours cover Script and Storyboard only. This module and the interface reference cover Production.
More answers in the Academy FAQ and the button-by-button interface guide.