Scene pipelines in ScreenWeaver: Reference to video and Storyboard panels to video
Add a pipeline to a scene so one video node shoots several shots in a single clip, with the same faces and the same light.
Chapters (10)
Video: lesson 5.3 of the free AI Filmmaking Course.
Why shoot the scene, not the shots
A video model has no memory between generations. Shot by shot, a scarf changes colour or a hand jumps across the cut. Recent models such as Seedance 2.5 can cut between several framings inside one clip. Give them the whole scene at once and the faces, the light and the weather hold across the cuts.
A pipeline gathers that context for you: the shots of the scene, their action, and the production sheets of everything they cite. The result is one video file for the selected shots, with the cuts baked in. It is not a finished edit; think of it as a take of the whole scene that you will cut later.
Before you add one
- The art direction is approved, and every character, place and object in the scene has its Production reference. Without those sheets, the model invents the faces.
- Each shot's "Action" says what the camera sees: who does what, with which object, and where they sit. Vague lines like they talk give the model nothing to stage.
- For Storyboard panels to video, every shot has a generated storyboard panel.
Step 1: Choose a pipeline
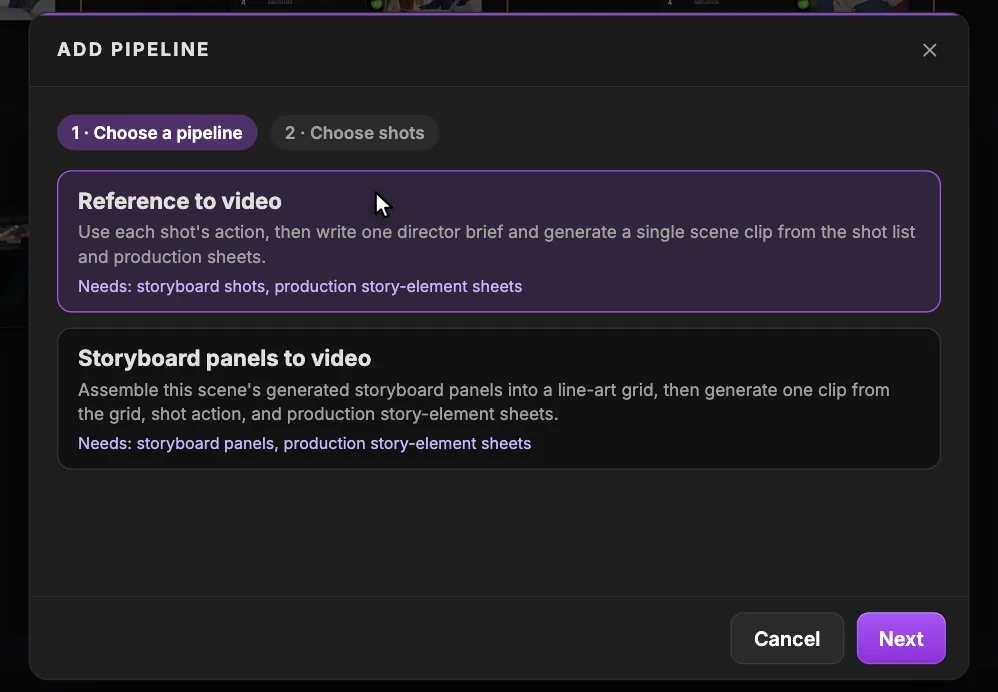
Click the "Add pipeline" button of the scene's production group ("Add a production pipeline to this scene"), or click the Pipeline tile in the toolbar and then click inside that group. Pipelines can only be added to a scene's production group. The window opens on "Choose a pipeline".
Swipe sideways to see the whole screen.
- 11. Choose a pipeline. Step 1: pick the template. Two exist today.
- 22. Choose shots. Step 2: tick the shots of the scene the clip will cover.
- 3Reference to video. "Use each shot's action, then write one director brief and generate a single scene clip from the shot list and production sheets." It builds a "Prompt director" LLM node (in Names-only mode) feeding a "Scene video" node.
- 4What it needs. What must exist first: here storyboard shots and production story-element sheets. Generate the sheets before you run, or the clip has nothing to keep your characters consistent with.
- 5Storyboard panels to video. Assembles the scene's generated storyboard panels into a line-art grid ("Storyboard grid"), then a "Prompt director" and a "Scene video". Up to 14 panels; choose it when the composition of your panels must drive the clip.
- 6Next. Goes to step 2, Choose shots.
- "Reference to video": "Use each shot's action, then write one director brief and generate a single scene clip from the shot list and production sheets." It needs storyboard shots and production story-element sheets.
- "Storyboard panels to video": it assembles the scene's generated storyboard panels into a line-art grid, then generates one clip from the grid, the shot action and the production story-element sheets. It needs storyboard panels and production story-element sheets.
Read the Needs line (marker 4) before you choose, then click Next.
Step 2: Choose shots and watch the duration
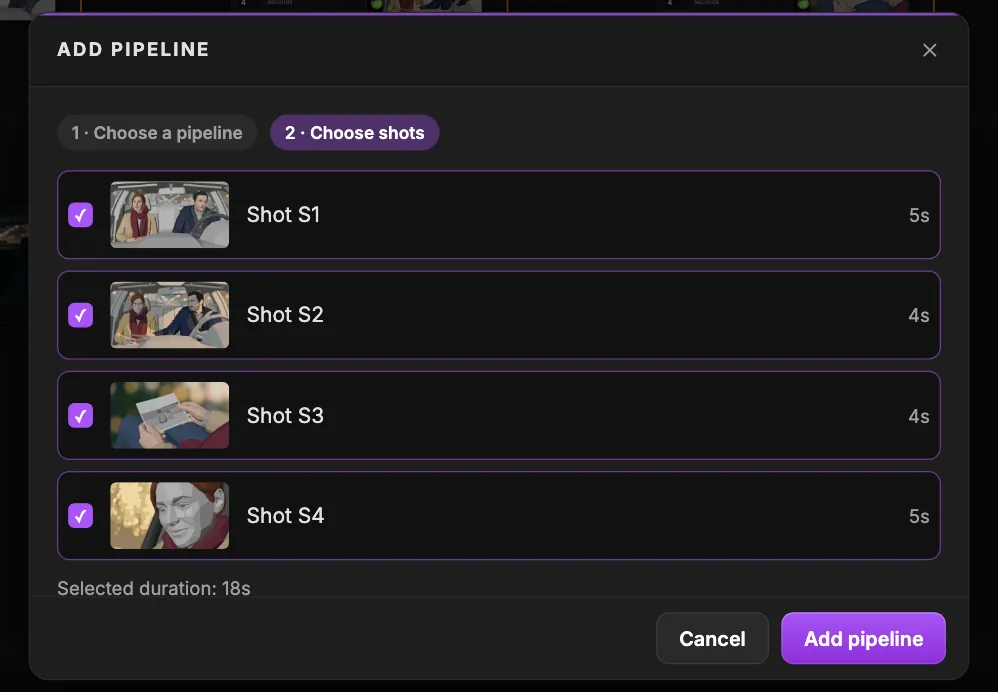
Swipe sideways to see the whole screen.
- 12. Choose shots. The current step; "Back" returns to the choice of pipeline.
- 2Include this shot. Tick or untick a shot to include it in the scene clip. A shot that already belongs to another pipeline is marked "Already in a pipeline".
- 3Shot. The shot's label and storyboard thumbnail; a shot without one shows "No storyboard panel yet". You can still add the pipeline and generate the missing panels afterwards.
- 4Shot duration. The shot's duration from the storyboard.
- 5Selected duration. The total of the ticked shots. If it exceeds what the model can generate, the dialog warns you and suggests adding a second pipeline for the remaining shots.
- 6Add pipeline. Creates the pipeline's nodes, wired, in the scene's production group.
Every shot of the scene is listed with its thumbnail and its duration. Shots that are not in a pipeline yet are ticked by default; a shot already used by another pipeline is marked as such and left unticked, so tick it yourself when you want to compare two pipelines on the same shots. Untick the ones to leave out. "Selected duration" (marker 5) adds up what is ticked, and that sum becomes the clip length, kept inside the model's limits. With Seedance 2.5, a clip runs from 4 to 30 seconds: below 4 it is raised to 4, above 30 it is capped and your shots get squeezed.
Click "Add pipeline". The nodes appear in the production group, already wired.
What Reference to video builds
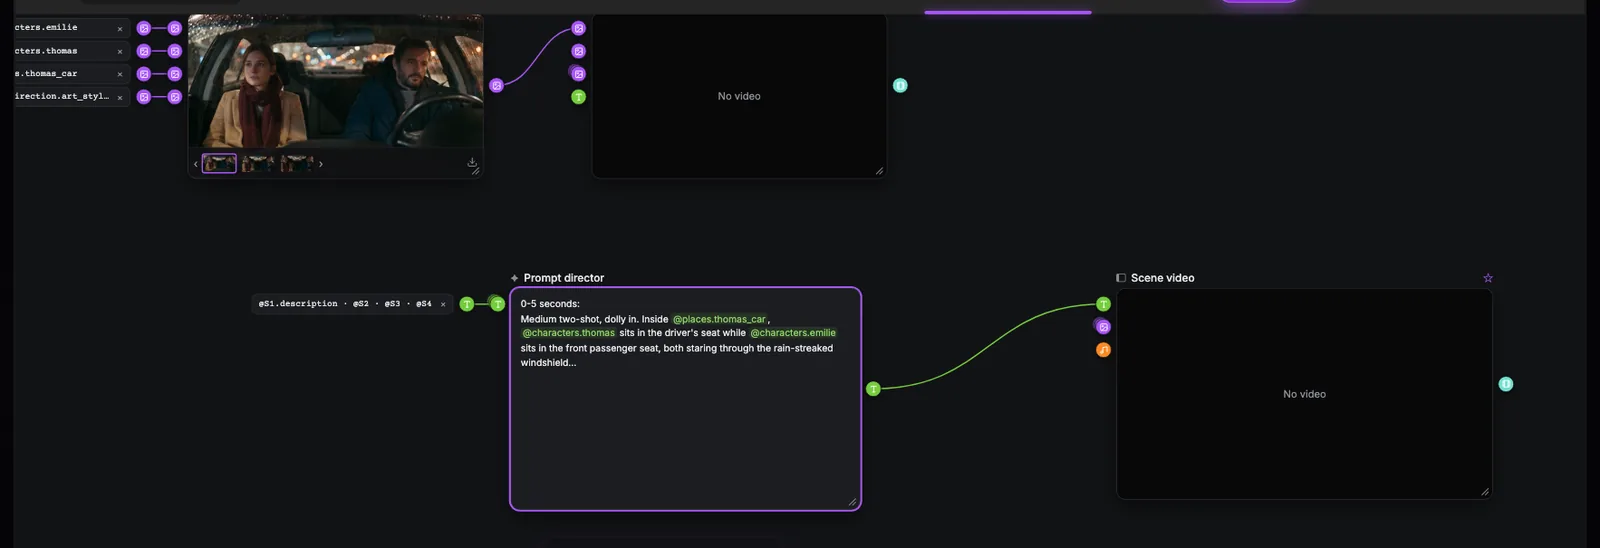
Swipe sideways to see the whole screen.
- 1Shot actions. The actions of the selected shots, cited as handles (@S1.description and the others) and wired into the director as text.
- 2Prompt director. An LLM node in "Names only" mode: it reads the shot list and writes one director brief, timed shot by shot. Read and edit the brief before you spend credits on the clip.
- 3Brief to video. The wire that sends the brief into the Scene video prompt. Change the director's text and the video warns "Inputs changed since last run".
- 4Scene video. A video node that generates one clip for the selected shots. Choose its model, resolution and duration like any video node.
- 5Single-shot nodes. The image and video nodes of a single shot. Keep them for shots that need their own clip, a precise start frame or a retake outside the scene clip.
Two nodes. The "Prompt director" is an LLM node that receives the action text of each selected shot (marker 1) and writes one time-coded staging for the whole scene (marker 2). It runs in "Names only" mode: it sees the names of your characters, places and objects, not their pictures, so it writes @characters.emilie instead of describing her again. The "Scene video" node (marker 4) receives that brief, and each element your shots cite is attached to it as its production sheet.
Note what it does not use: your storyboard panels. The model stages the scene from your words and your references, and chooses the framings itself.
Like any LLM node, the Prompt director offers "Gemini 3.8 Flash" or "Mistral Large 4" and a thinking level (Minimal, Low, Medium or High). Hand-made nodes can sit beside it in the same group (marker 5).
What Storyboard panels to video adds
This pipeline adds a "Storyboard grid" image node before the Prompt director. It assembles the panels of the selected shots, up to 14, in reading order: four panels make two rows of two. Run the grid by hand, check that every panel is there and in order, then go on.
The Scene video node receives the grid as its first image, with an instruction to use it for shot order and composition only, together with the Art Style text and image and the production sheets. The faces come from the sheets and the look from the art direction, so the grey previz style stays out of the film.
Generate, then judge the clip
- 1If you used Storyboard panels to video, run the Storyboard grid and check it.
- 2Run the Prompt director and read its staging. Correct it in plain words.
- 3On the Scene video node, open "Show what the model receives". The Asset Bindings say which picture is which. If a character is missing there, the model will invent them.
- 4Set the model, resolution and audio, then Generate. Draft at 480p first if you use Seedance 2.5.
- 5Watch the clip three times: once for identity, once for the order of the beats, once for the cuts.
Changed a shot, an action or a sheet? The orange "Inputs changed since last run" banner marks what is out of date. Re-run upstream first: the grid, then the Prompt director, then the Scene video.
Which pipeline, when
- Reference to video: quiet scenes, dialogue, performance. Your action lines are strong and you want the model free on framing.
- Storyboard panels to video: an insert that must come third, a reveal, a strict shot order. Your framing has to be respected shot by shot.
Do it now
Practice in ScreenWeaver
- 1Pick a short scene with one location and two or three shots, and check that every cited element has its Production reference.
- 2Add a Reference to video pipeline with all its shots and note the Selected duration.
- 3Read the Prompt director's staging and fix any missing beat before generating.
- 4Generate the Scene video as a 480p draft and watch it for identity, order and cuts.
- 5Add a Storyboard panels to video pipeline to the same scene and compare the two clips.
Watch the video lessons
Questions about this step
Can a pipeline give me each shot as a separate file?
No. Each pipeline delivers one clip for the shots you selected. Cut it in your editor like a take of the whole scene.
How long can a scene clip be?
With Seedance 2.5, from 4 to 30 seconds. The pipeline adds up the durations of the selected shots and keeps the total inside the model's limits, so split longer scenes into several pipelines.
Why can't I add a pipeline here?
Pipelines can only be added to a scene's production group, the group below the scene's shot groups. Click inside that group.
Does Reference to video use my storyboard panels?
No. It uses the action of each shot and the production sheets. Use Storyboard panels to video when the clip must follow your panels.
How many storyboard panels fit in the grid?
Up to 14. The grid guides shot order and composition only; the look comes from the art direction and the sheets.
My character looks wrong in the scene clip. Where do I look?
Open "Show what the model receives" on the Scene video node and check the Asset Bindings. If the sheet is there, fix the sheet or its description, as in reference sheets.
More answers in the Academy FAQ and the button-by-button interface guide.