How to fix an AI image without regenerating it: Edit with AI, Crop and Camera angle
Repair an almost-right image with Edit with AI, Crop or Camera angle instead of gambling on a new generation.
Chapters (10)
Video: lesson 5.4 of the free AI Filmmaking Course.
Diagnose before you reroll
You generated a frame you almost like: the faces are right, the light is right, one thing is off. A full regeneration is a gamble that can lose exactly what you liked. Name the failure first, then pick the tool that fixes only that.
- The frame is right, one detail is wrong (a prop, a gesture, a piece of costume): "Edit with AI".
- The angle is right but the frame is too loose: "Crop".
- You like the image but want another viewpoint on it: "Camera angle".
- The shot size is wrong: change "Shot value" and regenerate (compose a shot).
- The staging is wrong (who is where, what they do): rewrite the "Action" and regenerate.
- The face drifts in every shot: that is a sheet problem, fix it in reference sheets.
Open the image editor
In the shot composer, click "Edit with AI" next to the panel. On an entity card in the Storyboard tab, use "Edit image for {name}" to repair a reference sheet. Both open the "Edit image" window with three tools: "Edit with AI", "Crop" and "Camera angle".
Every result is "Saved as a new version of this image." The original stays, so trying a fix never destroys the panel you had. In the shot composer, "Previous" and "Next" step between versions.
Edit with AI: change one part of the frame
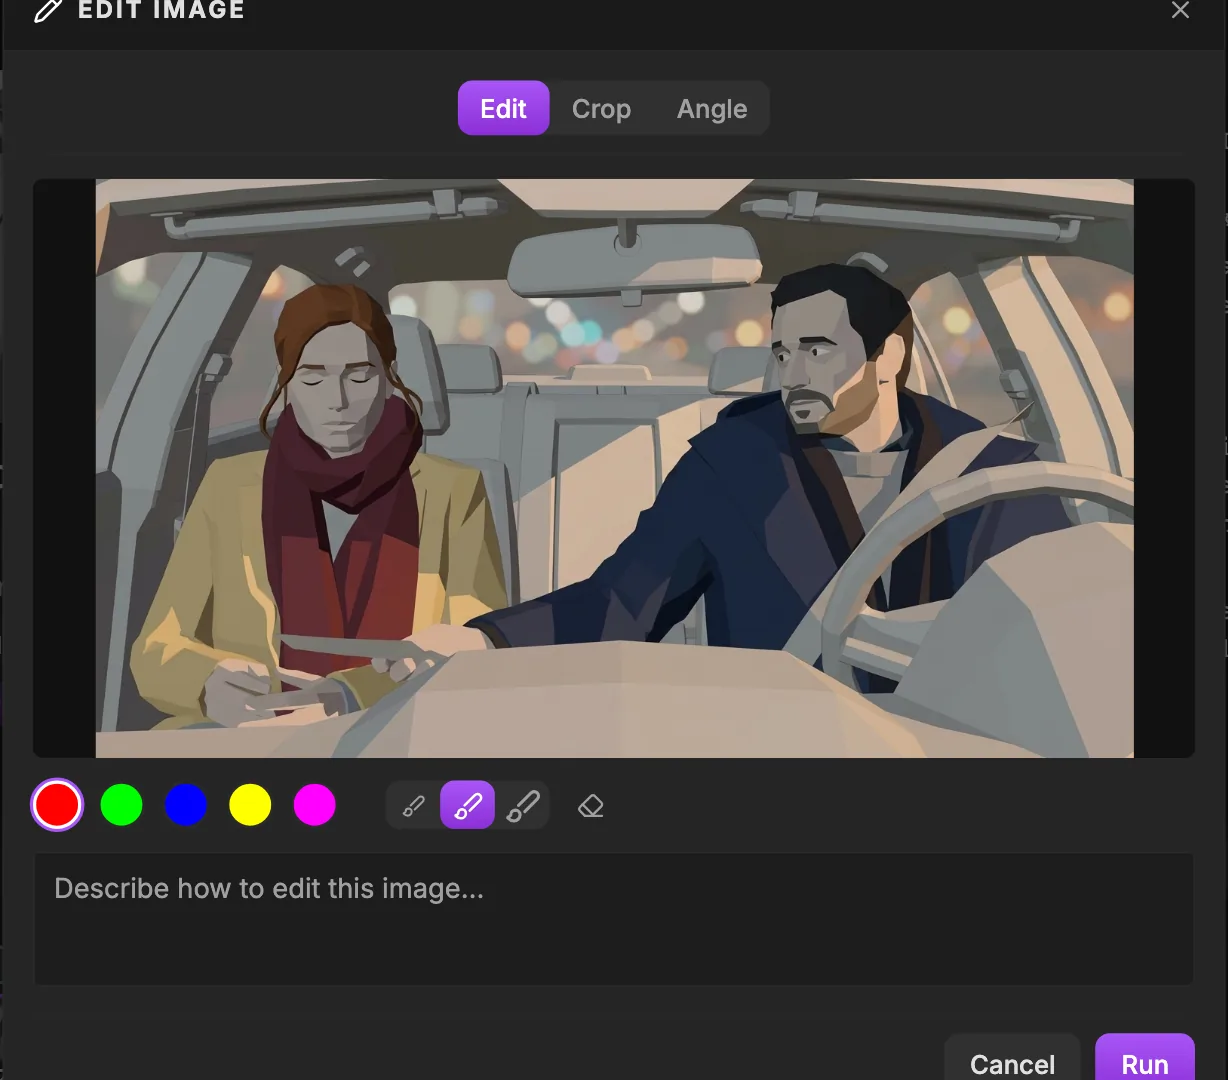
- 1Edit. The "Edit with AI" tool: brush strokes plus an "Edit prompt". It exists only here in the studio, not as a canvas node.
- 2Crop. Crops the image. Aspect options: Free, Source, 16:9, 9:16, 1:1, 4:3, 2.39:1 and Project, then "Reset" or "Apply crop".
- 3Angle. The "Camera angle" tool: move a camera on a 3D sphere around the subject, set the zoom, and generate the same image from a new viewpoint.
- 4Brush colors. Red, Green, Blue, Yellow and Magenta. Paint over the zone you want changed; with several zones, use one colour per zone and name the colour in your prompt.
- 5Brush size. Small, Medium or Large brush: small for a hand or a face detail, large for a whole background area.
- 6Clear strokes. "Clear strokes" erases everything you painted so you can mark the image again.
- 7Edit prompt. The "Edit prompt" (placeholder "Describe how to edit this image…"). Say what should change in the painted zone, short and concrete.
- 8Run. Runs the edit. Its credit cost shows in the tooltip, as on every AI button. "Cancel" closes without running.
- 1Pick a brush colour, Red, Green, Blue, Yellow or Magenta, whichever stands out best against your image.
- 2Pick a size: Small, Medium or Large.
- 3Paint only the area that should change. The tighter the area, the more of your frame survives. "Clear strokes" wipes them if you overshoot.
- 4In the "Edit prompt" field ("Describe how to edit this image…"), write what should be there, not what is wrong.
- 5Click "Run" (the tooltip shows the cost), then check the rest of the frame when the result comes back.
She holds a small old photo with a white border in both hands, resting on her lap.
Crop: reframe what you already have
Crop keeps part of the image instead of inventing a new one. Drag the frame to move it, pull the corner handle to resize it. The "Aspect" options are Free, Source, 16:9, 9:16, 1:1, 4:3, 2.39:1 and Project. "Reset" starts over, "Apply crop" saves the result.
Camera angle: move the camera around the subject
Instead of rewriting a prompt and hoping for a better angle, you take a panel you like and walk the camera around it, the way a cinematographer walks around the set. The model redraws the same scene from the new viewpoint, so characters, set and light carry over.
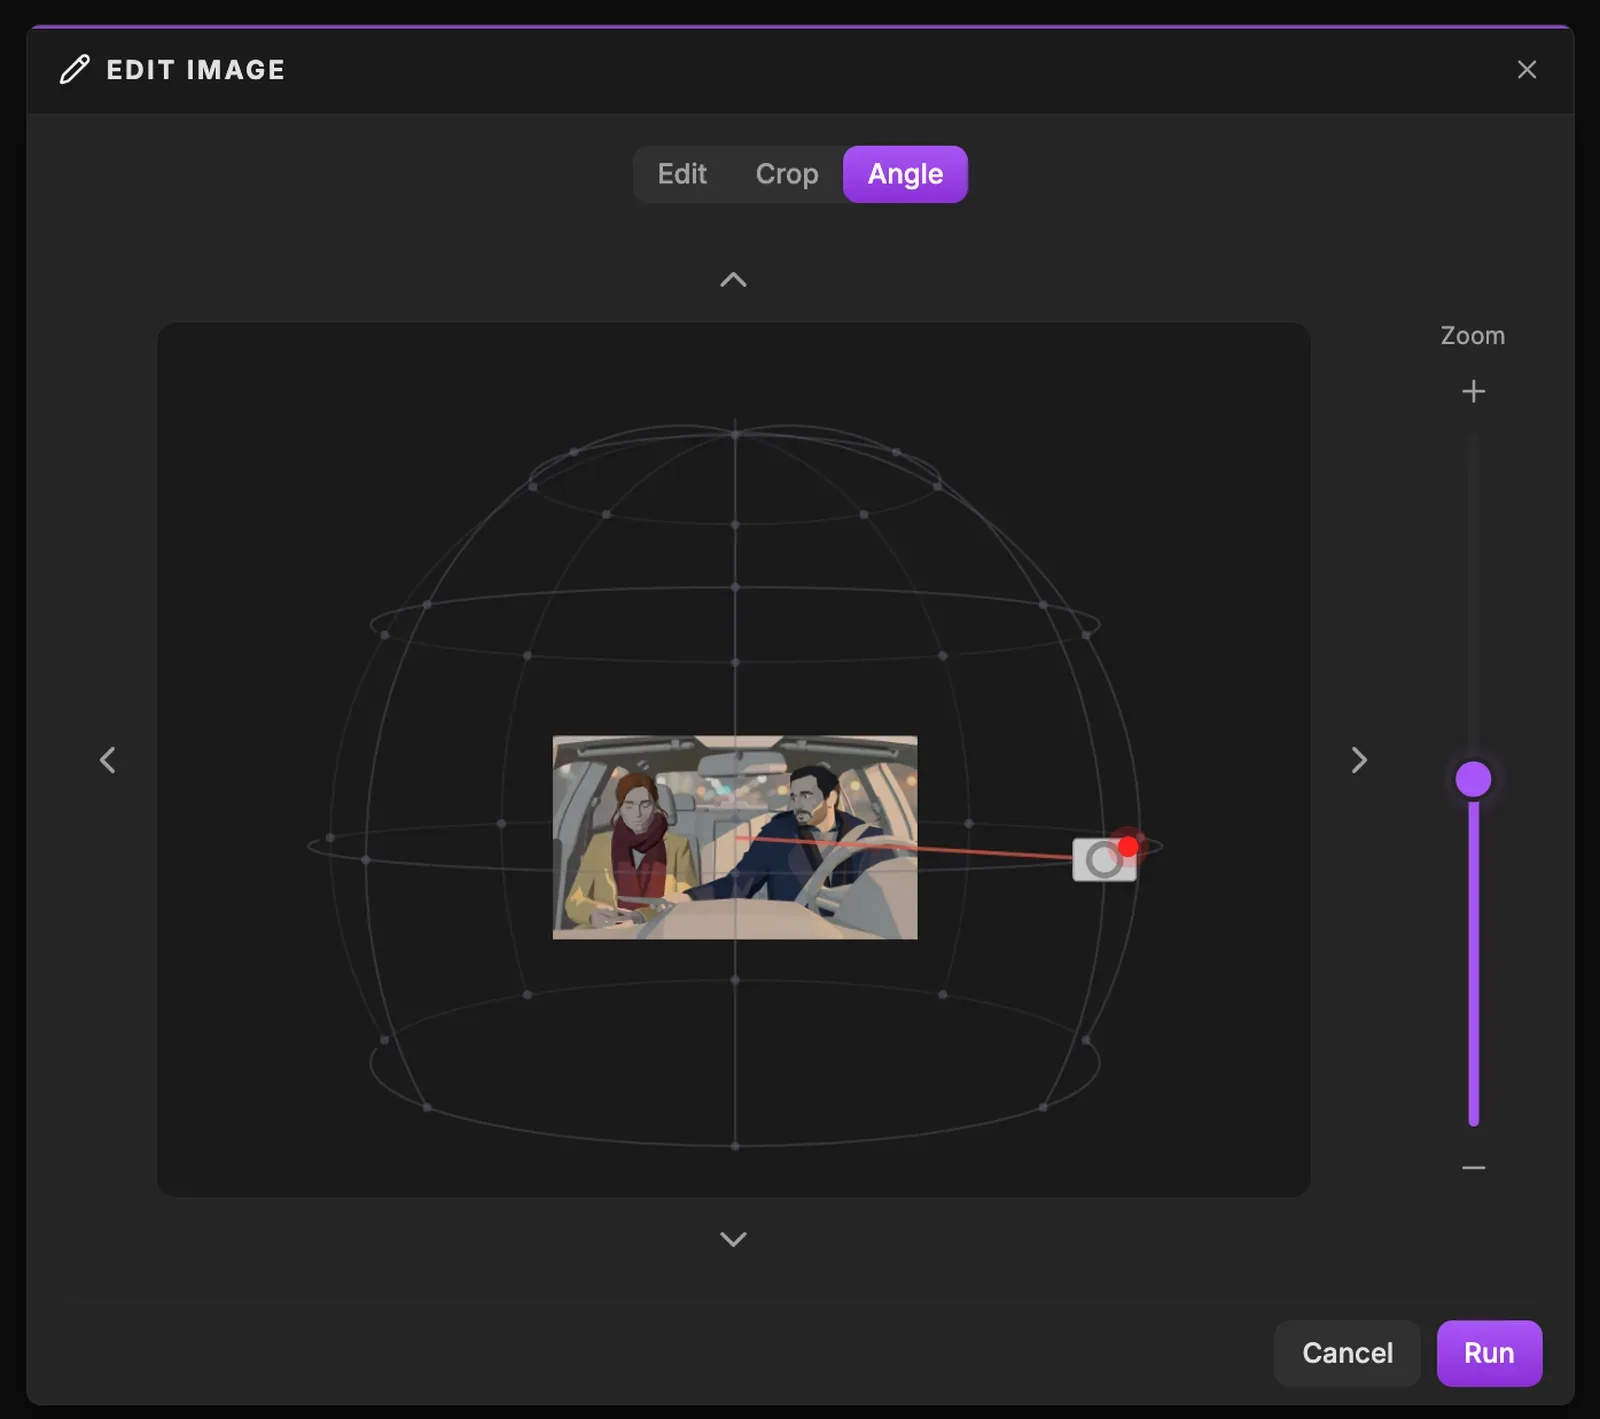
- 1Angle. Switches the window to the camera angle tool. The other tabs are "Edit" (Edit with AI) and "Crop".
- 2Source image. The image you are re-angling, at the centre of the sphere. Each run is "Saved as a new version of this image.", so the original stays available.
- 3Camera position. Where the new camera stands. Drag it around the sphere to pick the viewpoint; it snaps to set positions unless you tick "Free angle (disable snap)".
- 4Tilt up. Moves the camera 30 degrees higher on the sphere, toward a high angle that looks down on the subject. Click again to climb further.
- 5Tilt down. Moves the camera 30 degrees lower, toward a low angle that looks up at the subject and gives it weight.
- 6Rotate left. Turns the camera 45 degrees around the subject to the left. Four clicks take you from a front view to a back view.
- 7Rotate right. Turns the camera 45 degrees around the subject to the right, for a three-quarter view, a profile or a reverse angle.
- 8Zoom. Sets the framing of the new image, from wide to medium to close. Use + and - or drag the slider: the camera on the sphere moves closer or farther.
- 9Run. Generates the new angle and saves it as a new version of the image. Like every AI button, its credit cost shows in the tooltip. "Cancel" closes without running.
- "Rotate left" and "Rotate right" orbit the camera around the subject in 45 degree steps.
- "Tilt up" and "Tilt down" move it between heights, from below eye level to looking down.
- "Zoom" sets the distance: wide, medium or close.
- Positions snap so every run lands on a clean viewpoint. "Free angle (disable snap)" allows in-between positions.
Click "Run". The result is saved as a new version of the image.
The same tools in Production, and why stills come first
On the Production canvas, the "Image tools" tile places Crop and Camera angle as nodes, so you can reframe a production image without leaving the canvas. "Edit with AI" exists only in the image editor, not as a node. See the production canvas tour.
Fixing a still costs seconds, fixing a video costs a full generation. When a shot needs a precise first image, repair the still until it is right, then use it as the start frame or the panel for the video. Settle angles on the storyboard, where panels are cheap, and keep production tools for small corrections.
Full walkthrough with real results: how to change the camera angle of an AI image.
Do it now
Practice in ScreenWeaver
- 1Pick your weakest panel and write the diagnosis in one sentence: which tool, and why.
- 2Fix one detail with "Edit with AI": paint tightly, describe what should be there, run.
- 3Crop a loose two-shot into a single with the Project aspect.
- 4Try one small Camera angle move (one rotate step, nothing else), compare with "Previous", keep the best version.
Watch the video lessons
Questions about this step
Does editing an image overwrite the original?
No. Every result is saved as a new version of the image, and the original stays available.
Why did my new camera angle come out broken?
Usually the camera has nowhere real to stand, like a high or low angle inside a car. Try a smaller move, change one setting at a time, or regenerate with a different shot value.
Can AI change the camera angle of an existing image?
Yes. "Camera angle" orbits around the subject, changes height with Tilt up and Tilt down, and sets the distance with Zoom (wide, medium, close), then redraws the scene from there.
Which brush colour should I use in Edit with AI?
The one that stands out best against your image, so the area you mark is unmistakable. Paint only what should change.
Is it better to edit the image or regenerate the shot?
Edit when you like the image and one thing is off. Regenerate when the shot size or the staging is wrong: change the Shot value or the Action, then regenerate that shot alone.
Can I use Edit with AI on the Production canvas?
Not as a node. The canvas "Image tools" tile offers Crop and Camera angle; Edit with AI is only in the image editor.
More answers in the Academy FAQ and the button-by-button interface guide.