Tour of ScreenWeaver: the three tabs, the header and the sidebar
Find your way around ScreenWeaver in ten minutes: the three tabs, every icon in the header, the sidebar and the shortcuts.
Chapters (8)
Video: lesson 1.2 of the free Screenwriting Course.
One project, three tabs, in the order of a film
ScreenWeaver is laid out like a production. In the centre of the header you see three tabs, "Script", "Storyboard" and "Production", joined by chevrons. Together they form the "Production pipeline", and each one feeds the next: the storyboard reads your script, and the production canvas is built from your storyboard.
- "Script": write or import the screenplay, structure it in the outline, and create your characters, places and objects.
- "Storyboard": break every scene into shots, give each shot a size and a camera move, and draw a previz panel for it. Press play and it runs as an animatic.
- "Production": a node canvas, already wired from your storyboard, where you generate the final images and video clips.
Why this order matters: the script is the source of truth. A vague scene on the page gives a vague shot on screen, and fixing a sentence costs nothing while regenerating a video costs credits. Pros lock each step before moving to the next one.
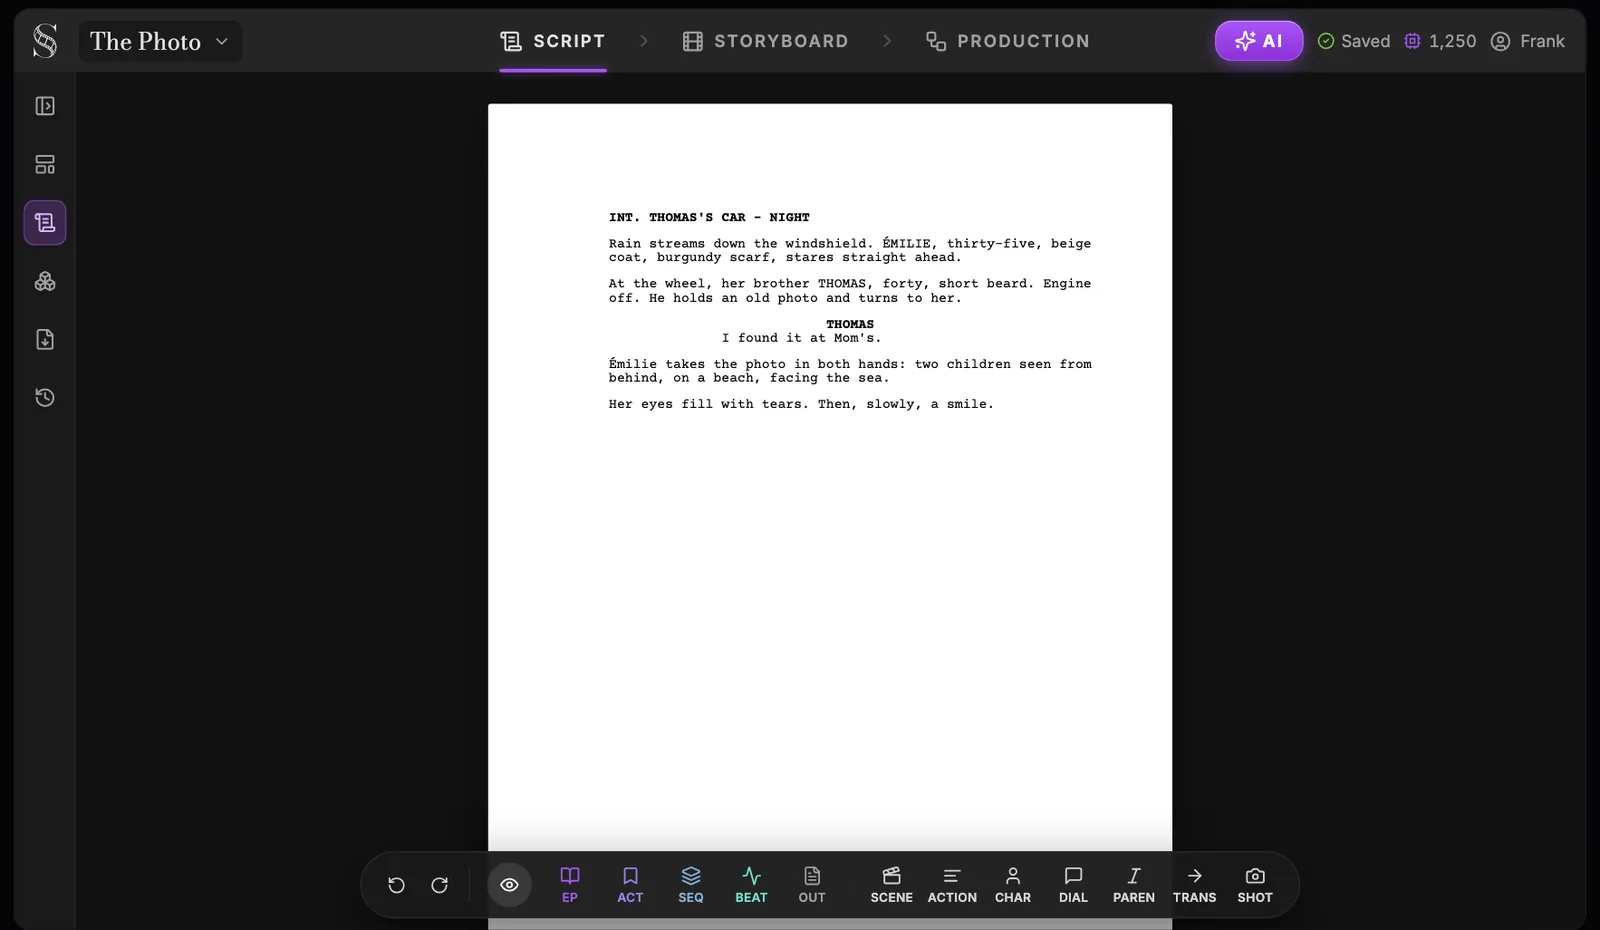
Swipe sideways to see the whole screen.
- 1Project menu. Shows the current project's title. Click it for "Project settings", "Team & Sharing", "Duplicate", "Delete", the "Switch project" list and "+ New Project".
- 2Script tab. Opens the screenplay editor you see here, the first step of the "Production pipeline". The left sidebar exists only in this tab.
- 3Storyboard tab. Turns your scenes into shots: entities panel, shot composer, a script viewer that follows the playhead, and the shot sequencer. Your first visit asks you to choose the project aspect ratio.
- 4Production tab. Opens the production canvas, where you set the artistic direction and generate final images, videos and scene pipelines. Go there once your storyboard tells the story.
- 5AI button. Opens the "AI Center" (tooltip "AI generations & assistant"): the Generations list on the left, the writing assistant on the right. A spinner and a count appear on it while generations are running.
- 6Save status. Reads "Saving...", "Saved", "Unsaved Changes" or "Offline". When you are offline, a banner tells you changes will sync automatically once you are back online. Cmd/Ctrl + S saves at any time.
- 7Credit balance. Your total credits. Click it ("View billing & credits") to open the billing screen with your balance, plans, packs and usage history. Guests and paused members do not see it.
- 8Account. Holds your organisation ("Switch organisation", "Create organisation", "Billing & credits", "Organisation settings", "Members") and your account ("Account settings", "Sign Out"). "Tutorial" and "Chat with us" live in the separate Help icon of the header.
- 9Collapse sidebar. Folds the sidebar to give the page more room; "Expand sidebar" brings it back. Cmd/Ctrl + . toggles it from the keyboard.
- 10Outline view. Shows the outline board above the page: title page or episode, acts, sequences, story beats and scenes as cards. Its eye icon shows or hides that pane, so you can restructure and write side by side.
- 11Script view. Shows or hides the screenplay page itself. Hide it to rework the structure on the outline cards alone, show it again to write.
- 12Story elements. Opens the canvas of your characters, places and objects, each with its Moodboard, Storyboard and Production stages. Visit it before you storyboard to write the descriptions that drive every reference sheet.
- 13Import / Export. Opens the window to export to "PDF", "FDX (Final Draft)" or "ScreenWeaver (Backup)" and to turn on auto-backup. Its Import tab explains that importing goes through the AI assistant.
- 14Version history. Lists the automatic checkpoints of your screenplay, what triggered each one, and lets you restore any of them. Editors only.
- 15The page. Your screenplay, formatted as you type. Enter creates the logical next element (Scene then Action, Character then Dialogue), Tab or Shift + Tab cycles the element type, Backspace at the start of a block merges it with the previous one, and autocomplete suggests scene prefixes, places, times of day and characters.
- 16Floating toolbar. Appears when a line has focus: "Undo", "Redo", the eye that shows or hides outline blocks, then the structure buttons (EP, ACT, SEQ, BEAT, OUT) and the element buttons (SCENE to SHOT). Click one to turn the current line into that type.
The header, from left to right
The header stays on screen in all three tabs. Learn it once and you will never hunt for a button again.
- 1The project menu (marker 1) shows the current project's title. Click it to open the project settings, share, duplicate, delete, switch project or create a new one.
- 2The three tabs (markers 2 to 4). The active tab is underlined.
- 3The "AI" button (marker 5), tooltip "AI generations & assistant". It opens the "AI Center", with the list of every generation on one side and the writing assistant on the other. While generations run, a spinner and a count appear on the button.
- 4The save status (marker 6): "Saving...", "Saved", "Unsaved Changes" or "Offline". There is no save button to think about, although Cmd/Ctrl + S forces a save.
- 5Presence avatars, when other people are in the project. Click one to jump to that person's cursor.
- 6The credit chip (marker 7), tooltip "View billing & credits". It shows your total credits and opens the billing window.
- 7The Help icon, tooltip "Help", with "Tutorial" (replays the guided tour) and "Chat with us" (opens the support chat).
- 8The Account icon (marker 8). Its first block is about your organisation: switch or create one, "Billing & credits", "Organisation settings" and "Members". Its second block holds your email, "Account settings" and "Sign Out".
The project menu
Everything that concerns the project as a whole lives behind its title, top left. You will use it on day one to create a project, and later to invite your team.
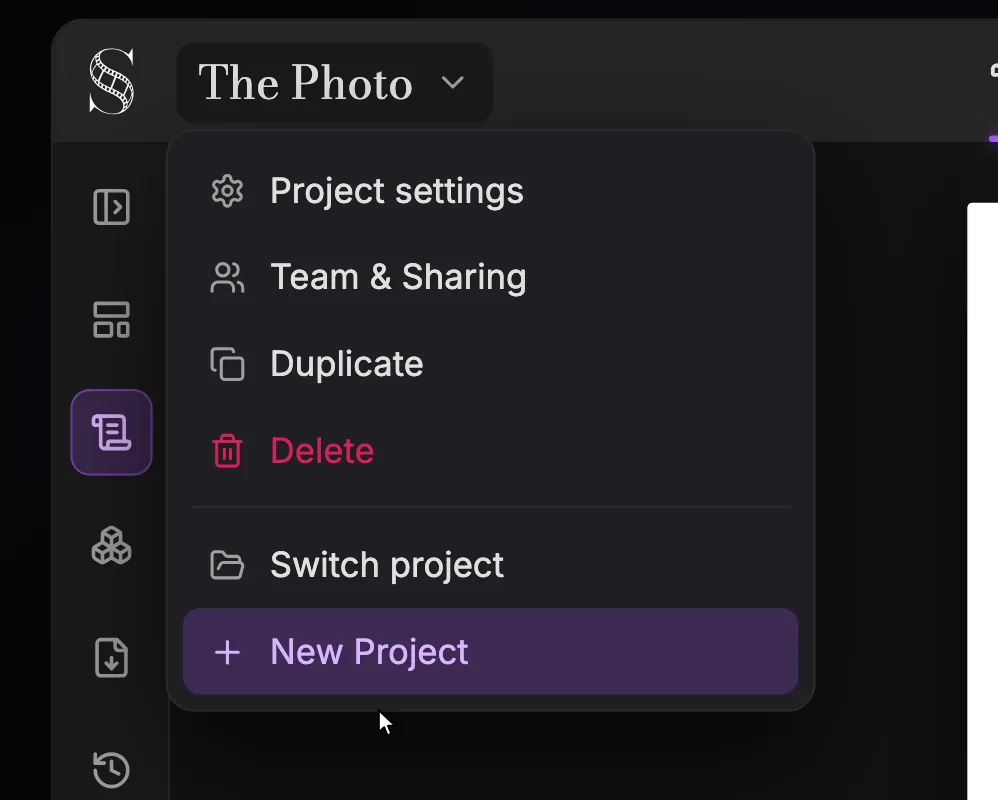
- 1Project menu. The current project's title. Click it to open or close this menu.
- 2Project settings. Edits the "Title", the "Format" and the default "Aspect ratio". Shown only if you can edit the project; owners of two or more organisations can also move the project to another organisation from here.
- 3Team & Sharing. Opens the "Share · {title}" dialog, where you give people a role: Owner, Editor, Viewer or Guest (a guest is set to "Can edit" or "Can view"). Collaboration needs the Studio plan; without it you see "Studio plan required" and "Upgrade to Studio".
- 4Duplicate. Makes a copy of the project ("Duplicating project…" while it runs). Duplicate before a risky rewrite, or to try a variant without touching the original.
- 5Delete. Deletes the project after the confirmation "Are you sure you want to delete this project?". Only owners see it; if in doubt, export a backup or duplicate first.
- 6Switch project. Lists your other projects (or "No other projects") so you can jump between them.
- 7New Project. Opens the "New project" dialog: a "Title", a "Format" ("Feature film" or "Episodical / TV"), then "Create project". The aspect ratio is asked later, on your first visit to Storyboard or Production.
- "Project settings": title, format and aspect ratio. Shown only if you can edit the project.
- "Team & Sharing": opens the share window to invite collaborators and set their role.
- "Duplicate": makes a copy of the project, handy before a risky experiment.
- "Delete": owners only, after a confirmation.
- "Switch project": jump to any other project you have access to.
- "+ New Project": start a new story. The next module walks you through it.
Shortcuts and canvas gestures worth learning today
- Cmd/Ctrl + . toggles the sidebar. Cmd/Ctrl + S saves.
- Cmd/Ctrl + Z undoes, Cmd/Ctrl + Shift + Z or Cmd/Ctrl + Y redoes, in the script and in the outline.
- Enter creates the next logical screenplay element, Tab and Shift + Tab cycle the element type.
- Space plays and pauses the storyboard sequencer.
- On the Story elements and Production canvases: scrolling pans, pinch or Cmd/Ctrl + scroll zooms, Space + drag pans, Shift, Cmd or Ctrl + click selects several nodes, dragging on empty space draws a selection box, and Cmd/Ctrl + C, X, V copies, cuts and pastes nodes.
Where to get help
A guided tour of the Script tab opens the first time you use ScreenWeaver, and a second tour opens on your first visit to the Storyboard tab. To replay it, open the Help icon and click "Tutorial" (some tour text mentions the profile menu, but the replay lives under Help). For a human answer, click "Chat with us" in the same menu.
Inside this Academy, the interface reference explains every numbered control, and the FAQ answers the questions users ask most. The ScreenWeaver guide gives the whole map on one page. Lost Garden, an AI anime series made by one person, Frank Houbre, was made in ScreenWeaver: the same app you are learning now.
Do it now
Practice in ScreenWeaver
- 1Open any project and hover each icon of the header to read its tooltip.
- 2Collapse and expand the sidebar with Cmd/Ctrl + . then open the Outline view and the Script view at the same time.
- 3Click the "AI" button and look at the two halves of the AI Center, then close it.
- 4Open the Help icon and replay the "Tutorial" once from start to finish.
- 5Click the Storyboard tab, then the Production tab, just to see where your script will travel next.
Watch the video lessons

Questions about this step
Why can't I see the sidebar in the Storyboard or Production tab?
The sidebar exists only in the Script tab. Storyboard has its own entities panel, shot composer and sequencer, and Production is a full-screen canvas.
Do I need to save my work?
No. ScreenWeaver saves as you type and the header shows "Saving..." then "Saved". Cmd/Ctrl + S forces a save if you want to be sure.
How do I replay the onboarding tour?
Open the Help icon in the header and click "Tutorial". The Storyboard tour opens on its own the first time you visit that tab.
What does the number next to the chip icon mean?
It is your total credit balance. Click it to open billing and credits; see credits and plans for what costs credits.
Where is the Share button?
There is no share button in the header. Open the project menu and click "Team & Sharing"; see work as a team.
Can I use ScreenWeaver in French?
Yes. The app exists in English and French, and the language selector is in Account settings and on the login screen.
More answers in the Academy FAQ and the button-by-button interface guide.