Import a script, export to PDF or Final Draft, and restore any version in ScreenWeaver
Bring an existing script in with the assistant, send it out as PDF, FDX or a full backup, and go back to any earlier draft.
Chapters (7)
Video: lesson 4.4 of the free Screenwriting Course.
Import an existing script with the assistant
Already have a draft? You do not retype it. Open "Import / Export" in the sidebar and click the "Import" tab: it explains that importing goes through the AI assistant. The assistant reads your file, recognises scene headings, action, characters and dialogue, and writes them into the editor as real screenplay elements.
- 1Click "AI" in the header to open the AI Center.
- 2Click the paperclip in the message box, or drag and drop the file into the conversation. The paperclip accepts PDF, Final Draft (.fdx), Fountain, WriterDuet JSON, plain text and images, up to 15 MB.
- 3Type "Import this script" and send.
- 4The assistant lists each step it takes, such as "Read an attached file", "Previewed the import" and "Imported a file".
- 5Close the AI Center and read your script.
Swipe sideways to see the whole screen.
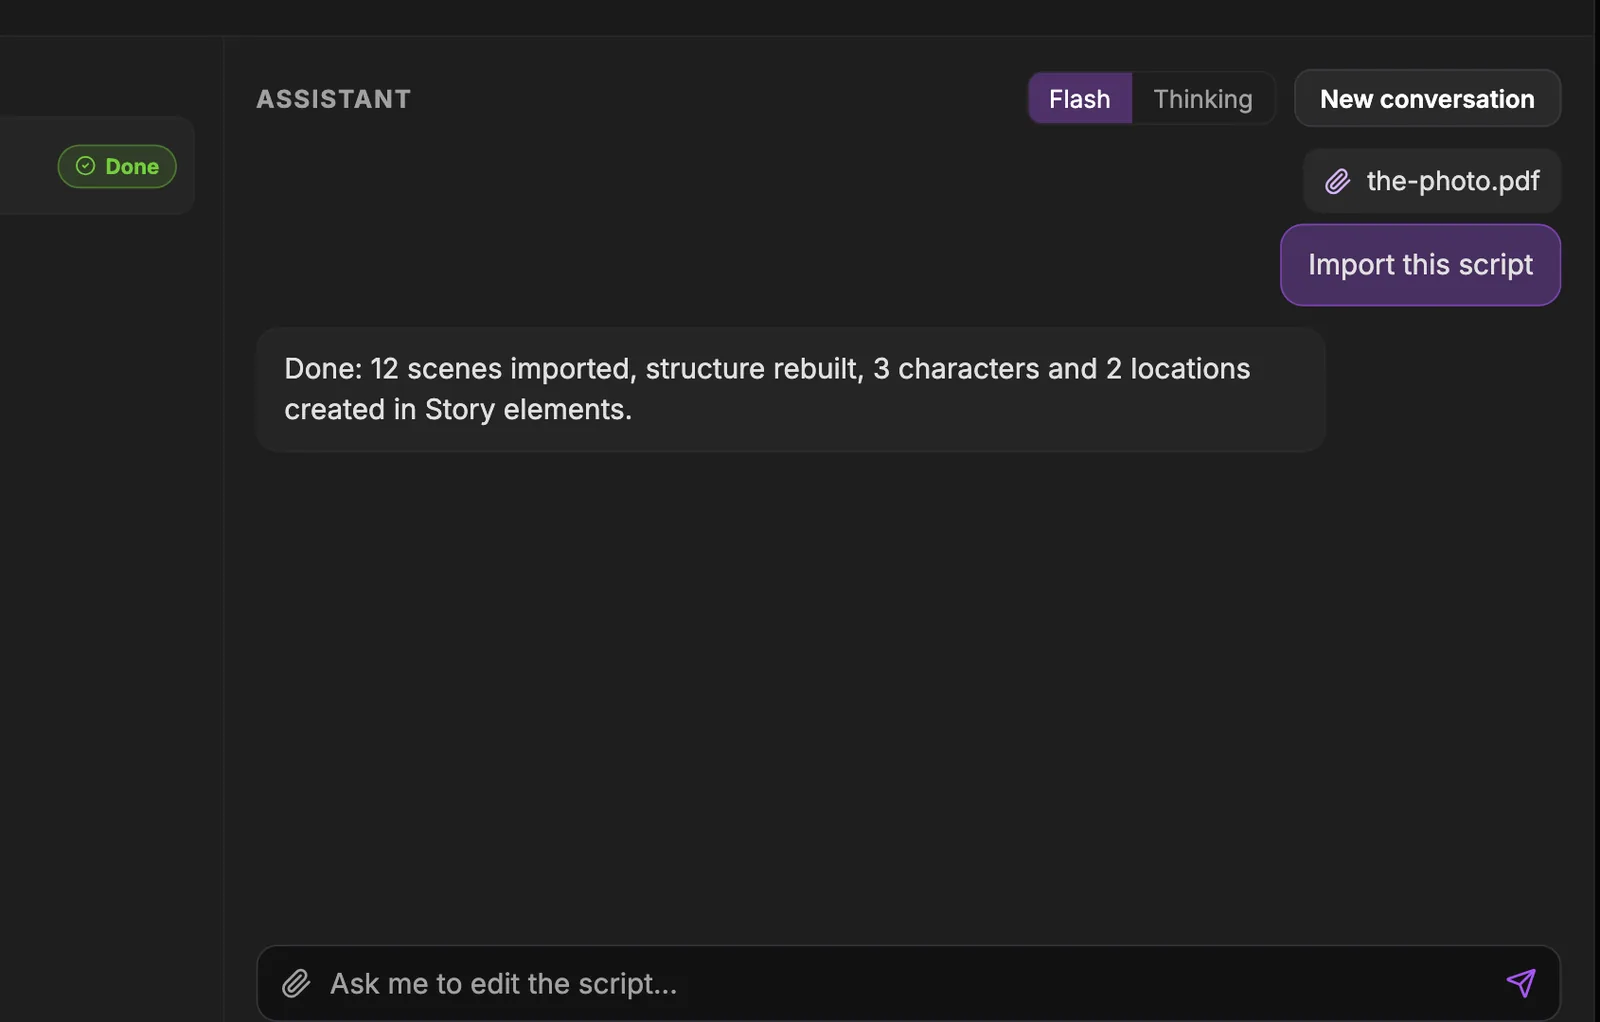
- 1Attached script. The file you attached with the paperclip or by drag and drop. Supported: PDF screenplays, Final Draft (.fdx), WriterDuet JSON, Fountain, plain text or any text-based format, up to 15 MB.
- 2Import this script. The request that starts the import. The assistant reads the attached file, can preview the import first ("Previewed the import"), then imports it ("Imported a file").
- 3Assistant reply. Its report of what changed. Characters and places found in the script are created automatically in Story elements: check the scene count and the names before you move on.
- 4Generation status. The status of the job in the Generations column: "Running", "Done", "Failed", "Error" or "Canceled". An import also leaves a "Created after import" checkpoint in Version history.
- 5New conversation. Starts a clean conversation, a good habit before an import so the assistant works on the file alone. "Switch conversation" and "Delete" manage older ones.
- 6Attach a file. The paperclip: "Attach a script (Final Draft, Fountain, WriterDuet), notes, a PDF or an image." The picker accepts .pdf, .json, .fdx, .fountain, .txt and images.
- 7Message box. Where you type the request, for example "Import this script". Follow up in the same conversation to fix whatever the import got wrong.
- 8Send. Sends the request. You pay only for what the reply uses, capped at 50 credits per message.
The import also rebuilds the structure and creates your characters from the character cues and your places from the scene headings, straight into Story elements. Objects are never created by an import: add the important props yourself with a right-click.
Three checks after every import
- 1Format: read the first and last pages. Headings must be Scene elements, names Character elements, lines Dialogue elements. Fix any wrong line with Tab.
- 2Names: every character must have one single spelling. MOM and MOTHER become two characters.
- 3Story elements: open "Story elements" in the sidebar and look for duplicate characters and places. Fix the spelling in the script first, then keep one element.
Export: one format for each reader
Open "Import / Export" in the sidebar. The "Export" tab offers three formats.
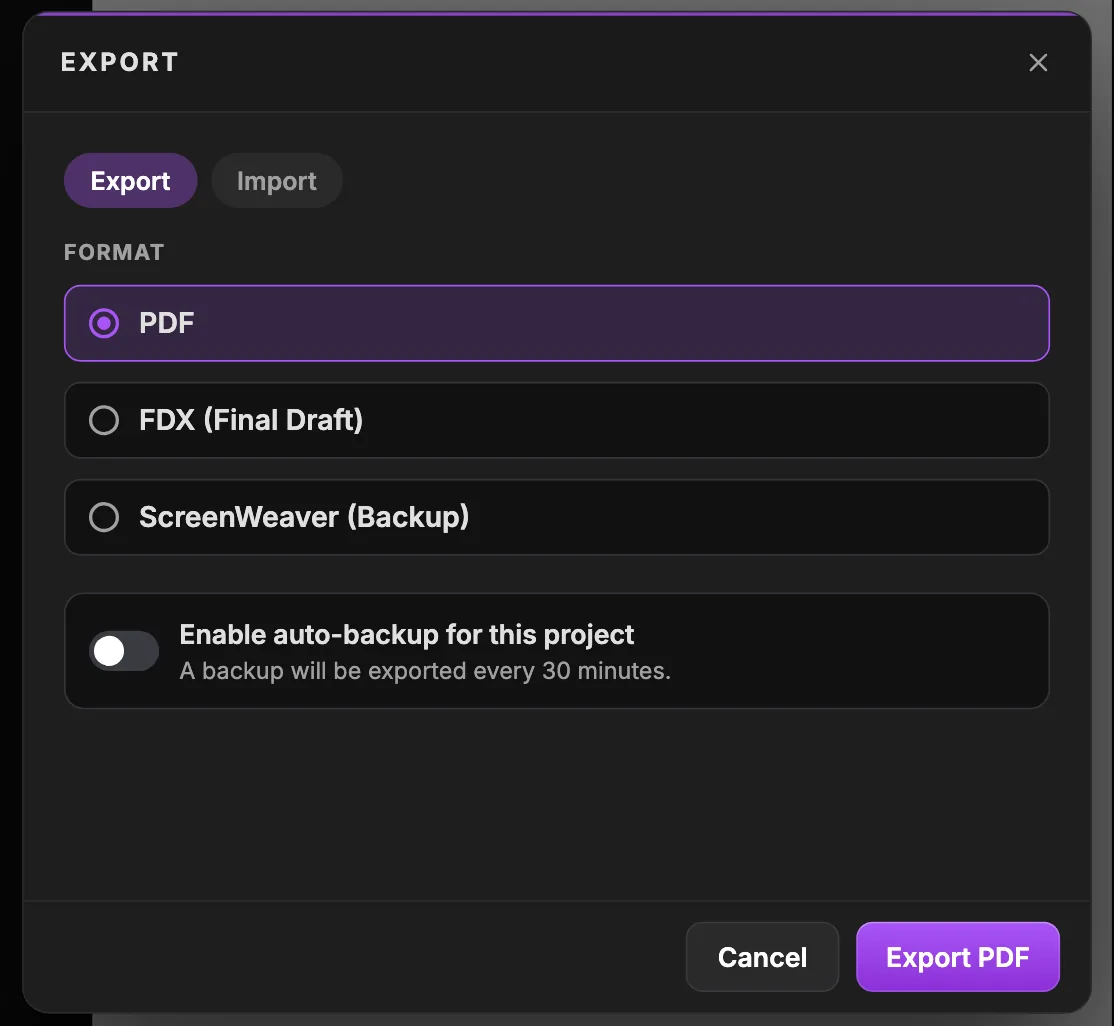
- 1Export. The export tab. Its options include "Include outline" and "Content to export", where you pick the episode: "Only one episode can be exported at a time."
- 2Import. Explains that importing goes through the AI assistant: attach the file with the paperclip or drag and drop it, then ask "Import this script". Listed formats: "PDF screenplays", "Final Draft (.fdx)", "WriterDuet JSON", "Plain text / any text-based format".
- 3PDF. A PDF of your formatted screenplay, to read, print or send to readers, producers and festivals.
- 4FDX (Final Draft). A Final Draft file, for a co-writer or a production that works in Final Draft.
- 5ScreenWeaver (Backup). A ScreenWeaver file with the "Full script (all elements and outline)", "Characters" and "Story beat labels" ("Not included: chat history."). Keep one before big rewrites.
- 6Auto-backup. "Enable auto-backup for this project": a backup is exported every 30 minutes. The setting lives in this browser, so turn it on again on another computer.
- 7Export. Exports in the selected format; the button's label follows your choice, here "Export PDF".
- "PDF": the formatted script, to send to a reader, a contest or a producer.
- "FDX (Final Draft)": for a collaborator or a production that works in Final Draft.
- "ScreenWeaver (Backup)": a JSON copy to keep on your own drive. It includes the "Full script (all elements and outline)", "Characters" and "Story beat labels". "Not included: chat history."
Tick "Include outline" when you want the structure to travel with the script. Under "Content to export" you pick the episodes of a series; "Only one episode can be exported at a time.", so deselect the current one before choosing another. The button follows your choice, for example "Export PDF".
Auto-backup: switch it on once
In the same window, turn on "Enable auto-backup for this project": a backup will be exported every 30 minutes. The setting is remembered by the browser you switched it on in, so turn it on again if you also write from another computer.
Version history: go back to any draft
Click "Version history" at the bottom of the sidebar (editors only). ScreenWeaver saves checkpoints on its own: after a few minutes of idle time, and always after an AI edit or an import. Until the first one exists you see "No versions saved yet."
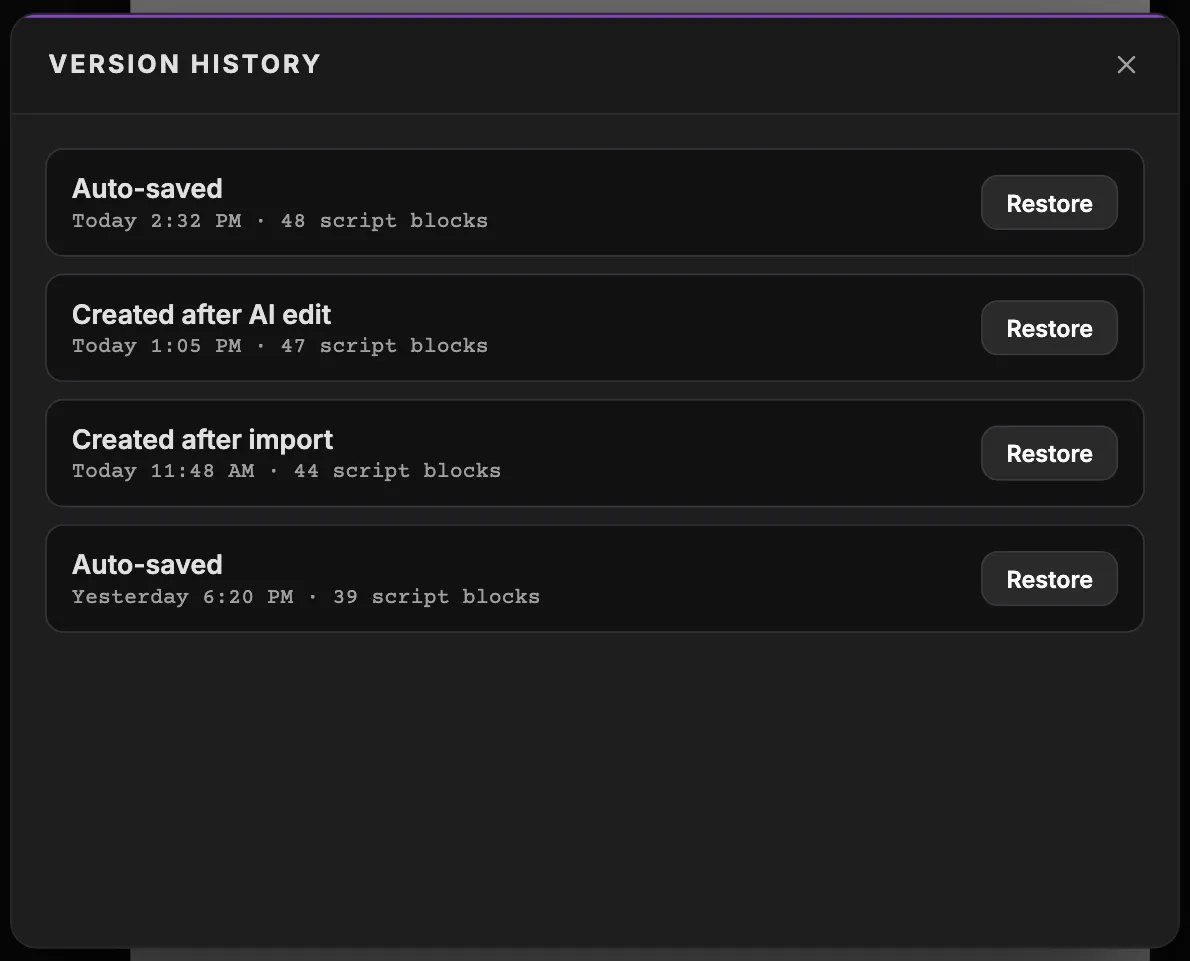
- 1Auto-saved. A checkpoint made after a few minutes of idle time. The other triggers are "Saved during continuous editing", "Created after AI edit", "Created after import", "Created after tab was hidden" and "Created before restore".
- 2Time and size. When the version was saved and how many script blocks it holds. A sudden drop in blocks shows you where content went missing.
- 3Created after AI edit. Saved after the assistant edited the script. If you dislike the AI's changes, restore the version listed just before it.
- 4Created after import. Saved right after an import: the clean imported script, to come back to if later edits go wrong.
- 5Restore. Asks "Restore this version?" and restores the screenplay only. The option "Reattach shots to matching scenes" keeps your storyboard shots linked to their scenes.
- "Auto-saved" and "Saved during continuous editing": regular checkpoints while you write.
- "Created after AI edit": made each time the assistant changes the script.
- "Created after import": made after each import.
- "Created after tab was hidden": made when you switch away from the browser tab.
- "Created before restore": made automatically before you restore, so a restore can itself be undone.
- 1Find the checkpoint you want by its reason, time and block count.
- 2Click "Restore". ScreenWeaver asks "Restore this version?".
- 3If shots belong to scenes that are missing from the old version, they would become Unscheduled; tick "Reattach shots to matching scenes" to link them back where the scenes match.
- 4Confirm. Only the screenplay goes back.
Pro habits
- Use Cmd/Ctrl + Z for the last few changes, and Version history for anything older.
- Before a bold AI rewrite, note the time: the "Created after AI edit" checkpoint lets you compare and come back.
- Export a ScreenWeaver backup before deleting a project or restructuring a whole act.
- Send PDFs to readers, never your working project: then you know which draft they read.
Next, meet the assistant properly in the AI Center and the assistant.
Do it now
Practice in ScreenWeaver
- 1Import a scene you already wrote: attach it in the AI Center and send "Import this script".
- 2Run the three checks: format, names, story elements.
- 3Export a PDF with "Include outline" on, and open it.
- 4Switch on "Enable auto-backup for this project".
- 5Open Version history, find the "Created after import" checkpoint and read what restoring it would do, without confirming.
Watch the video lessons
Questions about this step
Which formats can I import?
PDF screenplays, Final Draft (.fdx), WriterDuet JSON, Fountain and plain text or any text-based format, up to 15 MB, through the paperclip in the AI assistant.
Why is there no Import button in the Import tab?
Importing goes through the AI assistant. The Import tab explains the steps: attach the file in the chat, then ask "Import this script".
Does an import create my characters?
Yes, characters from the cues and places from the scene headings. Objects are added by hand with a right-click.
Can I export my storyboard as a PDF?
No. The export window exports the script: PDF, FDX (Final Draft) or a ScreenWeaver backup. Images and videos are downloaded from Production and the AI Center.
Does the backup include my chat with the assistant?
No. The backup holds the full script and outline, the characters and the story beat labels. "Not included: chat history."
Will restoring a version delete my storyboard?
No. A restore changes the screenplay only. Storyboard, story elements and production stay as they are.
More answers in the Academy FAQ and the button-by-button interface guide.