How to make reference sheets that keep your characters, places and objects consistent
Generate one storyboard sheet and one production sheet per element, check them like a director, and lock them before the first shot.
Chapters (10)
Video: lesson 3.2 of the free AI Filmmaking Course.
Why a sheet, and not a longer prompt, keeps a face
Describe Émilie in words in ten prompts and you get ten slightly different women. Give the model the same picture ten times and you get one. That picture is the reference sheet. What keeps a face is a chain: one description, one sheet, and an @ mention of that sheet in every shot.
In ScreenWeaver every element gets two sheets. The "Storyboard reference" is a previz sheet used to block your panels. The "Production reference" is the same element in the final look of the film, and it is what the production shots receive. Both are generated once and reused everywhere.
What a good sheet contains
- A character: the same person from the front, in three-quarter view, in profile and from the back, plus a face close-up. Neutral pose, even light, plain background, one costume. ScreenWeaver asks the model for a "Clean 3D Animated Film Previs reference sheet" with four views and the face.
- A place: one master view of the set from a high angle, with nobody in it. Characters come from their own sheets.
- An object: the prop alone, from several angles, with a detail. No seat, no table, nothing that suggests a place.
Generate a storyboard reference sheet
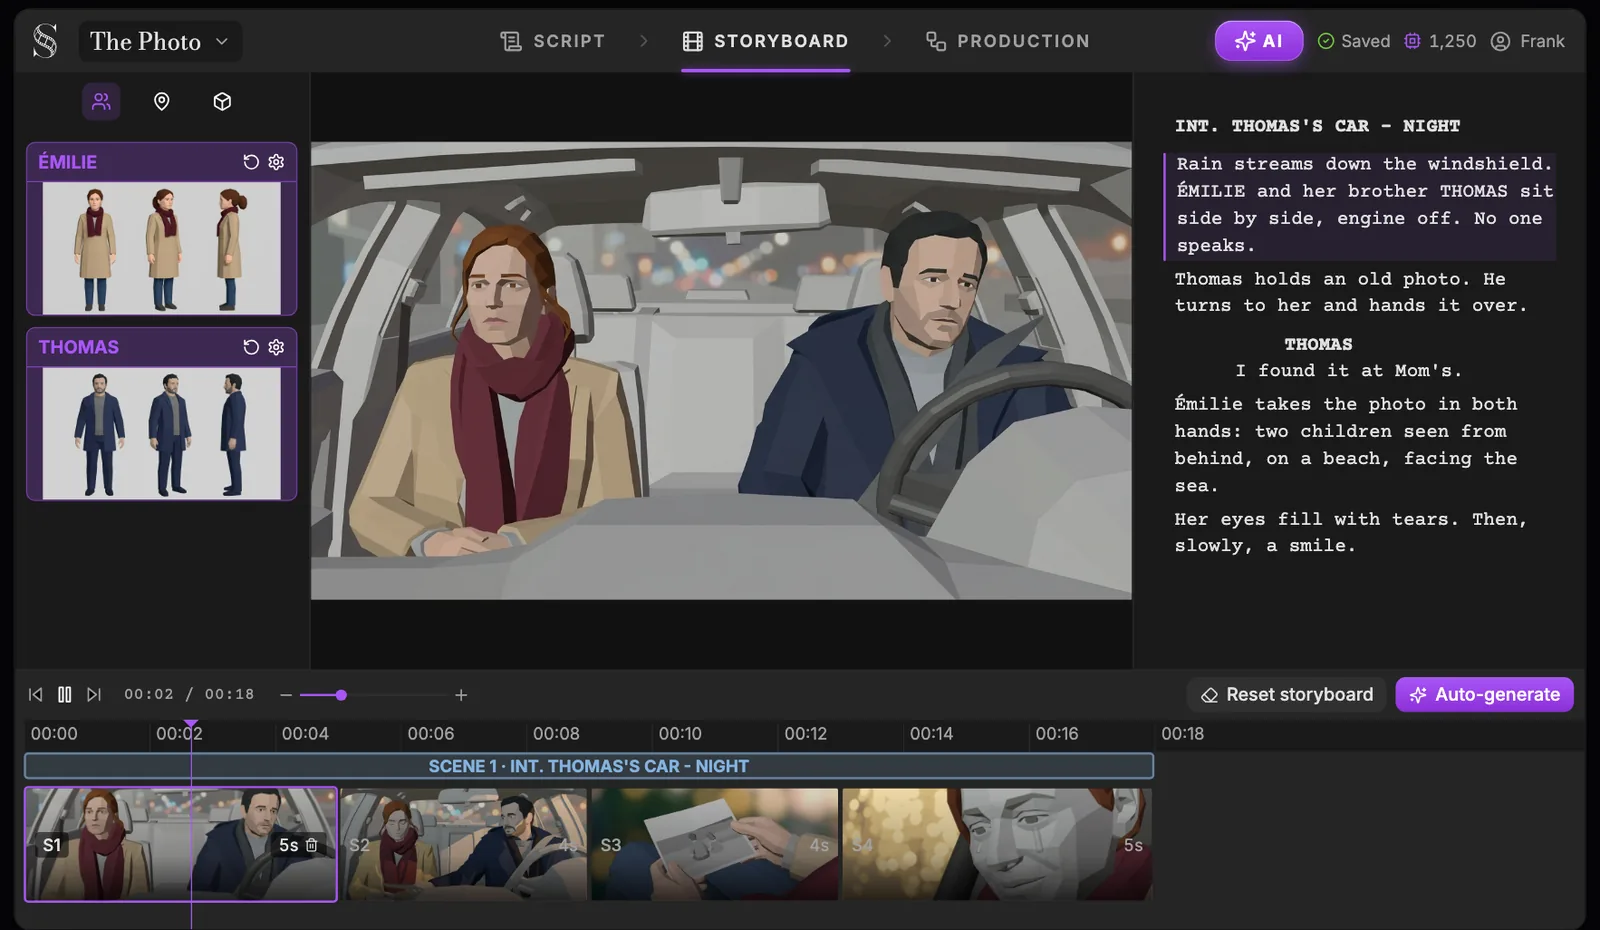
Open the Storyboard tab. The left panel holds one card per element, under "Characters", "Places" and "Objects". An empty section says "No characters yet" and "Add them from the script tab."
Swipe sideways to see the whole screen.
- 1Characters, places, objects. The entities panel, with "Characters", "Places" and "Objects" sections. An empty section says "No characters yet" (or places, or objects) and sends you to the Script tab to add them.
- 2Reference sheet. The entity's storyboard reference sheet, the image panels use to draw it. "Inspect reference image for {name}" shows it large, "Edit image for {name}" fixes it, and "Download reference image" saves it.
- 3Regenerate sheet. "Regenerate reference sheet for {name}"; with no sheet yet, the button generates one, and "Stop reference sheet generation for {name}" cancels a run. Without a description you get the "{name}: no description" warning.
- 4Advanced settings. "Advanced generation settings for {name}": more control over the sheet's generation when the one-click result is not enough.
- 5Shot composer. Composes the selected shot: storyboard panel, "Continues from", "Shot value", "Camera movement" and "Action". With nothing selected it says "Select a shot in the sequencer to start composing."
- 6Script viewer. A read-only view of the script that follows the playhead and highlights the text of the current shot. Check that each shot covers its lines; edit the text in the Script tab.
- 7Play / pause. "Skip to start", "Play" / "Pause" and "Skip to end". Space plays and pauses: watch the storyboard as an animatic to judge the rhythm before you spend credits on video.
- 8Timeline zoom. "Zoom in timeline" and "Zoom out timeline". Zoom in to trim short shots precisely, out to see the whole film.
- 9Reset storyboard. A menu with "Clear unscheduled shots" (shots whose scene no longer exists) or "Clear entire storyboard". Use the first after script changes; the second starts over.
- 10Auto-generate. Opens "Automatic storyboard generation": missing entity sheets, shot breakdowns for empty scenes, then panel images, each step with its credit estimate, or "Run all".
- 11Scene. The scene bar, with its shots underneath. Shots are grouped by episode and by scene (orphans go under "Unscheduled"); an empty scene shows "No shots" and an "Auto" button that generates shots from the scene script, with an optional shooting plan.
- 12Shot. A shot, labelled S1, S2, or S1A for a continuation. Click it to compose it, drag it to reorder within the scene, and use "Add shot" (+), "Insert shot after {label}" or "Delete shot" to edit the list.
- 13Shot duration. Drag the right edge of a shot to change its duration. The Shot node on the production canvas shows the same duration, where you can type an exact value from 0.5 to 60 seconds.
- 1Check that the element has a description (see the previous module).
- 2On its card, click "Generate a storyboard reference sheet for {name}". The tooltip shows the credit cost first.
- 3Wait for the image. If you launched it by mistake, "Stop reference sheet generation for {name}" cancels it.
- 4Click "Inspect reference image for {name}" to see it large, and check it before anything uses it.
Check it like a casting director
- Are all the views there? The model does not always return all four, so check before you move on.
- Does the sheet match the description: the age, the hair, the coat, the one distinctive detail?
- Is the costume simple and readable? Fewer, bolder details hold better across shots than many small ones.
- Do two characters look too alike? Contrast their silhouettes and colours, like Émilie's beige against Thomas's navy.
Then run the three-shot test the pros use: generate a wide, a medium and a close-up with the character and compare them side by side. If something drifts, fix the sheet or the description, not the individual shots.
Fix a sheet: rewrite, regenerate or edit
- The sheet is wrong because the text is vague: improve the description, then click "Regenerate reference sheet for {name}".
- The sheet is right except one detail: click "Edit image for {name}" and repair that detail with the image tools from fix and edit images.
- You need the sheet outside the app: "Download reference image".
- You need more control: the gear, "Advanced generation settings for {name}".
The production reference: same person, final look
Swipe sideways to see the whole screen.
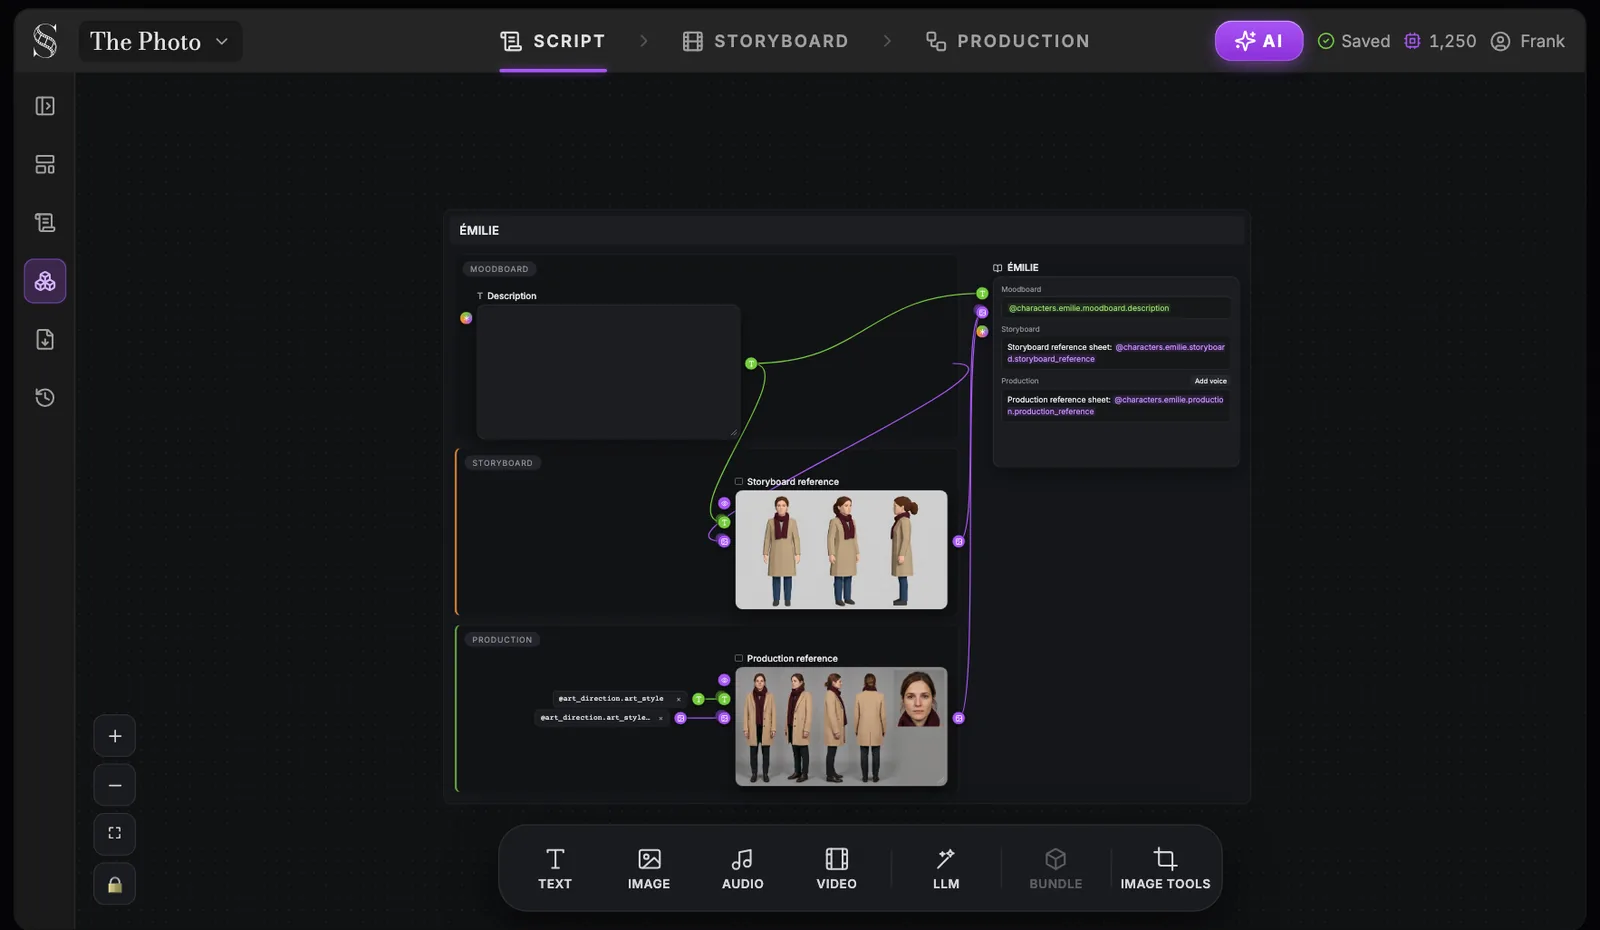
- 1Story elements. The sidebar entry that opens this canvas. The same entities appear in the Storyboard entities panel and in the Characters, Places and Objects sections of Production.
- 2Entity group. The group of one entity, here ÉMILIE. Its actions are "Open as sub-canvas", "Edit name" and "Delete entity"; deletion is blocked while the script still uses the entity.
- 3Moodboard stage. The first stage: the written description and any mood material. Text nodes here accept @handles to reference other entity sheets.
- 4Description. The pinned "Description" text node: what the entity looks like, wears or contains. It feeds the reference sheets, so it is the single most important text for consistency.
- 5Storyboard stage. The previs stage. It holds the "Storyboard reference" used by every storyboard panel where this entity appears.
- 6Storyboard reference. A "Clean 3D Animated Film Previs reference sheet" (for a character: four views plus a face close-up). Generate or regenerate it here or from the Storyboard entities panel.
- 7Production stage. The final-look stage. Its reference follows the project's artistic direction, so the entity looks the same in every production image and video.
- 8Production reference. The "Production reference" image: the same entity rendered in your art style. Production image and video nodes reference it, which keeps faces and costumes stable from shot to shot.
- 9Art direction input. Handles such as @art_direction.art_style, coming from the "Artistic direction" section of Production. Change the art style there, then regenerate this reference so it follows.
- 10Story element node. The node that cannot be deleted. It shows the three stages with their handles (for example @characters.emilie.moodboard.description); stages owned by another canvas are read-only with "Edit on the {stage} canvas".
- 11Add voice. Adds an audio node named "Voice" to the Production stage and links it to the entity. The button shows only on the Production stage while no audio is linked yet.
- 12Zoom and fit. + and - zoom, the frame icon fits the whole canvas on screen, and the padlock locks the canvas against accidental moves. Scrolling pans, pinch or Cmd/Ctrl + scroll zooms, and holding Space while dragging pans too.
The "Production reference" is already linked to the element's description, and its style comes from the "Artistic direction" of the Production tab, plugged in as two inputs. Because every element reads the same art direction, Émilie, Thomas and the car come out in one look. Generate it once per element at the start of production, then let every shot reuse it. The production canvas tour shows where it lives.
The story wins over the sheet
The sheet gives the model a face and a silhouette. What a character wears, holds and looks like in a given scene comes from the story. If Thomas arrives soaked, his hair is wet even if the sheet shows it dry. ScreenWeaver has no expression sheet, and you do not need one: write the emotion in the action of the shot, such as "Tears well up, then a smile", and the face still comes from the sheet.
Do it now
Practice in ScreenWeaver
- 1Open the Storyboard tab and generate a storyboard reference sheet for your lead character.
- 2Inspect it: count the views, compare it with the description, fix the description and regenerate if needed.
- 3Generate the sheets of your main place and your key prop, and check the prop is shown alone.
- 4Run the three-shot test (wide, medium, close-up) and start a consistency log.
Watch the video lessons
Questions about this step
Why does ScreenWeaver say "no description" before generating a sheet?
Because the element has no description text on its moodboard, so the sheet prompt would lack detail. Write the description first; "Generate anyway" makes the model guess.
What is the difference between the storyboard reference and the production reference?
The storyboard reference is a previz sheet used to block storyboard panels. The production reference shows the same element in the film's final look, set by the artistic direction, and feeds the production shots.
My sheet shows three views instead of four. Is that a problem?
It can be. Shots will show the character from every side, so check what is missing. If it matters, improve the description and regenerate before any shot uses the sheet.
Can I regenerate a sheet after I have made shots?
You can, but every shot made with the old sheet will no longer match. If you change a sheet, re-run every shot that uses it.
Does ScreenWeaver make expression sheets?
No. Write the emotion in the action of the shot that needs it; the face and costume still come from the sheet.
How do I show a costume change in one scene?
The story wins: write the change in the action of the shots in that scene ("hair soaked from the rain"), and keep a log so the change stays consistent.
More answers in the Academy FAQ and the button-by-button interface guide.