The ScreenWeaver Storyboard tab: aspect ratio, panels, sequencer and animatic
Choose your aspect ratio, find your way around the four areas of the Storyboard tab and play your film as an animatic.
Chapters (10)
Video: lesson 4.1 of the free AI Filmmaking Course.
Why the storyboard is the cheapest place to make a mistake
The Script tab says what happens. The Storyboard tab decides how we see it: from where, how close, for how long. A storyboard panel costs a fraction of a video and takes seconds, so every camera problem you fix here is a video you will not throw away later.
Each panel is a 3D blocking pass, like the previz big studios use: simple shapes, real perspective, a real direction of light. It is not the final look of your film. It locks framing, staging and timing. The look arrives later, in Production.
First visit: choose the aspect ratio
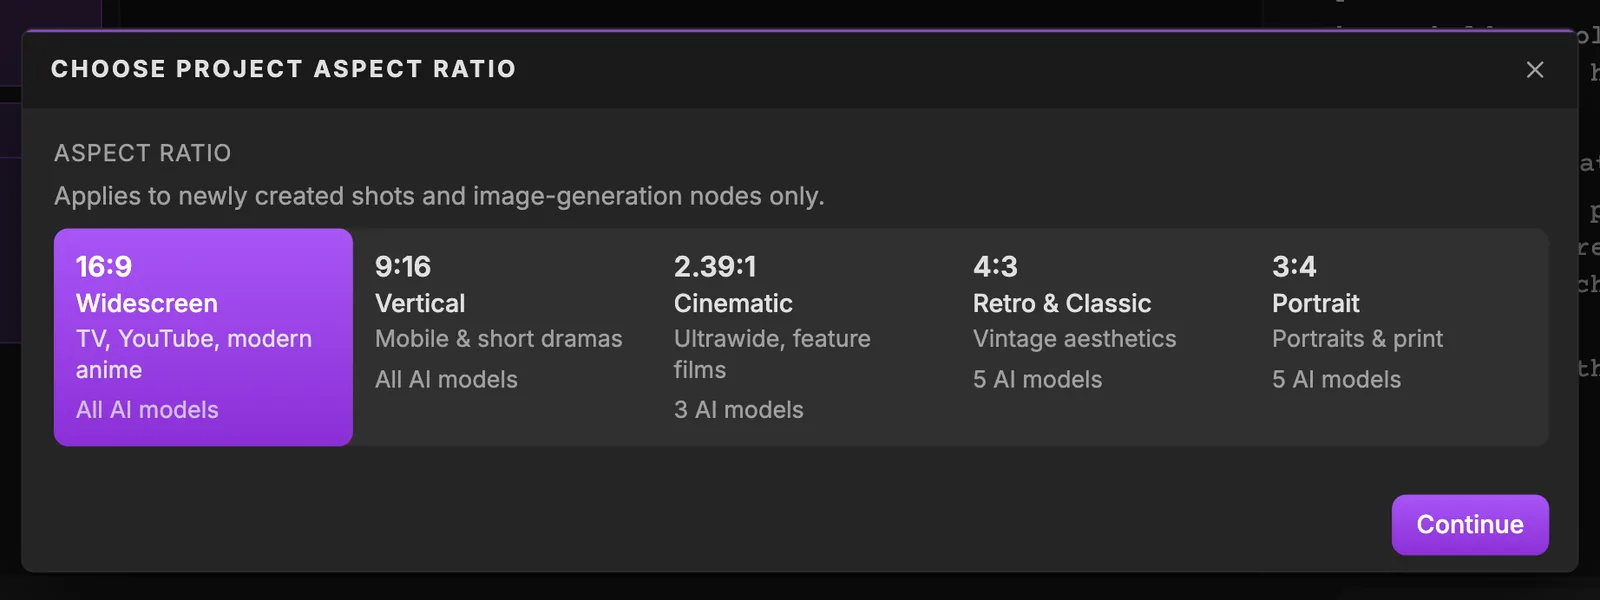
The first time you open Storyboard (or Production), a window titled "Choose project aspect ratio" blocks the screen until you pick one. It says: "Set the default frame shape for new storyboard and production images. You can change this later in project settings. Existing images keep their current ratio."
Swipe sideways to see the whole screen.
- 116:9 Widescreen. "Standard for TV, YouTube & modern anime". The safe default for most films and series.
- 29:16 Vertical. "Built for mobile & short dramas". Choose it for vertical series and social formats.
- 32.39:1 Cinematic. "Ultrawide aspect ratio for feature films". Check the model count on the card first: not every model supports it (Veo 3.1, for instance, accepts only 16:9 and 9:16).
- 44:3 Retro & Classic. "Vintage aesthetics & classic 90s anime". A squarer frame for period looks; the card shows how many models support it.
- 53:4 Portrait. "Classic portrait stills & print formats". Use it for stills and print work.
- 6Continue. Confirms the ratio and opens the tab. To change it later, use "Aspect ratio" in "Project settings".
- 16:9 Widescreen: "Standard for TV, YouTube & modern anime". The safe default.
- 9:16 Vertical: "Built for mobile & short dramas".
- 2.39:1 Cinematic: "Ultrawide aspect ratio for feature films".
- 4:3 Retro & Classic: "Vintage aesthetics & classic 90s anime".
- 3:4 Portrait: "Classic portrait stills & print formats".
Pick one, then click "Continue". Later you can change "Aspect ratio" in Project settings, but as the hint says, it "Applies to newly created shots and image-generation nodes only."
The four areas of the tab
Swipe sideways to see the whole screen.
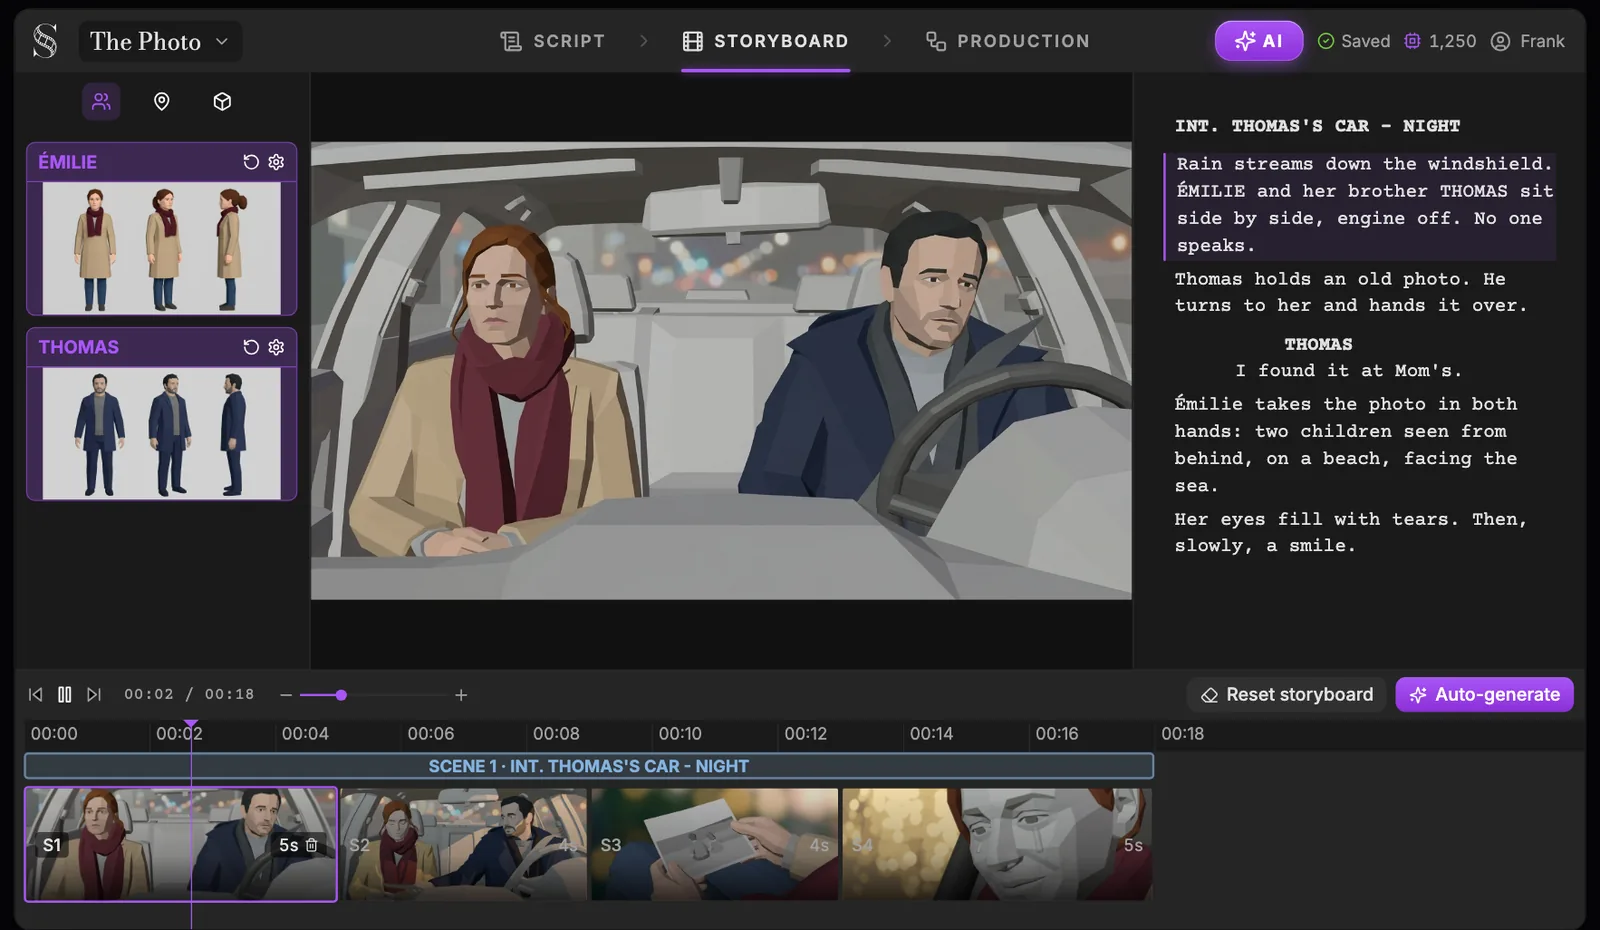
- 1Characters, places, objects. The entities panel, with "Characters", "Places" and "Objects" sections. An empty section says "No characters yet" (or places, or objects) and sends you to the Script tab to add them.
- 2Reference sheet. The entity's storyboard reference sheet, the image panels use to draw it. "Inspect reference image for {name}" shows it large, "Edit image for {name}" fixes it, and "Download reference image" saves it.
- 3Regenerate sheet. "Regenerate reference sheet for {name}"; with no sheet yet, the button generates one, and "Stop reference sheet generation for {name}" cancels a run. Without a description you get the "{name}: no description" warning.
- 4Advanced settings. "Advanced generation settings for {name}": more control over the sheet's generation when the one-click result is not enough.
- 5Shot composer. Composes the selected shot: storyboard panel, "Continues from", "Shot value", "Camera movement" and "Action". With nothing selected it says "Select a shot in the sequencer to start composing."
- 6Script viewer. A read-only view of the script that follows the playhead and highlights the text of the current shot. Check that each shot covers its lines; edit the text in the Script tab.
- 7Play / pause. "Skip to start", "Play" / "Pause" and "Skip to end". Space plays and pauses: watch the storyboard as an animatic to judge the rhythm before you spend credits on video.
- 8Timeline zoom. "Zoom in timeline" and "Zoom out timeline". Zoom in to trim short shots precisely, out to see the whole film.
- 9Reset storyboard. A menu with "Clear unscheduled shots" (shots whose scene no longer exists) or "Clear entire storyboard". Use the first after script changes; the second starts over.
- 10Auto-generate. Opens "Automatic storyboard generation": missing entity sheets, shot breakdowns for empty scenes, then panel images, each step with its credit estimate, or "Run all".
- 11Scene. The scene bar, with its shots underneath. Shots are grouped by episode and by scene (orphans go under "Unscheduled"); an empty scene shows "No shots" and an "Auto" button that generates shots from the scene script, with an optional shooting plan.
- 12Shot. A shot, labelled S1, S2, or S1A for a continuation. Click it to compose it, drag it to reorder within the scene, and use "Add shot" (+), "Insert shot after {label}" or "Delete shot" to edit the list.
- 13Shot duration. Drag the right edge of a shot to change its duration. The Shot node on the production canvas shows the same duration, where you can type an exact value from 0.5 to 60 seconds.
- 1Left, the entities panel: your characters, places and objects with their reference sheets, from the reference sheets module.
- 2Centre, the shot composer: the panel of the selected shot and its settings. Until you pick a shot it says "Select a shot in the sequencer to start composing." It is covered in compose a shot.
- 3Right, a read-only script viewer that follows the playhead, so you always see the lines the current shot comes from.
- 4Bottom, the sequencer: your film on a timeline.
The sequencer: your film on a timeline
Shots are grouped by episode ("Episode {n}") and by scene, each scene as a bar above its shots (marker 11). Shots whose scene no longer exists in the script move to "Unscheduled".
- Shot labels read S1, S2 and so on. A shot that continues another one gets a letter, like S1A.
- A block's width is its duration (markers 12 and 13). Drag its right edge to make the shot longer or shorter.
- "Add shot" (+) creates a shot, "Insert shot after {label}" slips one in, "Delete shot" removes one.
- Drag a block to reorder it ("Drag to reorder within scene").
- "Zoom in timeline" and "Zoom out timeline" (marker 8) change the scale.
- A scene with no shots shows "No shots" and an "Auto" button that breaks it down for you.
- On the right, "Reset storyboard" (marker 9) and "Auto-generate" (marker 10), both covered in auto-generate a storyboard.
Play it as an animatic
Click "Play" (marker 7) or press Space. Each panel holds for its duration, the playhead moves along the ruler, and the script on the right follows the shot being played. "Skip to start" and "Skip to end" jump to either end. This is your animatic, the first time you feel the rhythm of your film.
- Does a shot drag, or cut before its action lands?
- Does a close-up arrive before the line it should catch?
- Is an insert long enough for the audience to read the object?
Fix what you feel: drag a duration, move a block, play again. It costs nothing here.
The guided tour, and pro habits
On your first visit, a short tour opens by itself and walks through the sequencer, automatic generation, the shot composer, action and references, the entities panel and the script reference. You can replay tutorials from the Help menu, under "Tutorial".
- Aim for three to five seconds per shot: long enough for an action to land, short enough to keep an AI performance clean.
- Watch the animatic end to end at least twice before you spend a single credit on video.
- Keep the script viewer open while you direct, so every shot stays tied to the line it serves.
Every control on this screen is described in the interface reference. For the method behind it, read AI previz from a script.
Do it now
Practice in ScreenWeaver
- 1Open the Storyboard tab and choose the aspect ratio your film will actually be watched in.
- 2Identify the four areas and resize the panes to your liking.
- 3Click a shot in the sequencer, then press Space and watch the script follow the playhead.
- 4Drag one shot's right edge to change its duration and play the scene again.
Watch the video lessons
Questions about this step
Can I change the aspect ratio after I start the storyboard?
Yes, in Project settings under "Aspect ratio". It only applies to newly created shots and image-generation nodes; existing images keep their ratio, so you would have to regenerate them.
Why does the storyboard look grey and simple?
On purpose. Each panel is a 3D blocking pass that locks framing, staging and light. The final look comes from the artistic direction in the Production tab.
Can I export my storyboard as a PDF or a video?
No. The storyboard and its animatic stay in the app, and the animatic has no audio. The storyboard feeds the Production tab directly.
What does a label like S1A mean?
It is a shot that continues S1: it follows on from that shot and inherits its shot value and camera movement. See compose a shot.
What is the "Unscheduled" group in the sequencer?
It holds shots whose scene is no longer in the script, usually after a rewrite. You can clear them with "Reset storyboard".
How do I replay the storyboard tour?
Open the Help menu in the header and click "Tutorial".
More answers in the Academy FAQ and the button-by-button interface guide.