30 screens of ScreenWeaver, 249 numbered controls. Hover or tap a number to see what it does, and when you need it. The screenshots are a faithful simulation of the app.
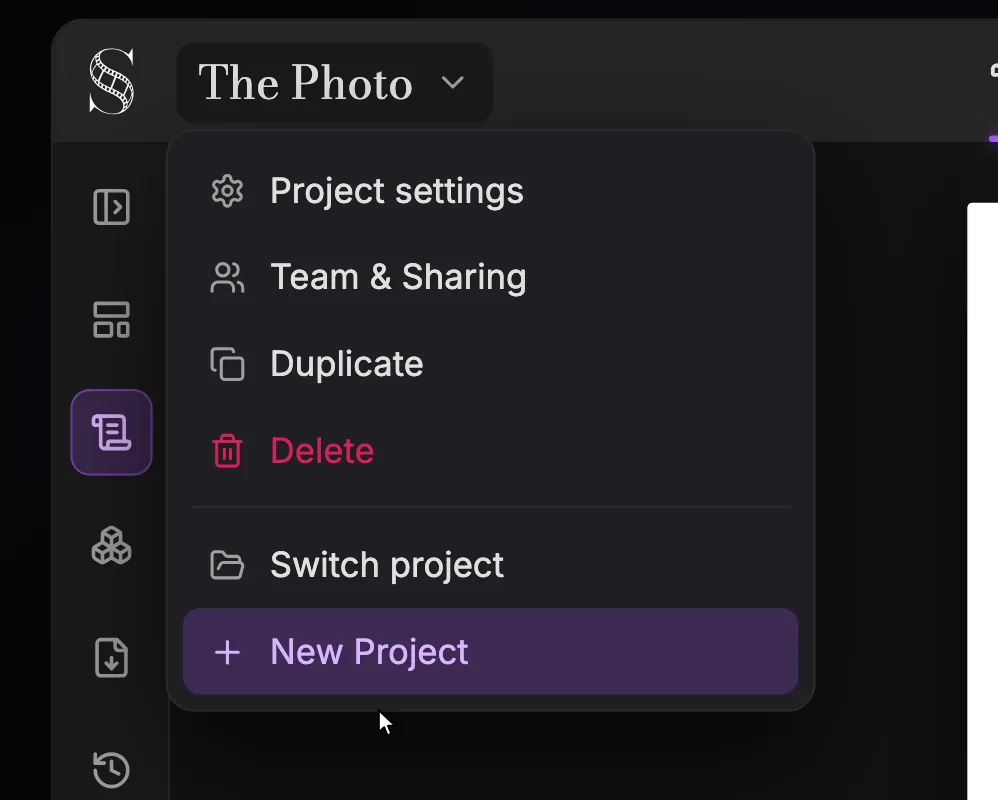
Click the project title at the top left to open this menu from any tab. It holds everything about the project as a whole: its settings, who can access it, copies, deletion, and the jump to your other projects or a new one.
1Project menu. The current project's title. Click it to open or close this menu.
2Project settings. Edits the "Title", the "Format" and the default "Aspect ratio". Shown only if you can edit the project; owners of two or more organisations can also move the project to another organisation from here.
3Team & Sharing. Opens the "Share · {title}" dialog, where you give people a role: Owner, Editor, Viewer or Guest (a guest is set to "Can edit" or "Can view"). Collaboration needs the Studio plan; without it you see "Studio plan required" and "Upgrade to Studio".
4Duplicate. Makes a copy of the project ("Duplicating project…" while it runs). Duplicate before a risky rewrite, or to try a variant without touching the original.
5Delete. Deletes the project after the confirmation "Are you sure you want to delete this project?". Only owners see it; if in doubt, export a backup or duplicate first.
6Switch project. Lists your other projects (or "No other projects") so you can jump between them.
7New Project. Opens the "New project" dialog: a "Title", a "Format" ("Feature film" or "Episodical / TV"), then "Create project". The aspect ratio is asked later, on your first visit to Storyboard or Production.
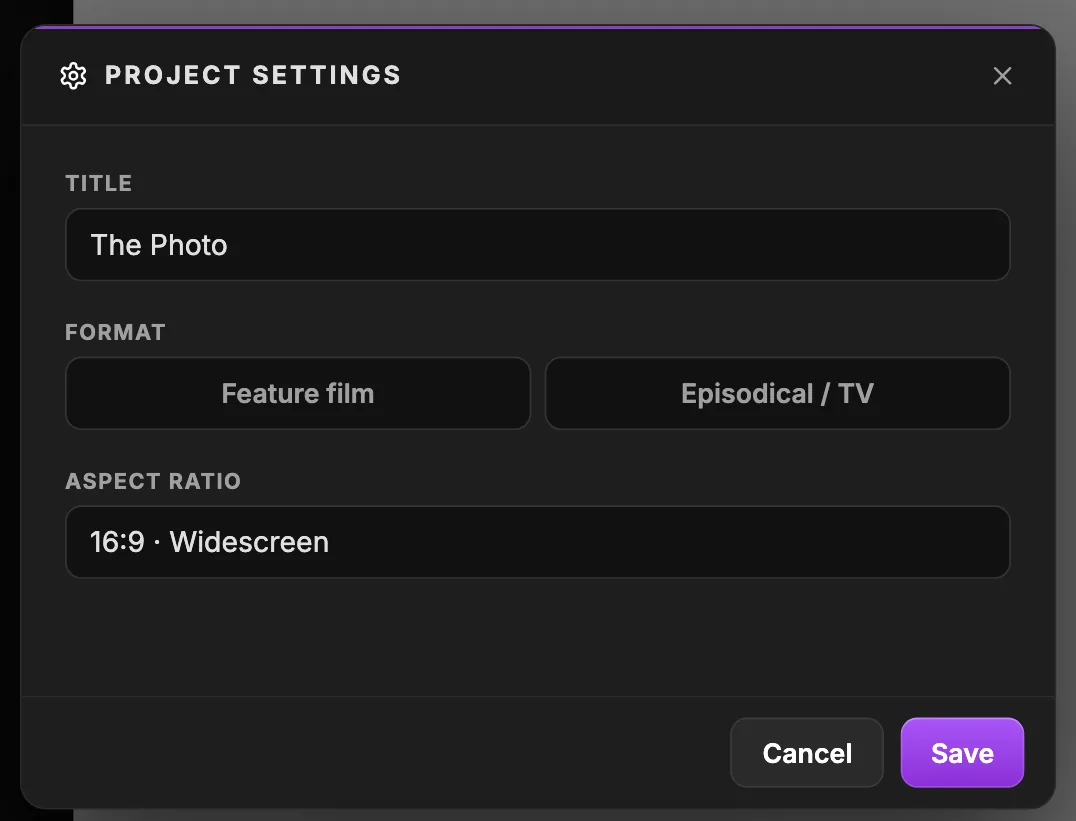
The same fields you fill when you create a project, plus the default aspect ratio. Open it from the project menu whenever the title, the format or the frame shape of new images has to change.
Swipe sideways to see the whole screen.
1Title. The project name shown in the header and in your project list (placeholder "My screenplay" on a new project).
2Feature film. "Standard mode: best for single-story screenplays". The structure starts with a single "Title page" and the Act level is hidden.
3Episodical / TV. "Episodes, acts, and series-style structure". Choose it for a series: the outline gets Episode and Act levels, and exports let you pick the episode.
4Aspect ratio. The default frame for new work: 16:9 Widescreen, 9:16 Vertical, 2.39:1 Cinematic, 4:3 Retro & Classic or 3:4 Portrait. "Applies to newly created shots and image-generation nodes only.": existing images keep their ratio.
5Save. Applies your changes. "Cancel" closes the dialog without saving.
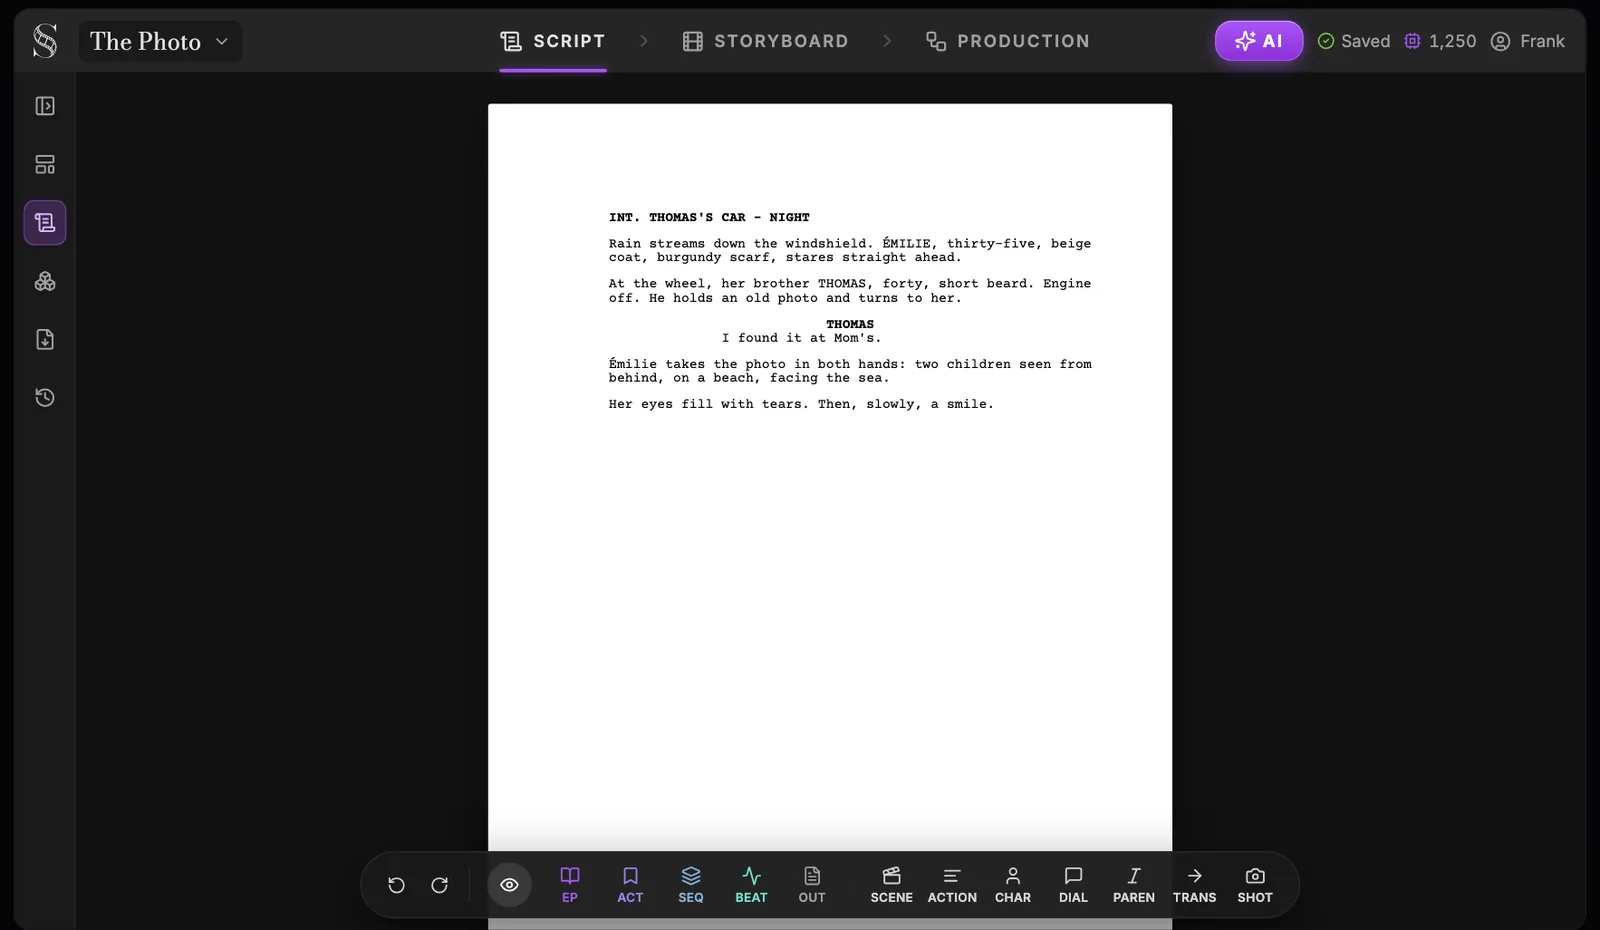
Every ScreenWeaver project starts here: a properly formatted screenplay page, the header that takes you to Storyboard and Production, and the sidebar that holds your outline, story elements, files and versions. Come back to it whenever the story changes, because everything downstream reads this script.
Swipe sideways to see the whole screen.
1Project menu. Shows the current project's title. Click it for "Project settings", "Team & Sharing", "Duplicate", "Delete", the "Switch project" list and "+ New Project".
2Script tab. Opens the screenplay editor you see here, the first step of the "Production pipeline". The left sidebar exists only in this tab.
3Storyboard tab. Turns your scenes into shots: entities panel, shot composer, a script viewer that follows the playhead, and the shot sequencer. Your first visit asks you to choose the project aspect ratio.
4Production tab. Opens the production canvas, where you set the artistic direction and generate final images, videos and scene pipelines. Go there once your storyboard tells the story.
5AI button. Opens the "AI Center" (tooltip "AI generations & assistant"): the Generations list on the left, the writing assistant on the right. A spinner and a count appear on it while generations are running.
6Save status. Reads "Saving...", "Saved", "Unsaved Changes" or "Offline". When you are offline, a banner tells you changes will sync automatically once you are back online. Cmd/Ctrl + S saves at any time.
7Credit balance. Your total credits. Click it ("View billing & credits") to open the billing screen with your balance, plans, packs and usage history. Guests and paused members do not see it.
8Account. Holds your organisation ("Switch organisation", "Create organisation", "Billing & credits", "Organisation settings", "Members") and your account ("Account settings", "Sign Out"). "Tutorial" and "Chat with us" live in the separate Help icon of the header.
9Collapse sidebar. Folds the sidebar to give the page more room; "Expand sidebar" brings it back. Cmd/Ctrl + . toggles it from the keyboard.
10Outline view. Shows the outline board above the page: title page or episode, acts, sequences, story beats and scenes as cards. Its eye icon shows or hides that pane, so you can restructure and write side by side.
11Script view. Shows or hides the screenplay page itself. Hide it to rework the structure on the outline cards alone, show it again to write.
12Story elements. Opens the canvas of your characters, places and objects, each with its Moodboard, Storyboard and Production stages. Visit it before you storyboard to write the descriptions that drive every reference sheet.
13Import / Export. Opens the window to export to "PDF", "FDX (Final Draft)" or "ScreenWeaver (Backup)" and to turn on auto-backup. Its Import tab explains that importing goes through the AI assistant.
14Version history. Lists the automatic checkpoints of your screenplay, what triggered each one, and lets you restore any of them. Editors only.
15The page. Your screenplay, formatted as you type. Enter creates the logical next element (Scene then Action, Character then Dialogue), Tab or Shift + Tab cycles the element type, Backspace at the start of a block merges it with the previous one, and autocomplete suggests scene prefixes, places, times of day and characters.
16Floating toolbar. Appears when a line has focus: "Undo", "Redo", the eye that shows or hides outline blocks, then the structure buttons (EP, ACT, SEQ, BEAT, OUT) and the element buttons (SCENE to SHOT). Click one to turn the current line into that type.
This toolbar floats at the bottom of the page whenever a line has focus. It sets the type of the current line: structure blocks on the left, screenplay elements on the right. Most writers type with Enter and Tab and use it to check or fix a line type.
Swipe sideways to see the whole screen.
1Undo. Reverts your last change, same as Cmd/Ctrl + Z.
2Redo. Reapplies what you undid, same as Cmd/Ctrl + Shift + Z or Cmd/Ctrl + Y.
3Show or hide outline blocks. Hides or shows the structure blocks inside the script (tooltip "Hide outline blocks in the script (page breaks ignore them)"). Hide them to read the screenplay clean, show them to see your structure inline.
4EP. Episode (Ep), the top structure level of an "Episodical / TV" project. In "Feature film" mode it becomes "Title page" (Title), and only one is allowed ("Title page already present").
5ACT. Act, the level under the episode. It exists only in "Episodical / TV" projects and is hidden in "Feature film" mode.
6SEQ. Sequence (Seq), a group of scenes that pursue one goal inside an act or episode.
7BEAT. Story Beat (Beat), a turning point of your story. On the outline board you tag beats with labels such as "Inciting Incident", "Midpoint" or "Climax".
8OUT. Outline (Out), the line that follows a structure block. Enter on Episode, Act, Sequence or Story Beat creates one, and Enter on it opens the next structure level (Episode, Act, Sequence, Story Beat, then Scene).
9SCENE. Scene heading. Autocomplete offers INT., EXT., INT./EXT., EXT./INT. or I/E., then your places (or "Create "{name}""), then DAY, NIGHT, DAWN, DUSK, MORNING, AFTERNOON, EVENING, LATER, CONTINUOUS, MOMENTS LATER or SAME TIME. Enter goes to Action.
10ACTION. What we see and hear. Autocomplete suggests your existing objects as you type, with no Create option here.
11CHAR. Character cue. Autocomplete suggests existing characters or "Create "{name}"", and after "(" offers V.O., O.S., O.C., CONT'D, PRE-LAP, FILTERED, INTO PHONE, ON PHONE, ON TV, ON RADIO or SUBTITLED (Tab confirms). Enter goes to Dialogue.
12DIAL. The spoken line under a cue. Enter after dialogue starts a new Character cue, ready for the reply.
13PAREN. Parenthetical (Paren), a short acting note inside dialogue. Enter returns to Dialogue.
14TRANS. Transition (Trans), such as a cut between scenes. Enter after it starts a new Scene heading.
15SHOT. Shot line, to call a specific angle on the page. Enter goes to Action. Tab cycles Scene, Action, Character, Dialogue, Parenthetical, Transition and Shot; Shift + Tab goes backwards.
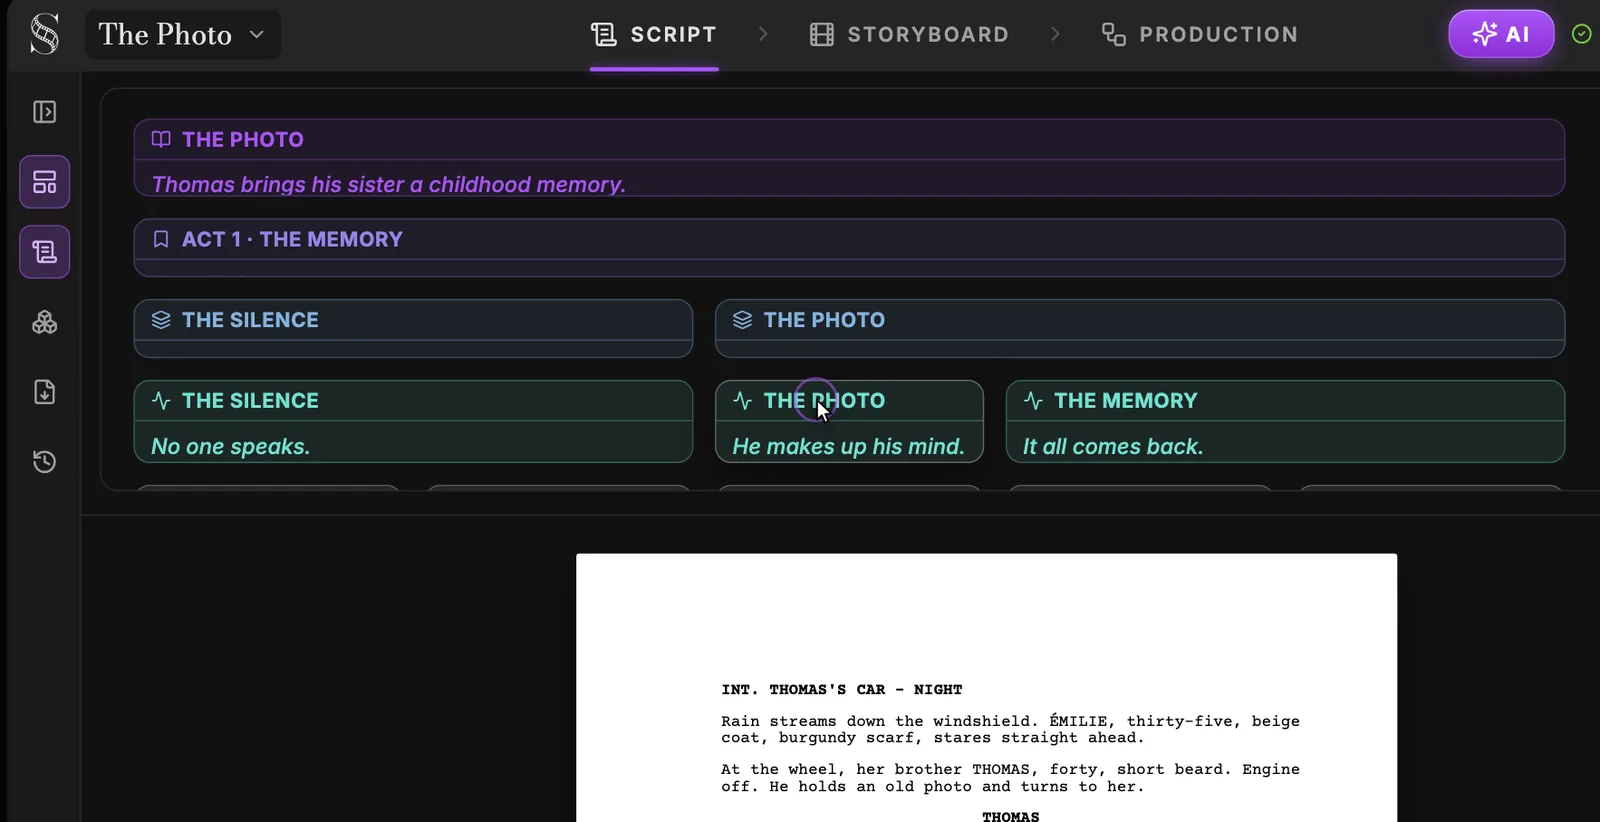
The outline board shows your story as cards on tracks: episode or title page, act, sequence, story beat and scene. It sits above the page and works on the same document, so you can restructure on the cards and write on the page at the same time.
Swipe sideways to see the whole screen.
1Outline view. Shows or hides the outline board. Turn it on when you plan or restructure, off when you only want the page.
2Script view. Shows or hides the screenplay under the board. With both on, you see the structure and the scenes it holds together.
3Title page or episode. The top card: one "Title page" in a feature film (with "Written by" and "Optional description..."), one card per Episode in a series. The italic line is its description.
4Act. One card per act, in "Episodical / TV" projects only. Acts group the sequences below them.
5Sequence. Each one sits under its act and groups the beats and scenes that belong together.
6Story beat. A turning point of the story. "Manage labels" tags it with one of the 13 default labels (Opening / Setup, Inciting Incident, Plot Point 1, Rising Action, Midpoint, Low Point, Plot Point 2, Climax, Resolution, Action / Kinetic, Tension / Suspense, Comedy / Levity, Heart / Emotional) or your own ("New label..."); "Add attachment" adds a Note, Link, Image or Audio.
7Beat summary. The card's one-line description (placeholder "Description..."). Write what changes in this beat: it is the sentence you check the whole structure against.
8The script, in sync. The page below is the same script. Structure blocks appear on the board as cards, so you never maintain two versions of the story.
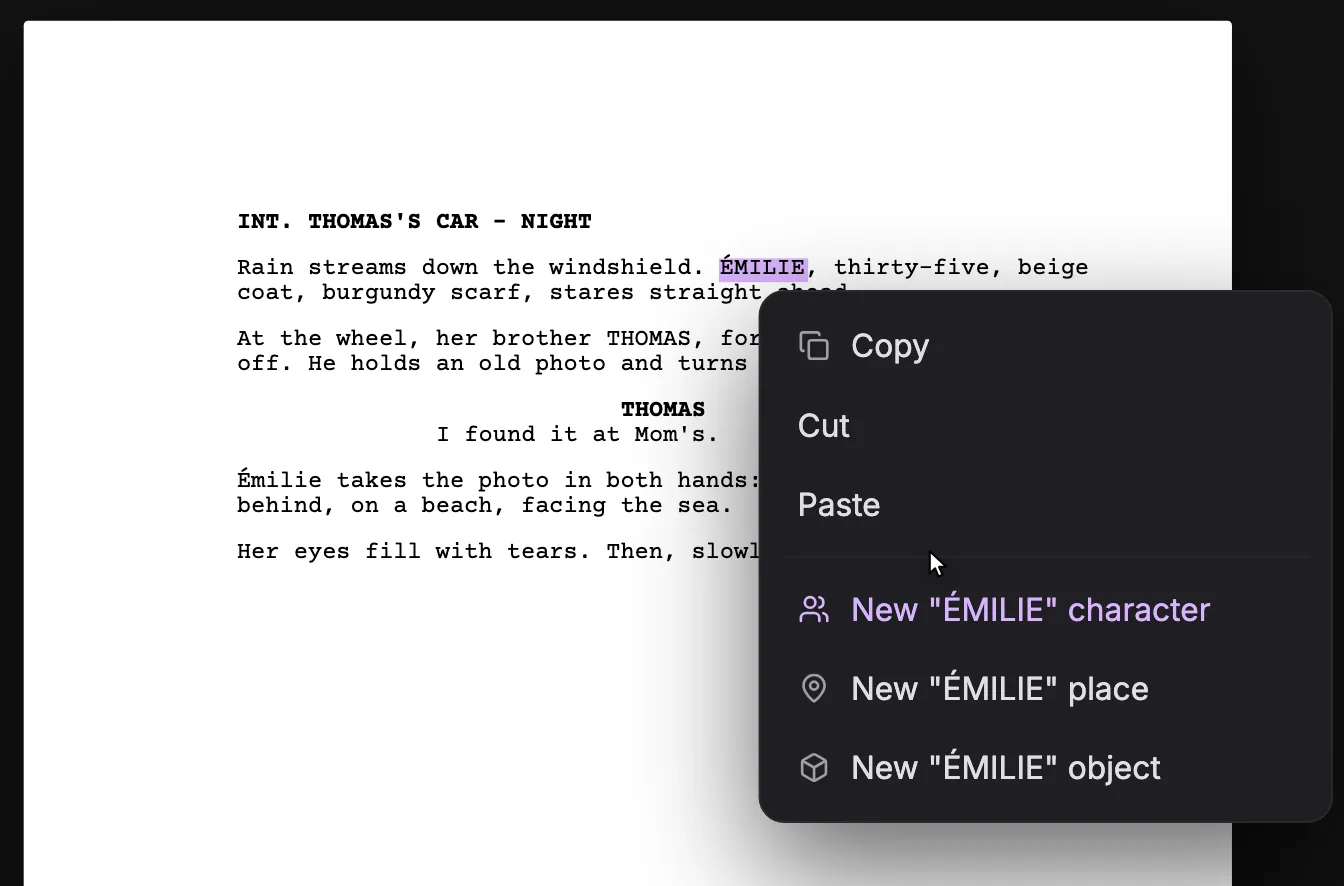
Select a word in the screenplay and right-click: besides Copy, Cut and Paste, the menu turns the selection into a character, a place or an object. It is the fastest way to register a story element that is named in an action line rather than in a cue or a heading.
Swipe sideways to see the whole screen.
1Selected name. The text you selected before right-clicking. It becomes the entity's name, so select exactly the name, without the punctuation around it.
2Copy, Cut, Paste. The usual clipboard actions on the selection.
3New character. Creates a character named after the selection ("New "{name}" character"). If it already exists, the line reads ""{name}" character exists" instead, so you never create a duplicate.
4New place. Creates a place with that name ("New "{name}" place"). Places also come from scene headings, where autocomplete offers "Create "{name}"" after the INT. or EXT. prefix.
5New object. Creates an object, a prop that matters to the story ("New "{name}" object"). This menu is how you create one from the page: action-line autocomplete only suggests existing objects, with no Create option.
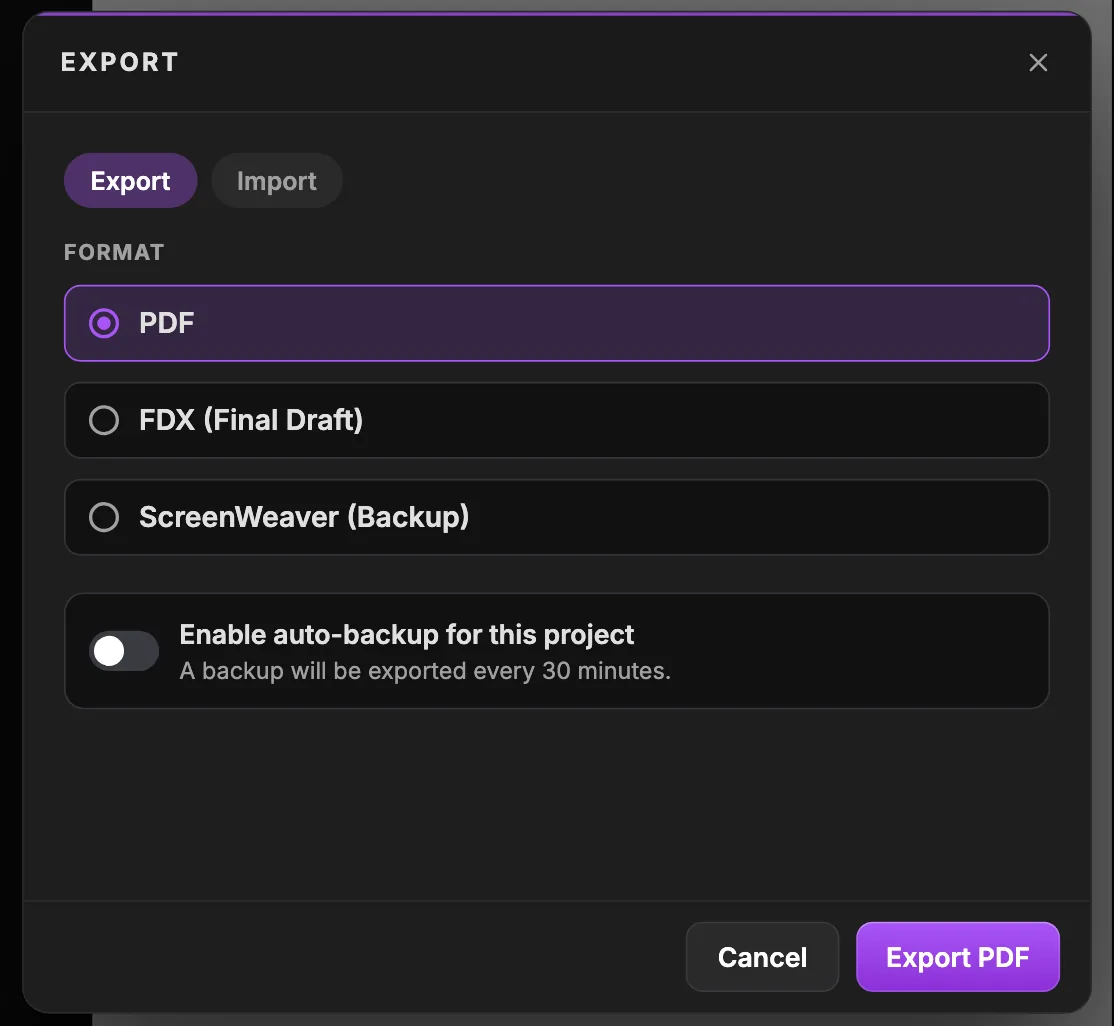
Opened from "Import / Export" in the Script sidebar. Export your screenplay to PDF or Final Draft, save a full ScreenWeaver backup, or turn on auto-backup; the Import tab explains how to bring a script in through the assistant.
1Export. The export tab. Its options include "Include outline" and "Content to export", where you pick the episode: "Only one episode can be exported at a time."
2Import. Explains that importing goes through the AI assistant: attach the file with the paperclip or drag and drop it, then ask "Import this script". Listed formats: "PDF screenplays", "Final Draft (.fdx)", "WriterDuet JSON", "Plain text / any text-based format".
3PDF. A PDF of your formatted screenplay, to read, print or send to readers, producers and festivals.
4FDX (Final Draft). A Final Draft file, for a co-writer or a production that works in Final Draft.
5ScreenWeaver (Backup). A ScreenWeaver file with the "Full script (all elements and outline)", "Characters" and "Story beat labels" ("Not included: chat history."). Keep one before big rewrites.
6Auto-backup. "Enable auto-backup for this project": a backup is exported every 30 minutes. The setting lives in this browser, so turn it on again on another computer.
7Export. Exports in the selected format; the button's label follows your choice, here "Export PDF".
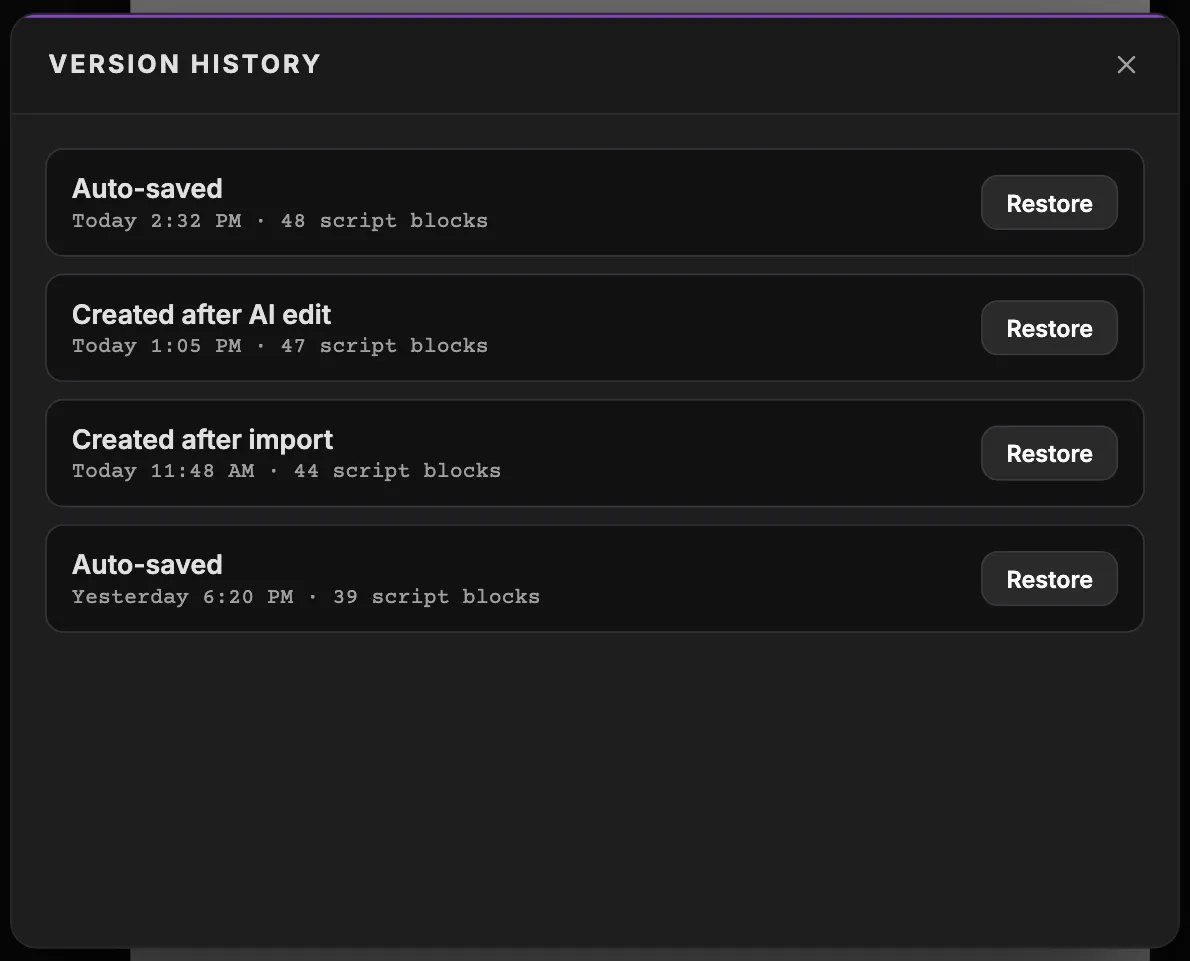
Opened from "Version history" in the Script sidebar (editors only). ScreenWeaver checkpoints the screenplay after a few minutes of idle time and after AI and import changes, so you can always go back to a version that worked.
1Auto-saved. A checkpoint made after a few minutes of idle time. The other triggers are "Saved during continuous editing", "Created after AI edit", "Created after import", "Created after tab was hidden" and "Created before restore".
2Time and size. When the version was saved and how many script blocks it holds. A sudden drop in blocks shows you where content went missing.
3Created after AI edit. Saved after the assistant edited the script. If you dislike the AI's changes, restore the version listed just before it.
4Created after import. Saved right after an import: the clean imported script, to come back to if later edits go wrong.
5Restore. Asks "Restore this version?" and restores the screenplay only. The option "Reattach shots to matching scenes" keeps your storyboard shots linked to their scenes.
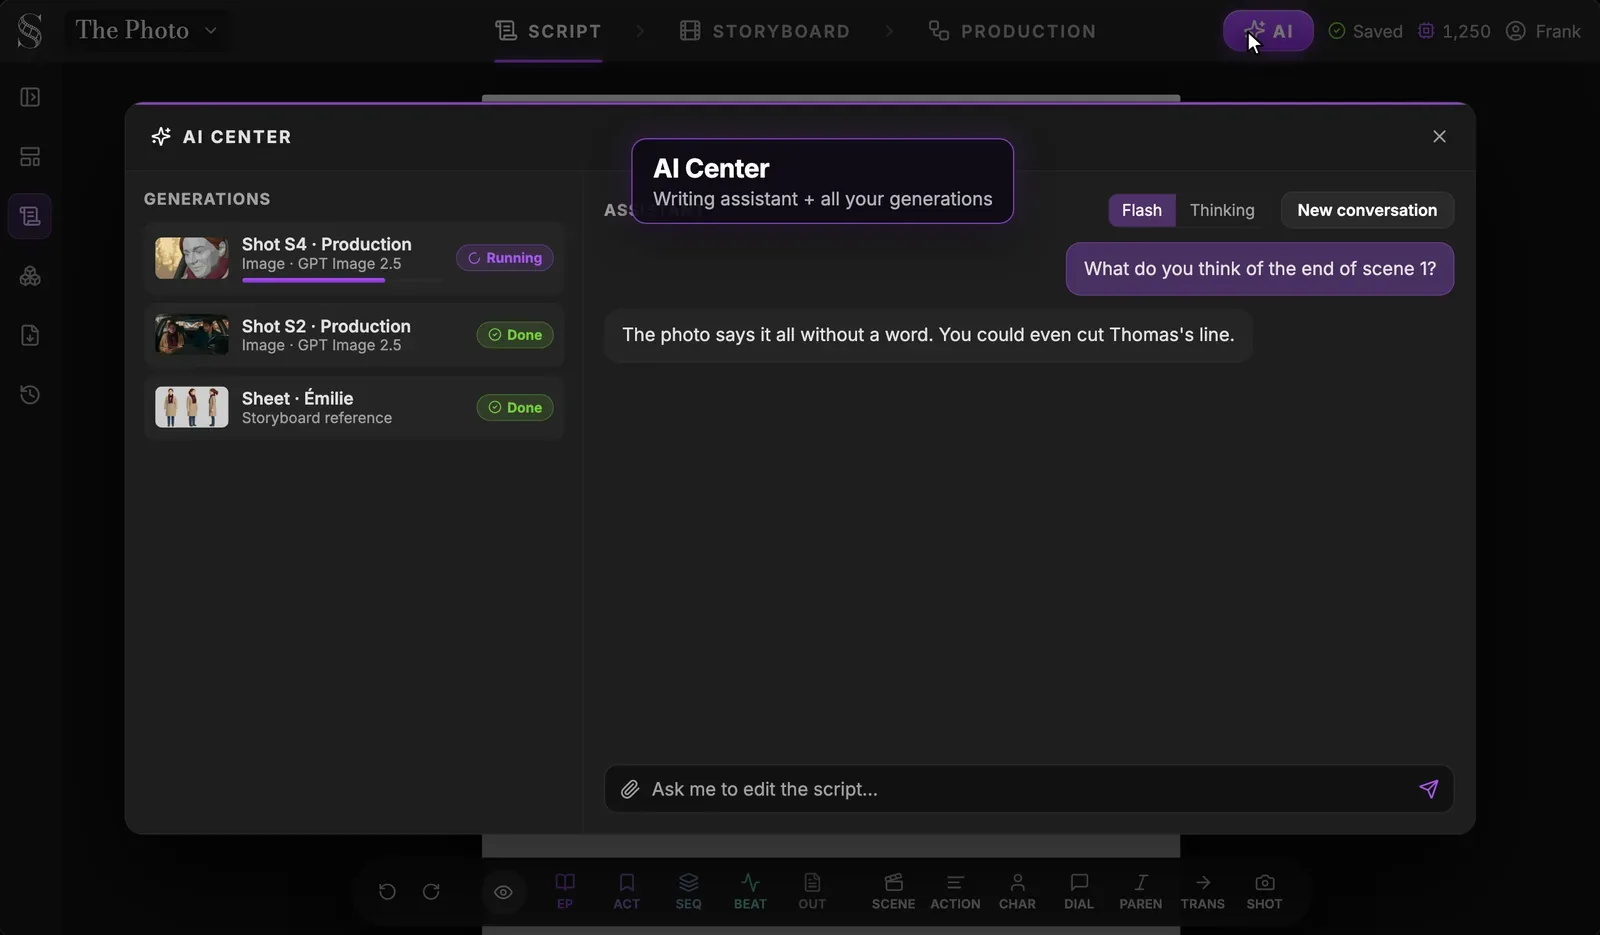
The "AI Center" gathers every AI generation of the project on the left and the writing assistant on the right. Open it with the AI button to follow long jobs, retrieve a result, or ask the assistant to read and change your script and storyboard.
Swipe sideways to see the whole screen.
1AI button. Opens this window from any tab (tooltip "AI generations & assistant"). While jobs run, it shows a spinner and how many are running.
2Generations. Every image, video, sheet and text the project generates, wherever you started it: storyboard, production canvas or entity panels. Click a finished item to preview it, download it or jump to its node.
3Running generation. A job in progress, with its name, type, model and a progress bar. "Cancel generation" stops it if you launched it by mistake.
4Done. The status badge: "Running", "Done", "Failed", "Error" or "Canceled". A finished item can be previewed with its "Model", "Prompt", "Parameters", "Credits" and "Created" details, downloaded, or traced back with "Go to node".
5Assistant. A chat that can read and change your script and storyboard: it reads the outline, scenes, story elements and shots, searches and edits the script, creates and updates shots, imports files and changes the aspect ratio. When it needs a decision, it asks you a question with choices plus "Something else".
6New conversation. Starts a fresh conversation; "Switch conversation" brings an older one back and "Delete" removes it. One conversation per task keeps the assistant focused.
7Attach a file. "Attach a script (Final Draft, Fountain, WriterDuet), notes, a PDF or an image." Accepted: .pdf, .json, .fdx, .fountain, .txt and images, up to 15 MB. You can also drag and drop the file.
8Message box. Type your request here (placeholder "Ask me to edit the script or build shots..."). Name the scene, say what must change and what must stay.
9Send. Sends the message. The tooltip gives the maximum the reply can cost and reminds you that "You only pay for what the reply uses.": a message is capped at 50 credits ($0.25).
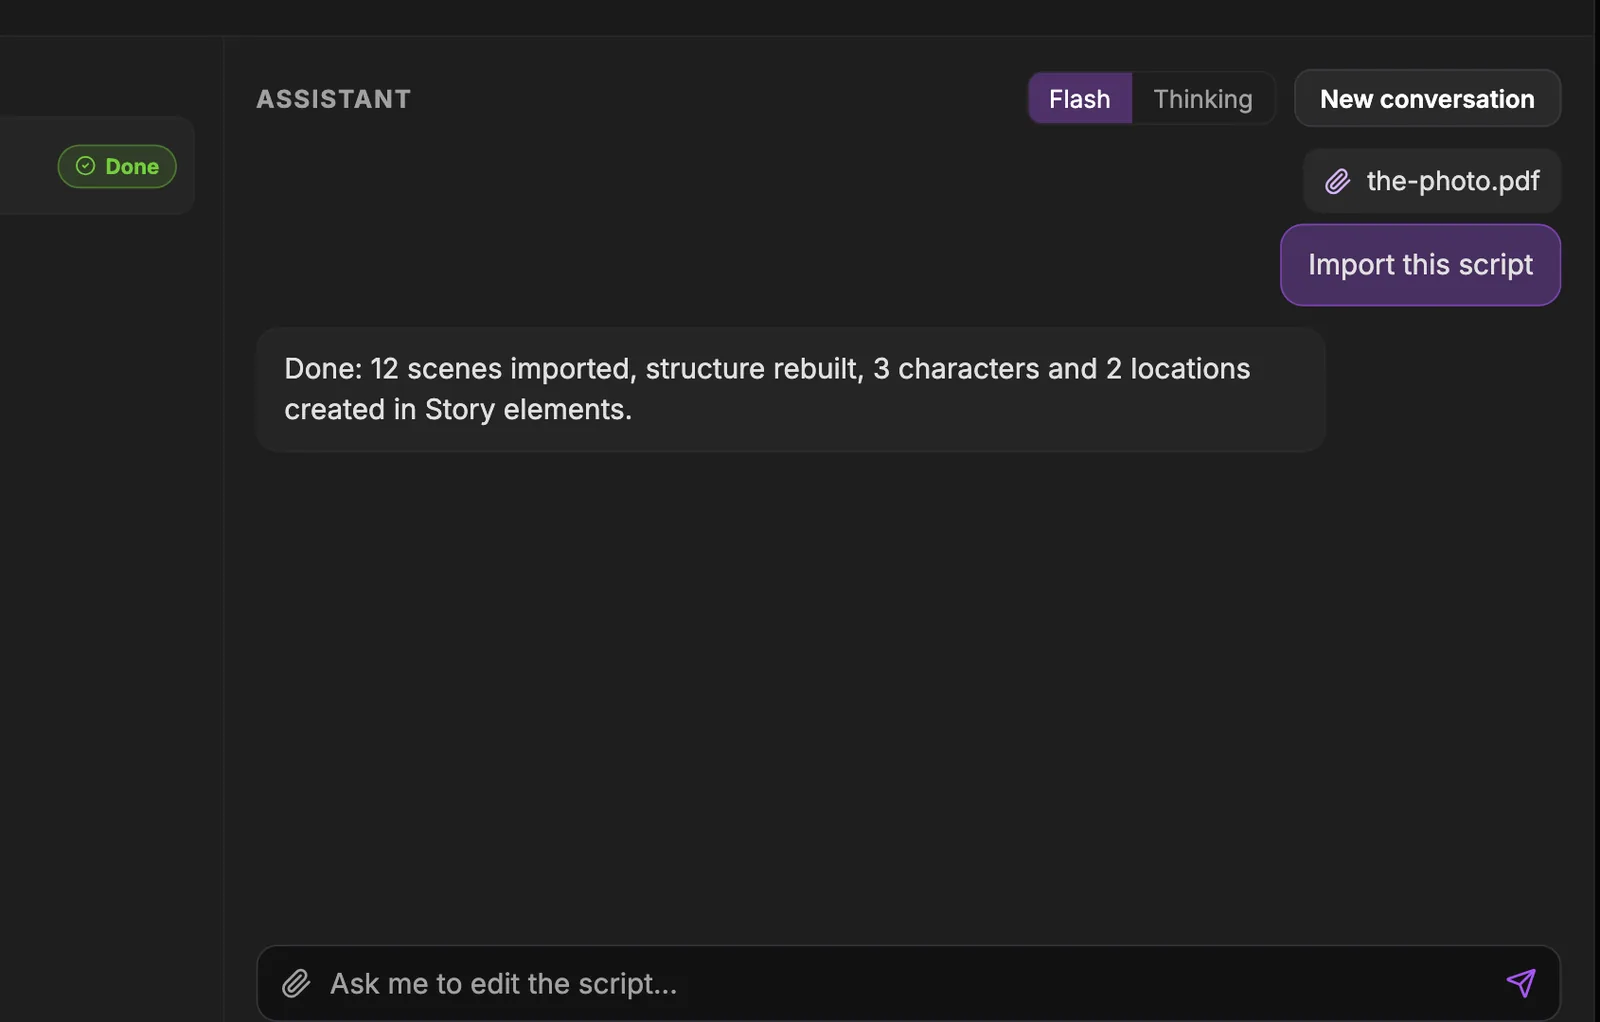
Importing an existing screenplay goes through the assistant in the "AI Center": attach the file, ask it to import, and it rebuilds the script and its structure and creates the story elements. Use it to bring a PDF, Final Draft, WriterDuet, Fountain or text script into ScreenWeaver instead of retyping it.
Swipe sideways to see the whole screen.
1Attached script. The file you attached with the paperclip or by drag and drop. Supported: PDF screenplays, Final Draft (.fdx), WriterDuet JSON, Fountain, plain text or any text-based format, up to 15 MB.
2Import this script. The request that starts the import. The assistant reads the attached file, can preview the import first ("Previewed the import"), then imports it ("Imported a file").
3Assistant reply. Its report of what changed. Characters and places found in the script are created automatically in Story elements: check the scene count and the names before you move on.
4Generation status. The status of the job in the Generations column: "Running", "Done", "Failed", "Error" or "Canceled". An import also leaves a "Created after import" checkpoint in Version history.
5New conversation. Starts a clean conversation, a good habit before an import so the assistant works on the file alone. "Switch conversation" and "Delete" manage older ones.
6Attach a file. The paperclip: "Attach a script (Final Draft, Fountain, WriterDuet), notes, a PDF or an image." The picker accepts .pdf, .json, .fdx, .fountain, .txt and images.
7Message box. Where you type the request, for example "Import this script". Follow up in the same conversation to fix whatever the import got wrong.
8Send. Sends the request. You pay only for what the reply uses, capped at 50 credits per message.
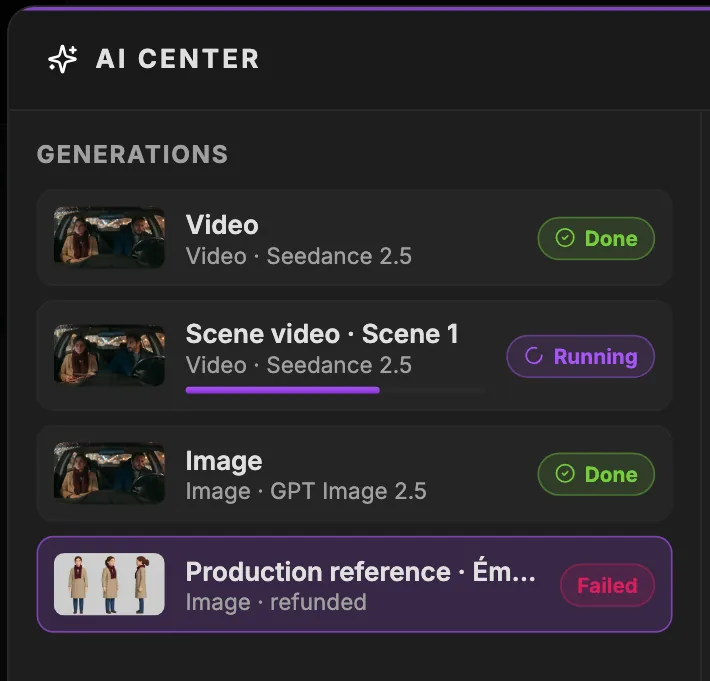
The left column of the "AI Center" lists every generation of the project, wherever you started it, with its model and status. Use it to follow long jobs, retrieve results and see what failed.
1Generations. The list itself. Empty, it reads "No generations yet. Start one from the storyboard, production canvas, or entity panels."
2Generation. One job: its name, type and model. "Preview generated media" shows its "Model", "Prompt", "Parameters", "Credits" and "Created"; "Download" saves it and "Go to node" jumps to the node that made it.
3Done. Finished and ready. The other statuses are "Running", "Failed", "Error" and "Canceled"; "Remove from list" tidies the column.
4Running. Still generating. "Cancel generation" stops it.
5Progress. How far the job has gone. Videos take longer than images: keep working, the list updates on its own.
6Failed, refunded. A run that fails is refunded, so you do not pay for it. "Retry generation" runs it again; if it fails twice, check the prompt and the inputs first.
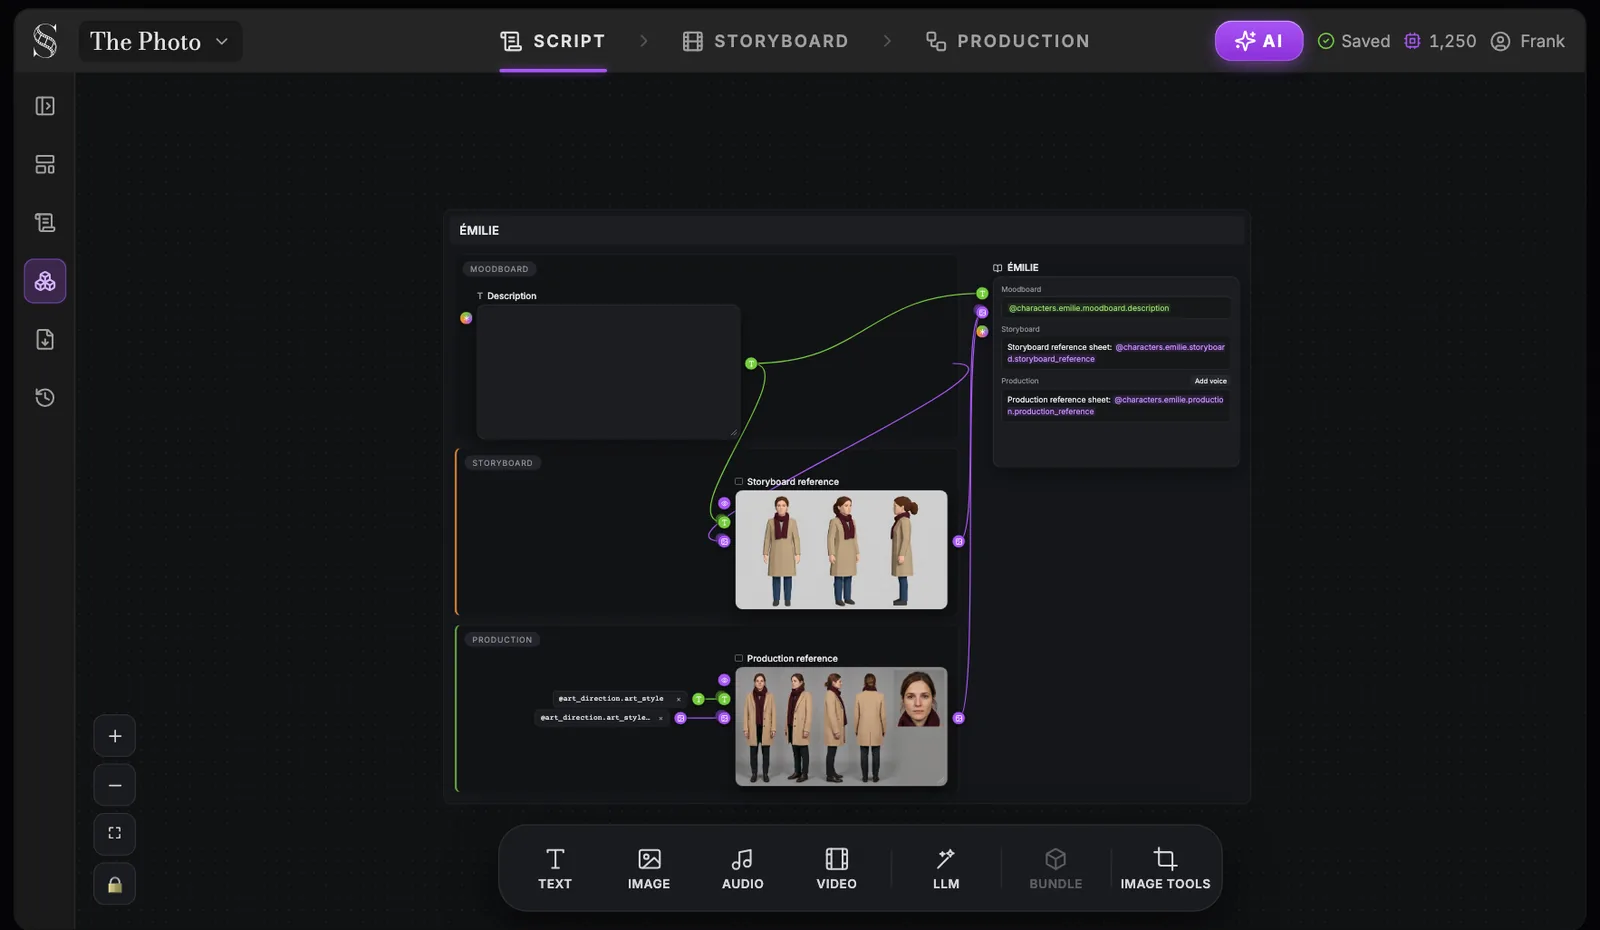
Every character, place and object has its own group on this canvas, with three stages: Moodboard for the description, Storyboard for the previs reference sheet, Production for the final reference in your art direction. Fill it before you storyboard, because these references keep your characters consistent in every shot.
Swipe sideways to see the whole screen.
1Story elements. The sidebar entry that opens this canvas. The same entities appear in the Storyboard entities panel and in the Characters, Places and Objects sections of Production.
2Entity group. The group of one entity, here ÉMILIE. Its actions are "Open as sub-canvas", "Edit name" and "Delete entity"; deletion is blocked while the script still uses the entity.
3Moodboard stage. The first stage: the written description and any mood material. Text nodes here accept @handles to reference other entity sheets.
4Description. The pinned "Description" text node: what the entity looks like, wears or contains. It feeds the reference sheets, so it is the single most important text for consistency.
5Storyboard stage. The previs stage. It holds the "Storyboard reference" used by every storyboard panel where this entity appears.
6Storyboard reference. A "Clean 3D Animated Film Previs reference sheet" (for a character: four views plus a face close-up). Generate or regenerate it here or from the Storyboard entities panel.
7Production stage. The final-look stage. Its reference follows the project's artistic direction, so the entity looks the same in every production image and video.
8Production reference. The "Production reference" image: the same entity rendered in your art style. Production image and video nodes reference it, which keeps faces and costumes stable from shot to shot.
9Art direction input. Handles such as @art_direction.art_style, coming from the "Artistic direction" section of Production. Change the art style there, then regenerate this reference so it follows.
10Story element node. The node that cannot be deleted. It shows the three stages with their handles (for example @characters.emilie.moodboard.description); stages owned by another canvas are read-only with "Edit on the {stage} canvas".
11Add voice. Adds an audio node named "Voice" to the Production stage and links it to the entity. The button shows only on the Production stage while no audio is linked yet.
12Zoom and fit. + and - zoom, the frame icon fits the whole canvas on screen, and the padlock locks the canvas against accidental moves. Scrolling pans, pinch or Cmd/Ctrl + scroll zooms, and holding Space while dragging pans too.
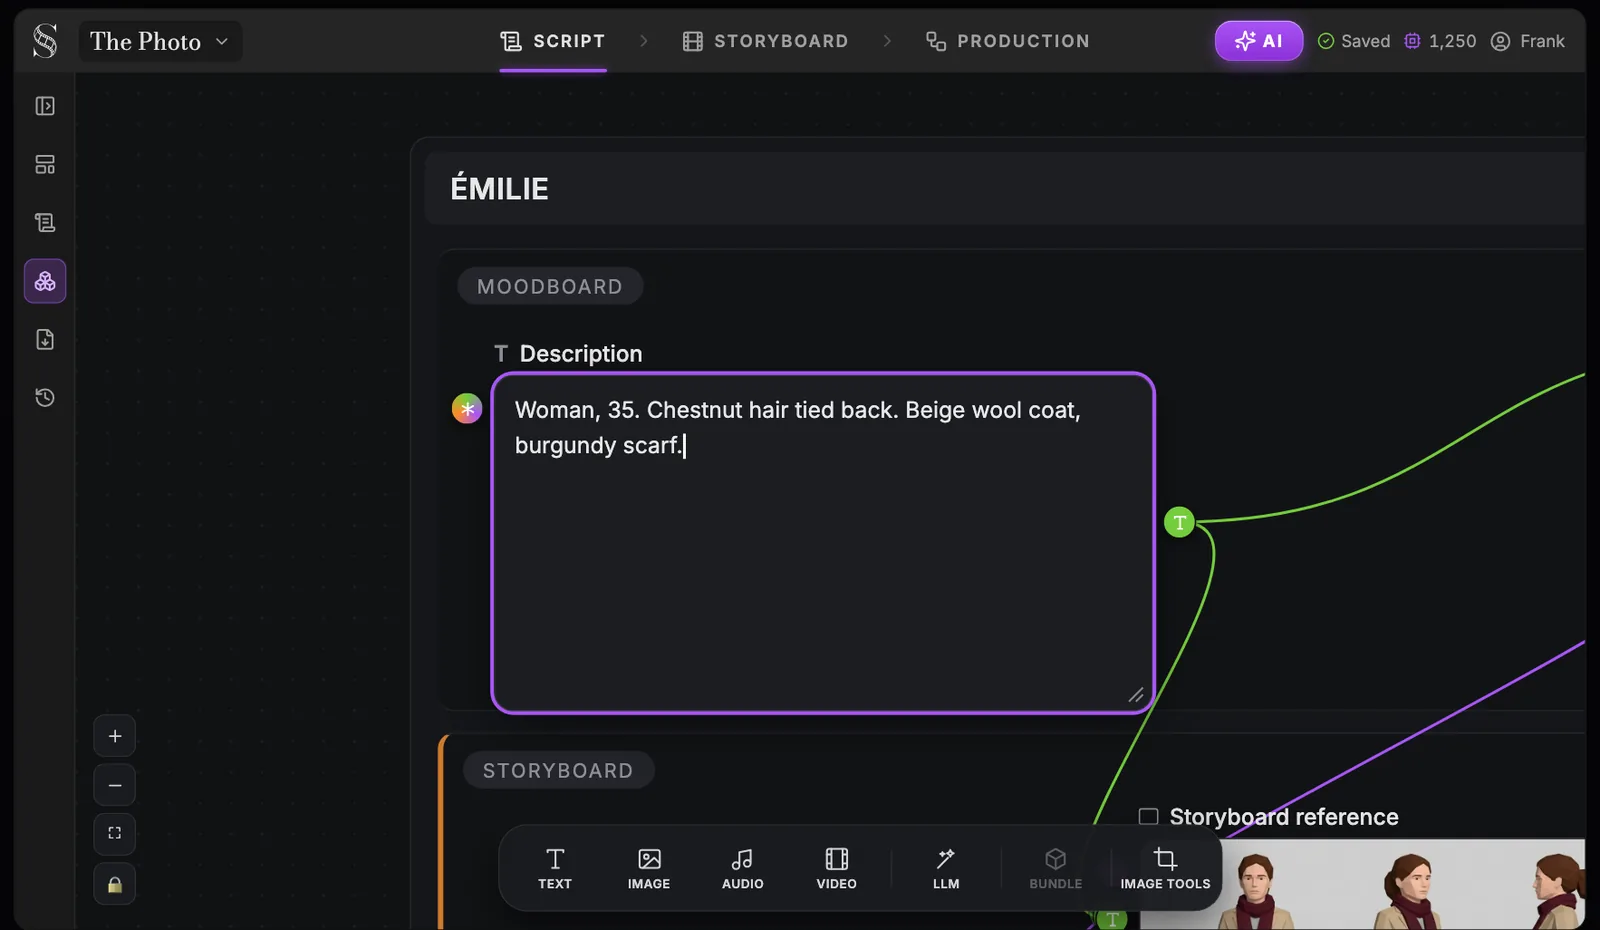
A close look at the Moodboard stage of a character. Every reference sheet generation reads the description written here, so a precise, visual description is the difference between one consistent character and a different face in every shot.
Swipe sideways to see the whole screen.
1Entity group. The entity whose stages you are editing, here ÉMILIE. "Edit name" renames it and "Open as sub-canvas" opens it on its own.
2Moodboard stage. The stage that holds the written description and any reference material for the look. Everything here is input for the sheets below.
3Description. Write what a camera sees: age, build, hair, face, costume, key props (placeholder "Type here. Use @handle to reference entity sheets…"). Keep it visual: the sheet generation reads it literally.
4Auto-fill from the script. Its tooltip says "Auto-fill description from the script (AI). Overwrites current text." Run it first to draft from the script, then refine by hand, never after your own edits. It costs credits.
5Output port. The description's output. The wires carry it to the Storyboard reference and the Production reference, so after a change, regenerate the sheets that read it.
6Storyboard stage. The next stage down, where the previs sheet is generated from this description.
7Storyboard reference. The sheet generated from the description. With no description, the Storyboard entities panel warns "{name}: no description" and offers "Generate anyway": write the description first.
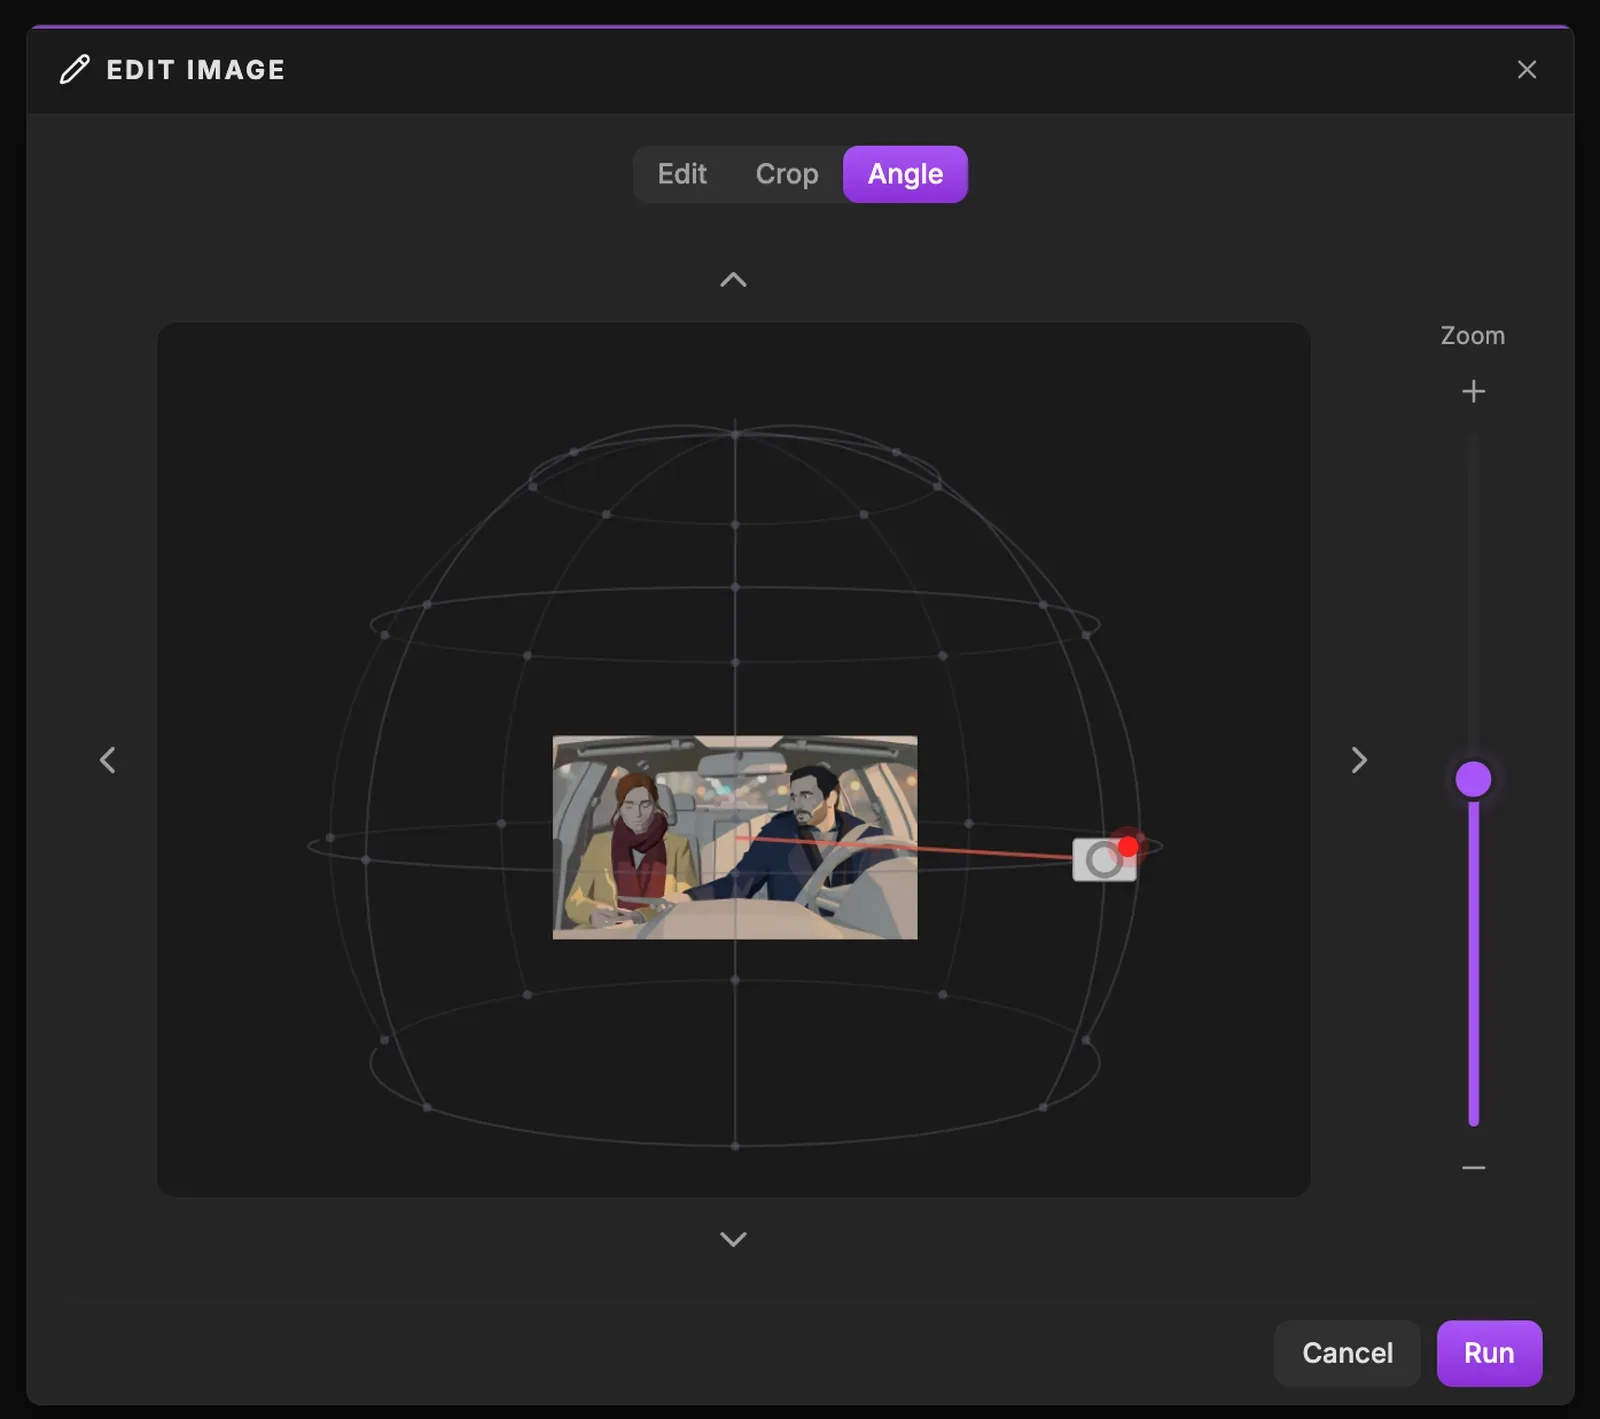
The third tab of the "Edit image" window re-shoots an existing image from another point of view: move the camera on a 3D sphere around your subject, choose the framing, and run. Use it when a panel is right but the angle is wrong, instead of regenerating from scratch.
1Angle. Switches the window to the camera angle tool. The other tabs are "Edit" (Edit with AI) and "Crop".
2Source image. The image you are re-angling, at the centre of the sphere. Each run is "Saved as a new version of this image.", so the original stays available.
3Camera position. Where the new camera stands. Drag it around the sphere to pick the viewpoint; it snaps to set positions unless you tick "Free angle (disable snap)".
4Tilt up. Moves the camera 30 degrees higher on the sphere, toward a high angle that looks down on the subject. Click again to climb further.
5Tilt down. Moves the camera 30 degrees lower, toward a low angle that looks up at the subject and gives it weight.
6Rotate left. Turns the camera 45 degrees around the subject to the left. Four clicks take you from a front view to a back view.
7Rotate right. Turns the camera 45 degrees around the subject to the right, for a three-quarter view, a profile or a reverse angle.
8Zoom. Sets the framing of the new image, from wide to medium to close. Use + and - or drag the slider: the camera on the sphere moves closer or farther.
9Run. Generates the new angle and saves it as a new version of the image. Like every AI button, its credit cost shows in the tooltip. "Cancel" closes without running.
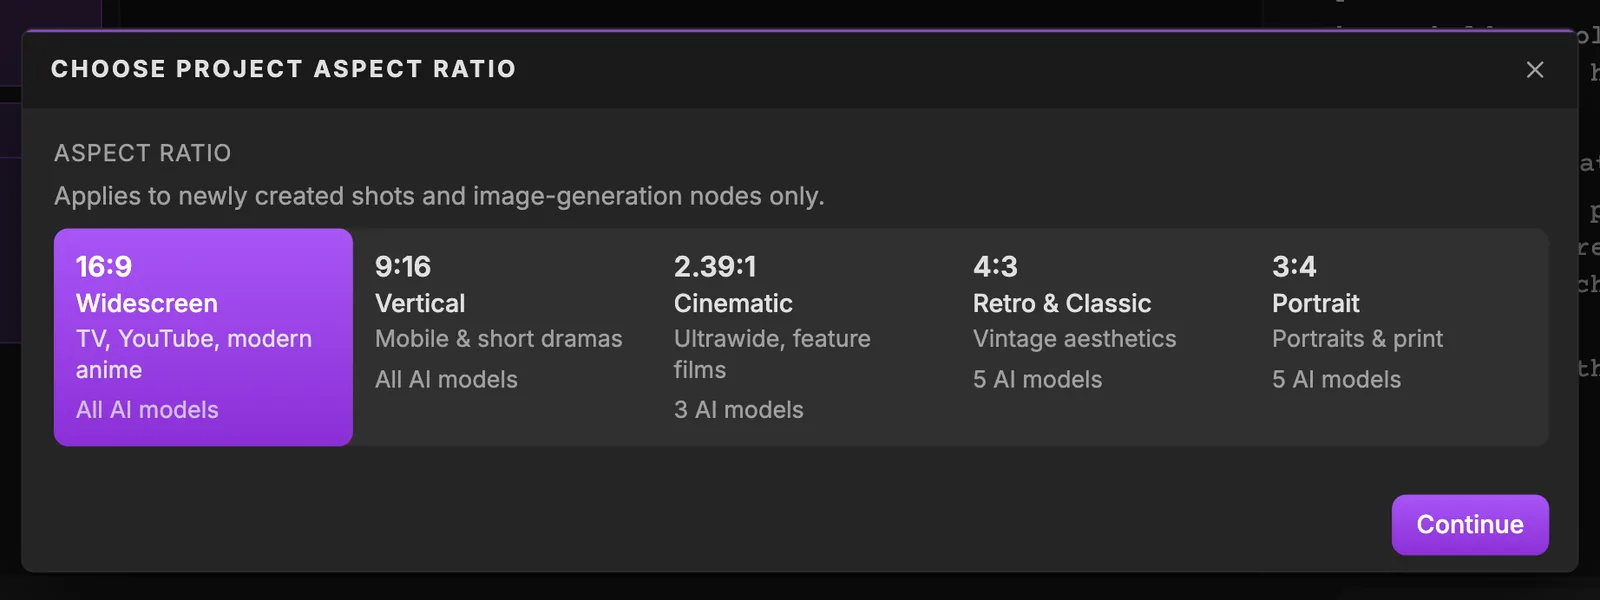
This window opens the first time you visit Storyboard or Production and must be answered before you go on. It sets the default frame shape for new storyboard and production images; you can change it later in project settings, and existing images keep their current ratio. Pick the frame of your final film now, because every panel and render is composed for it.
Swipe sideways to see the whole screen.
116:9 Widescreen. "Standard for TV, YouTube & modern anime". The safe default for most films and series.
29:16 Vertical. "Built for mobile & short dramas". Choose it for vertical series and social formats.
32.39:1 Cinematic. "Ultrawide aspect ratio for feature films". Check the model count on the card first: not every model supports it (Veo 3.1, for instance, accepts only 16:9 and 9:16).
44:3 Retro & Classic. "Vintage aesthetics & classic 90s anime". A squarer frame for period looks; the card shows how many models support it.
53:4 Portrait. "Classic portrait stills & print formats". Use it for stills and print work.
6Continue. Confirms the ratio and opens the tab. To change it later, use "Aspect ratio" in "Project settings".
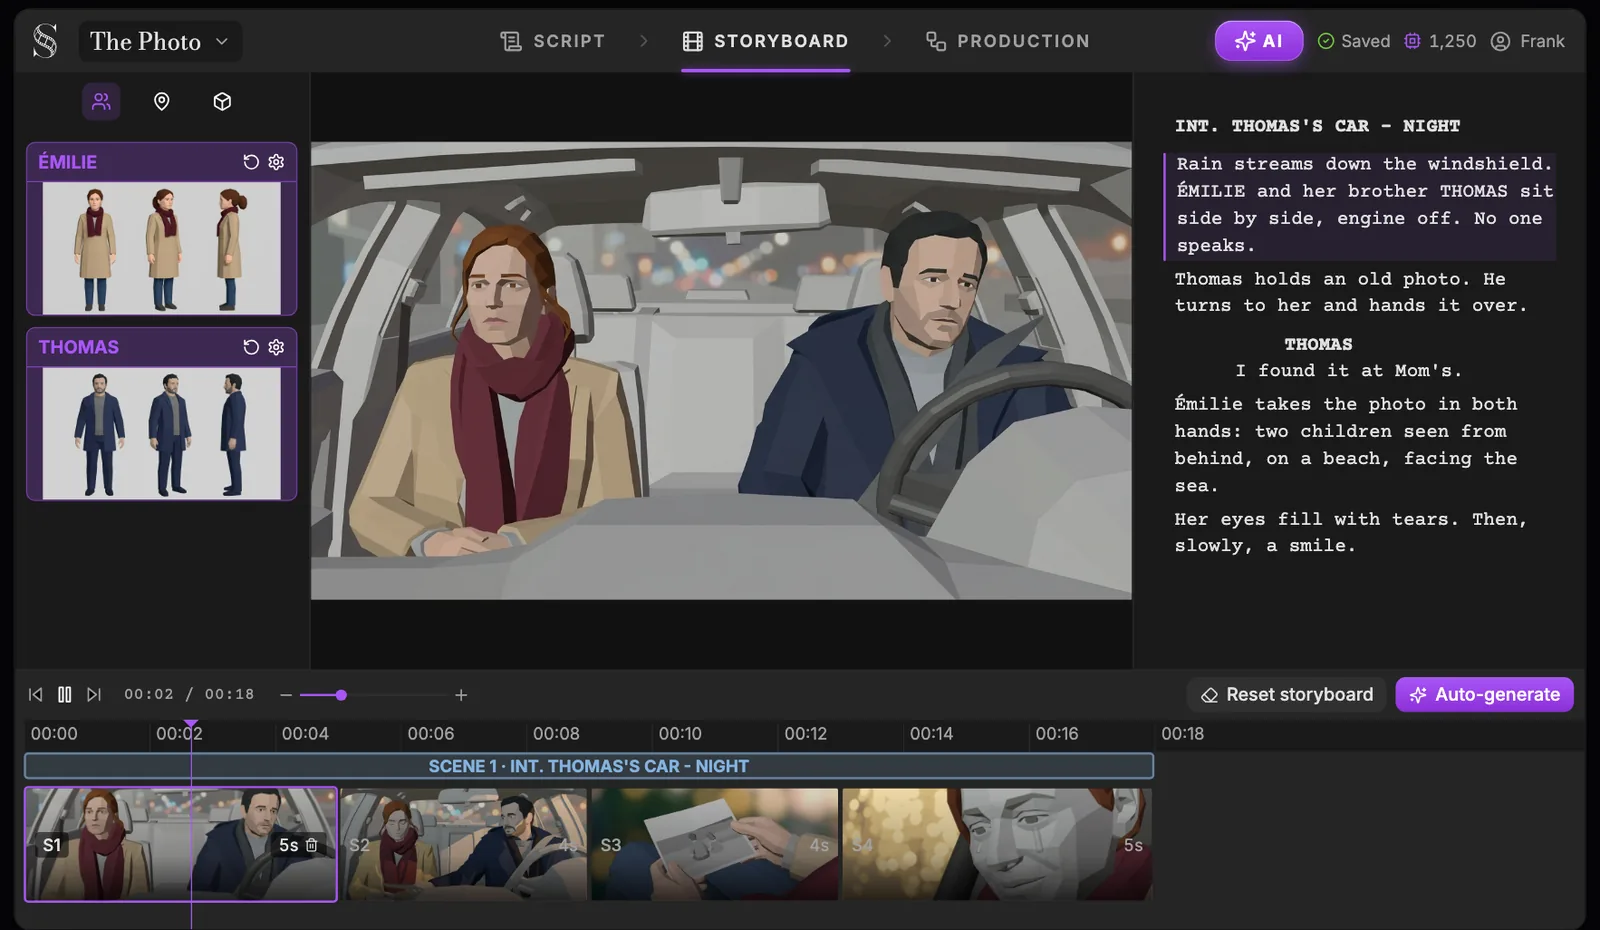
The Storyboard tab turns your scenes into shots: story elements on the left, the shot composer in the middle, the script on the right following the playhead, and the shot sequencer at the bottom, which plays your panels as an animatic. All panes can be resized.
Swipe sideways to see the whole screen.
1Characters, places, objects. The entities panel, with "Characters", "Places" and "Objects" sections. An empty section says "No characters yet" (or places, or objects) and sends you to the Script tab to add them.
2Reference sheet. The entity's storyboard reference sheet, the image panels use to draw it. "Inspect reference image for {name}" shows it large, "Edit image for {name}" fixes it, and "Download reference image" saves it.
3Regenerate sheet. "Regenerate reference sheet for {name}"; with no sheet yet, the button generates one, and "Stop reference sheet generation for {name}" cancels a run. Without a description you get the "{name}: no description" warning.
4Advanced settings. "Advanced generation settings for {name}": more control over the sheet's generation when the one-click result is not enough.
5Shot composer. Composes the selected shot: storyboard panel, "Continues from", "Shot value", "Camera movement" and "Action". With nothing selected it says "Select a shot in the sequencer to start composing."
6Script viewer. A read-only view of the script that follows the playhead and highlights the text of the current shot. Check that each shot covers its lines; edit the text in the Script tab.
7Play / pause. "Skip to start", "Play" / "Pause" and "Skip to end". Space plays and pauses: watch the storyboard as an animatic to judge the rhythm before you spend credits on video.
8Timeline zoom. "Zoom in timeline" and "Zoom out timeline". Zoom in to trim short shots precisely, out to see the whole film.
9Reset storyboard. A menu with "Clear unscheduled shots" (shots whose scene no longer exists) or "Clear entire storyboard". Use the first after script changes; the second starts over.
10Auto-generate. Opens "Automatic storyboard generation": missing entity sheets, shot breakdowns for empty scenes, then panel images, each step with its credit estimate, or "Run all".
11Scene. The scene bar, with its shots underneath. Shots are grouped by episode and by scene (orphans go under "Unscheduled"); an empty scene shows "No shots" and an "Auto" button that generates shots from the scene script, with an optional shooting plan.
12Shot. A shot, labelled S1, S2, or S1A for a continuation. Click it to compose it, drag it to reorder within the scene, and use "Add shot" (+), "Insert shot after {label}" or "Delete shot" to edit the list.
13Shot duration. Drag the right edge of a shot to change its duration. The Shot node on the production canvas shows the same duration, where you can type an exact value from 0.5 to 60 seconds.
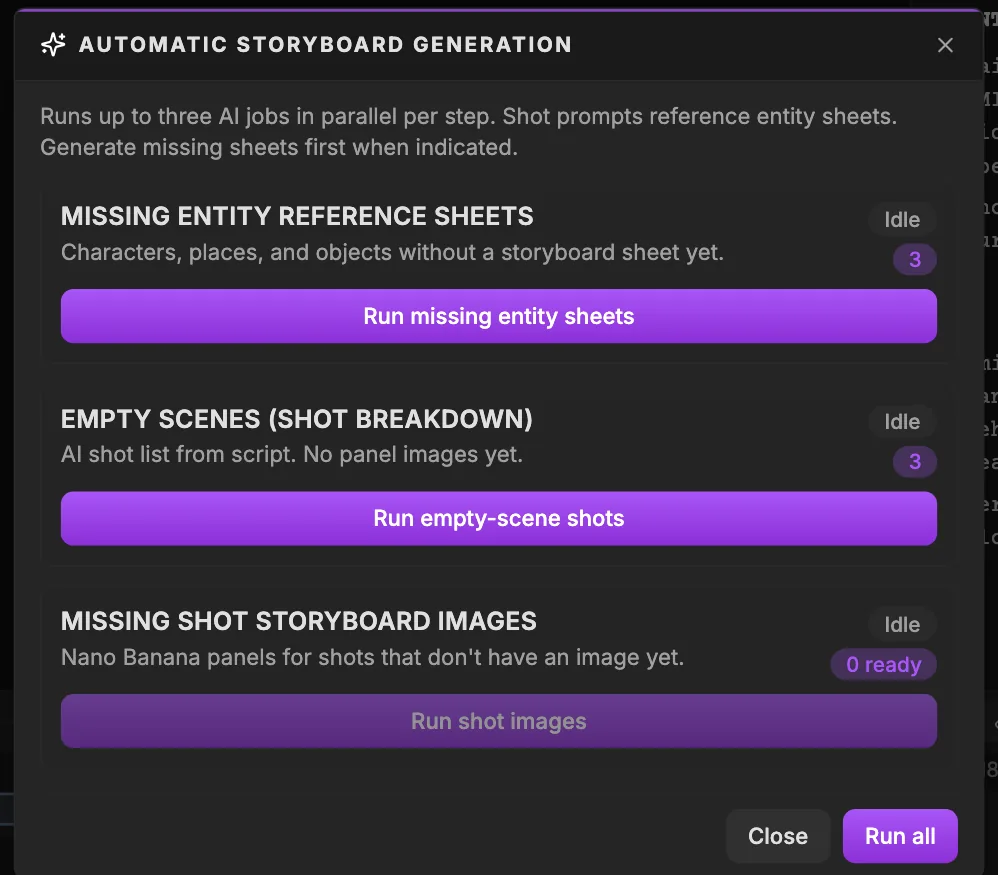
Opened from "Auto-generate" in the Storyboard tab, this dialog builds a first-pass storyboard in three steps: entity reference sheets, shot breakdowns for empty scenes, then panel images. Each step shows a credit estimate and a status, jobs run in parallel, and "You can close this dialog; jobs continue in Generations."
1Missing entity reference sheets. Step 1: characters, places and objects without a storyboard sheet yet. Run it first, because shot prompts reference the entity sheets.
2Items waiting. How many items this step will process. Read it with the step's credit estimate before you click.
3Step status. "Idle", "Running", "Done" or "Blocked". Watch it to know when a step has finished and the next one can start.
4Run missing entity sheets. Generates the missing reference sheets. Review them in the entities panel before going further: a wrong costume here repeats in every panel.
5Run empty-scene shots. Writes an AI shot list for every scene that has no shots yet ("Empty scenes (shot breakdown)"), without panel images. Read the breakdown and fix shot values and actions before you draw.
6Run shot images. Generates storyboard panels for the shots that don't have an image yet ("Missing shot storyboard images", Nano Banana panels).
7Run all. Runs every step. Handy on a short project; on a long one, run step by step and review in between so you never pay for panels of a breakdown you would change.
8Close. Closes the dialog. The jobs keep running in Generations, which you follow from the AI button.
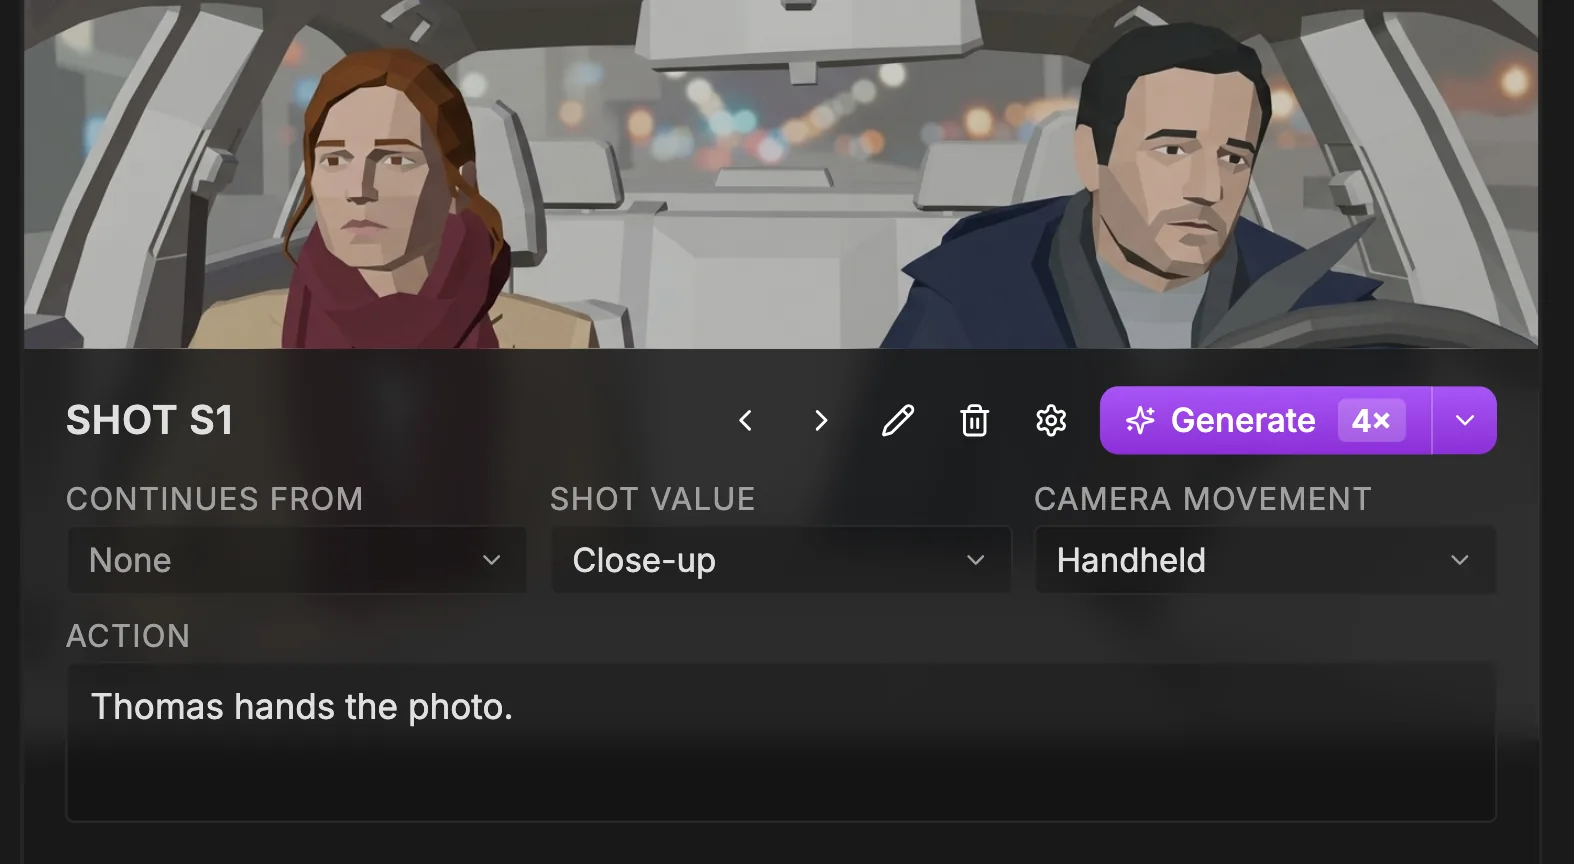
The centre of the Storyboard tab holds everything that defines one shot. Choose the framing and the move, write the action with @references to your entities, generate the panel, then browse versions or fix the image. Duration is not here: you set it on the sequencer.
Swipe sideways to see the whole screen.
1Storyboard panel. The current image of the shot. It is what the sequencer plays and what appears as the Storyboard panel of this shot on the production canvas.
2Shot label. "Shot {label}": S1, S2, or S1A for a shot that continues S1.
3Previous / Next image. "Previous" and "Next" browse the images generated earlier for this shot. Regenerating does not lose them, so you can step back to a better version.
4Edit with AI. "Edit with AI" opens the "Edit image" window: paint over part of the panel and describe the change, crop it, or change the camera angle. Faster and more faithful than regenerating when only a detail is wrong.
5Delete image. "Delete image" removes the current image from the shot.
6Advanced generation settings. "Advanced generation settings" opens the shot as a node canvas, for when the one-click panel needs more control.
7Generate. "Generate storyboard panel" draws the shot from its value, movement, action and the entity sheets; once an image exists it becomes "Regenerate", and "Stop" cancels a run. The credit cost is in the tooltip.
8Continues from. Links the shot to a previous one ("None" by default) to make a continuation such as S1A. A continuation inherits Shot value and Camera movement ("Inherited from {head}. Edit the head shot to change this.").
9Shot value. The framing: Extreme close-up (ECU), Close-up (CU), Medium close-up (MCU), Medium (MS), Medium long (MLS), Long / Wide (LS), Extreme long / Establishing (ELS), Over-the-shoulder (OTS), POV or Insert. Hover an option to preview it.
10Camera movement. The move: Static, Pan left, Pan right, Tilt up, Tilt down, Dolly in, Dolly out, Truck left, Truck right, Pedestal up, Pedestal down, Crane, Handheld, Steadicam, Whip pan, Zoom in or Zoom out. It stays with the shot and shows on its Shot node in Production.
11Action. What happens in the shot (placeholder "Describe the action of the shot. Reference entity sheets with @..."). Type @ to cite a character, place or object so the panel uses its reference sheet.
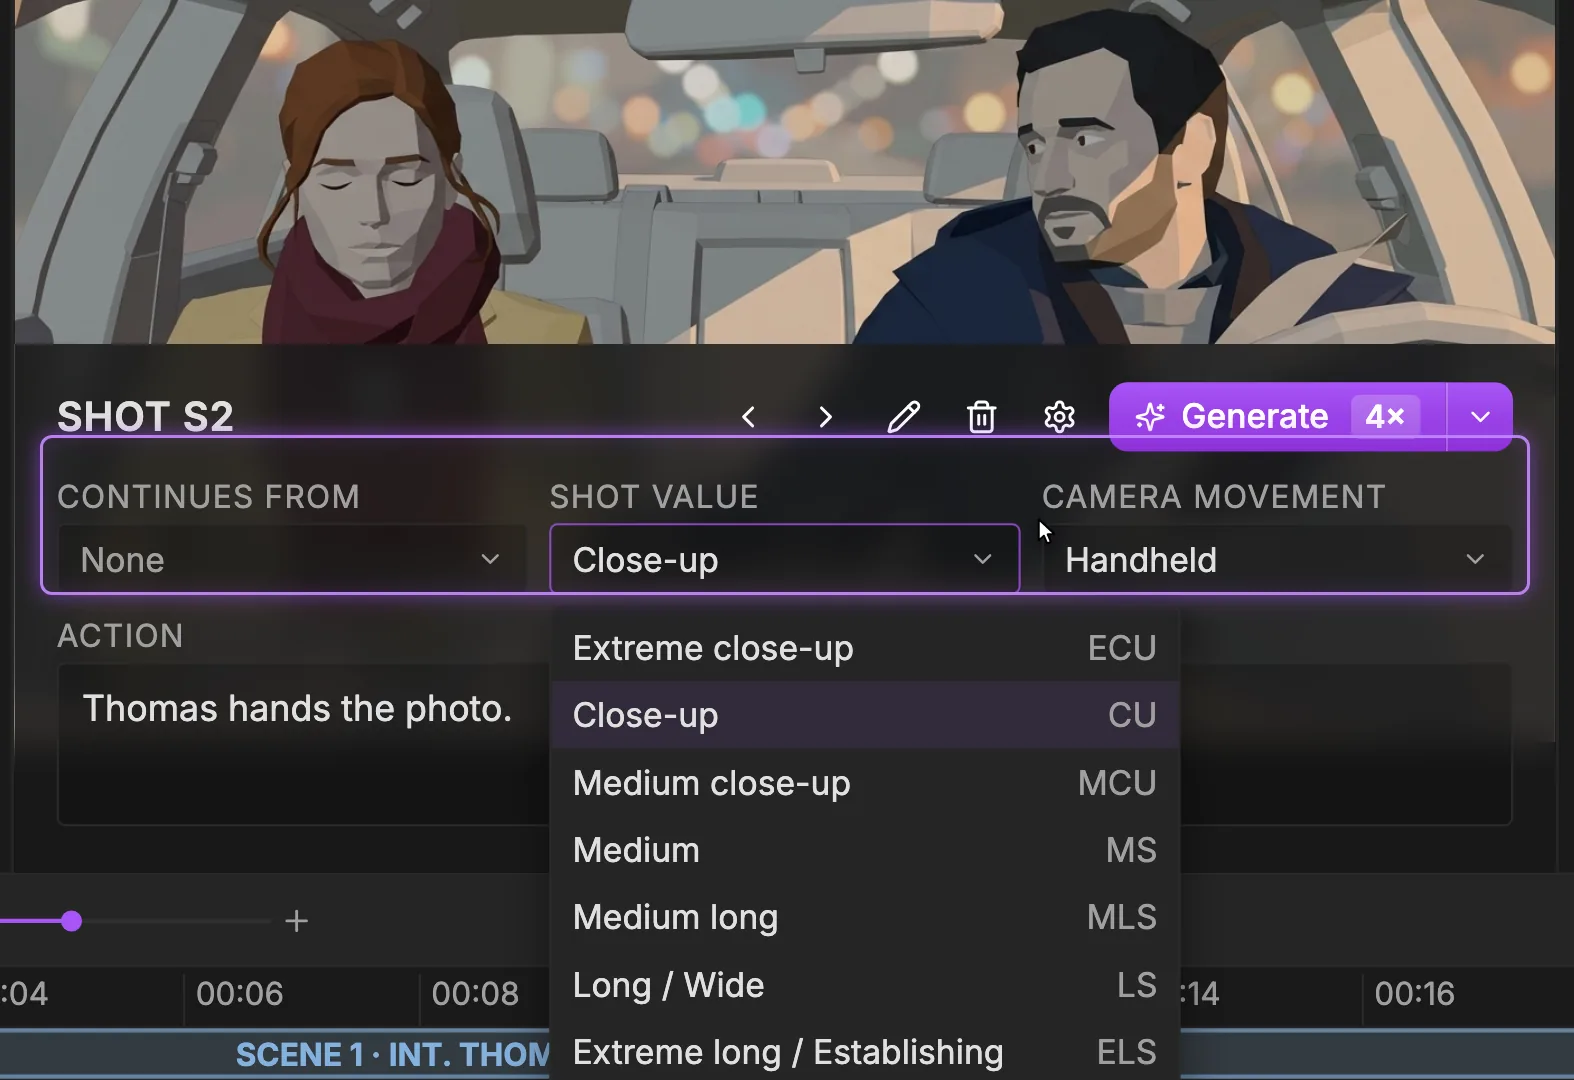
The Shot value menu lists the 10 framings ScreenWeaver works with, each with its standard abbreviation. Choose the size that serves the moment: wide to place the audience, close to make them feel.
Swipe sideways to see the whole screen.
1Shot value. The current framing of the shot, here Close-up. Click to open the list. On a continuation shot the value is inherited from the head shot and changed there.
2Shot sizes. Extreme close-up, Close-up, Medium close-up, Medium, Medium long, Long / Wide, Extreme long / Establishing, then Over-the-shoulder, POV and Insert further down. Hover an option to see a preview image of that framing.
3Abbreviation. The standard abbreviations: ECU, CU, MCU, MS, MLS, LS, ELS, OTS, POV and Insert, the shorthand of shot lists and call sheets.
4Camera movement. The next menu: Static, Pan left, Pan right, Tilt up, Tilt down, Dolly in, Dolly out, Truck left, Truck right, Pedestal up, Pedestal down, Crane, Handheld, Steadicam, Whip pan, Zoom in, Zoom out.
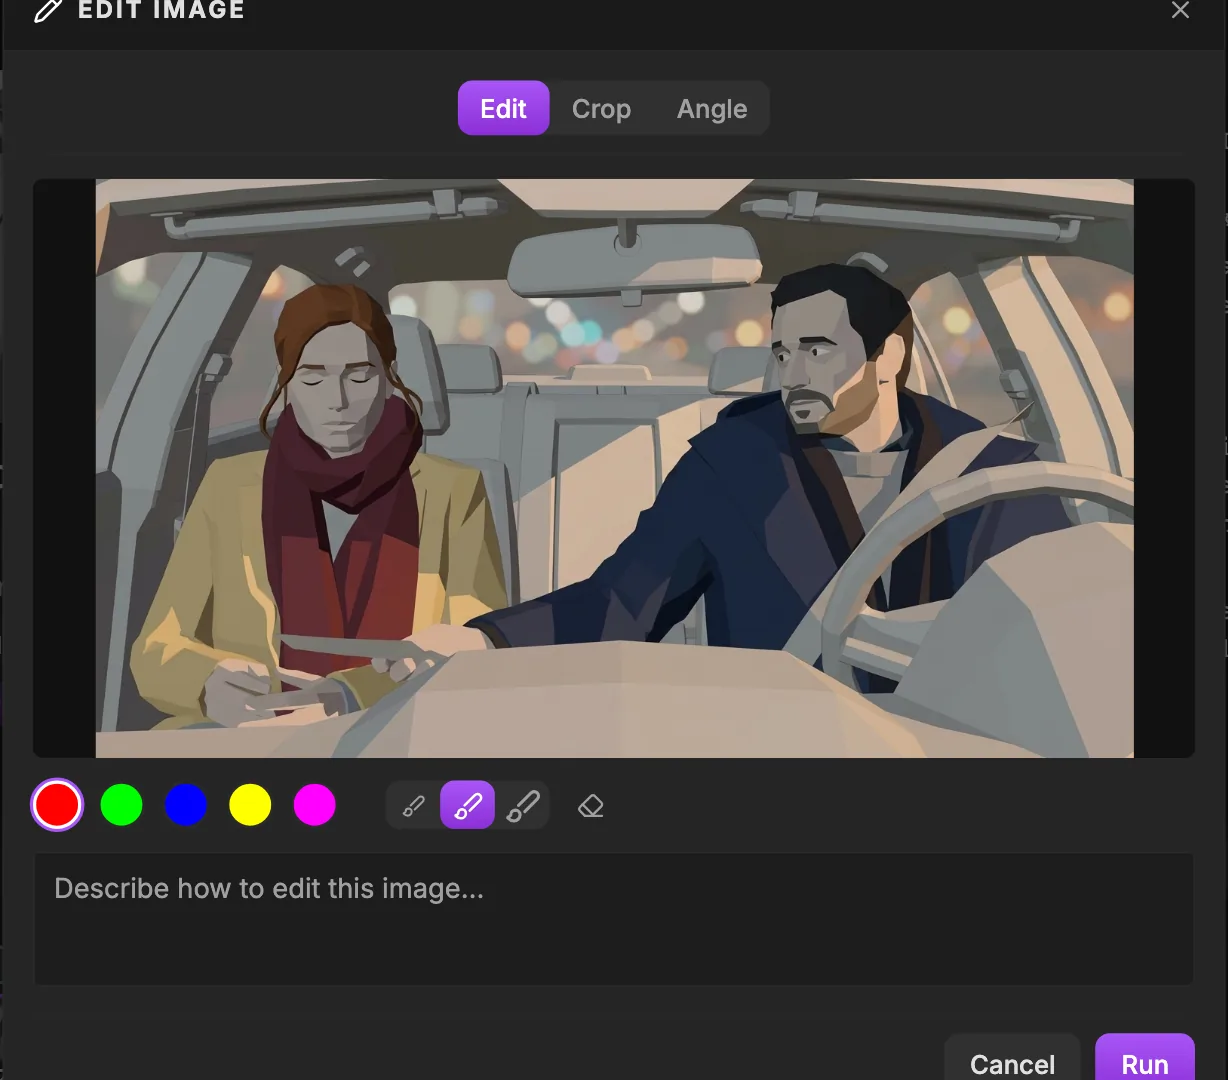
The "Edit image" window opens from "Edit with AI" on a panel or an image. Its first tab lets you paint over the part to change and describe the change in words; the other tabs crop and re-angle. Fix a detail here instead of regenerating, so you keep what already works.
1Edit. The "Edit with AI" tool: brush strokes plus an "Edit prompt". It exists only here in the studio, not as a canvas node.
2Crop. Crops the image. Aspect options: Free, Source, 16:9, 9:16, 1:1, 4:3, 2.39:1 and Project, then "Reset" or "Apply crop".
3Angle. The "Camera angle" tool: move a camera on a 3D sphere around the subject, set the zoom, and generate the same image from a new viewpoint.
4Brush colors. Red, Green, Blue, Yellow and Magenta. Paint over the zone you want changed; with several zones, use one colour per zone and name the colour in your prompt.
5Brush size. Small, Medium or Large brush: small for a hand or a face detail, large for a whole background area.
6Clear strokes. "Clear strokes" erases everything you painted so you can mark the image again.
7Edit prompt. The "Edit prompt" (placeholder "Describe how to edit this image…"). Say what should change in the painted zone, short and concrete.
8Run. Runs the edit. Its credit cost shows in the tooltip, as on every AI button. "Cancel" closes without running.
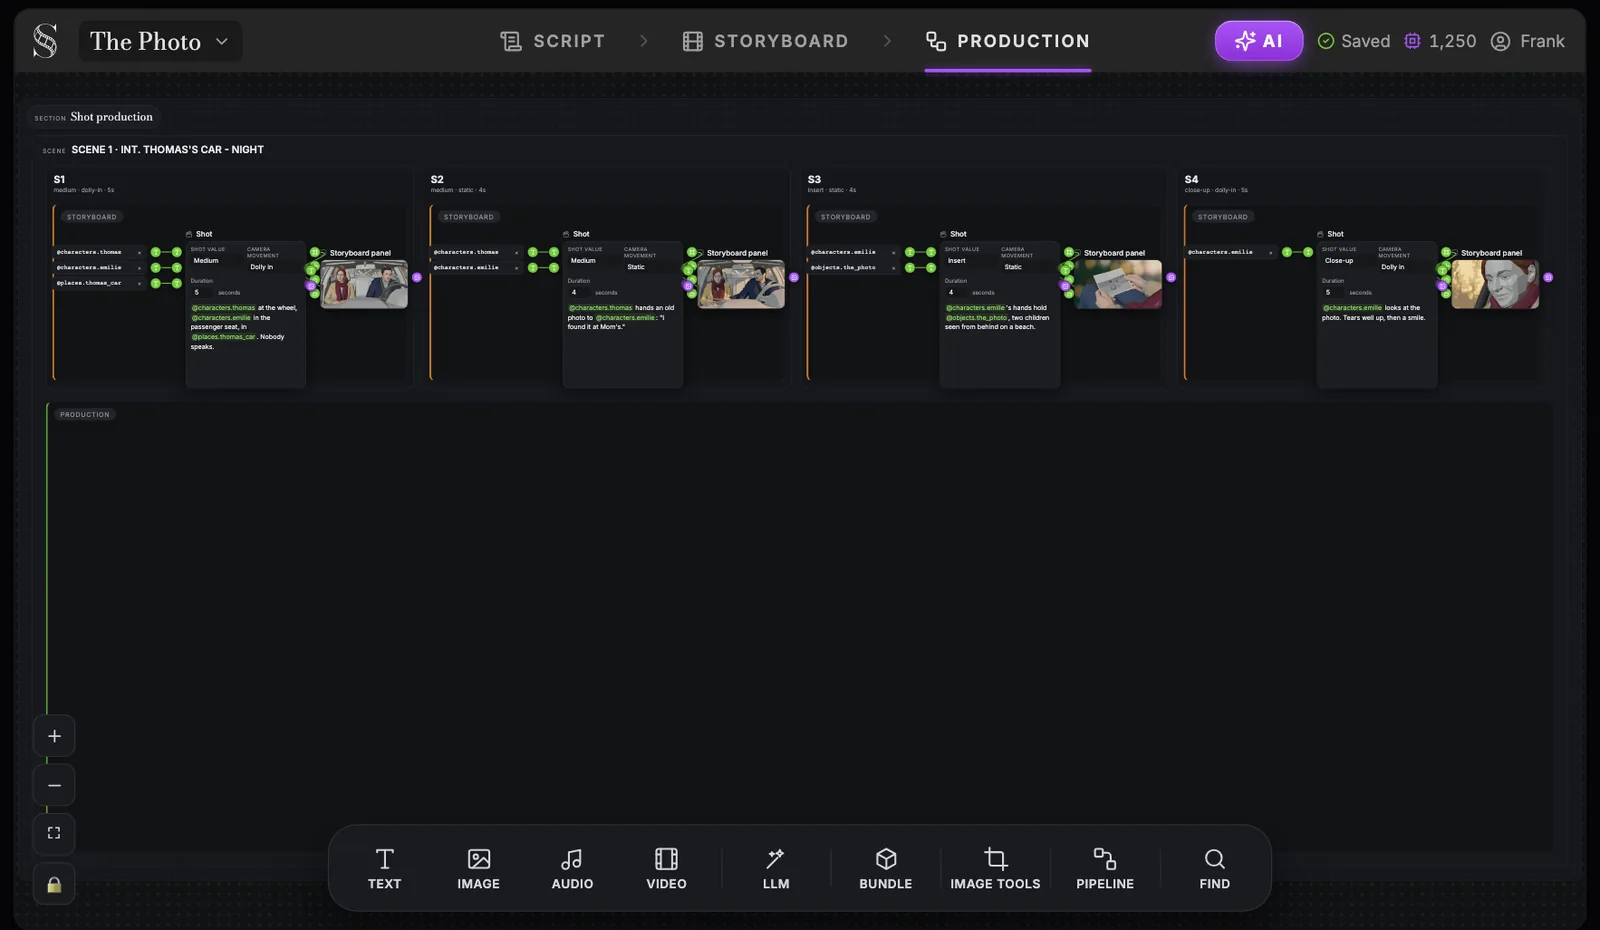
The Production tab is a node canvas where the storyboard becomes final images and video. It comes seeded with sections for artistic direction, characters, places, objects and shot production, one group per scene and per shot, and a toolbar to add nodes, tools and pipelines.
Swipe sideways to see the whole screen.
1Production tab. Opens this canvas. There is no guided tour here, so this reference is your map.
2Section. The top-level blocks of the canvas: "Artistic direction", "Characters", "Places", "Objects" and "Shot production". This one is Shot production.
3Scene group. One group per scene, named after its heading. Pipelines go here: "Pipelines can only be added to a scene's production group."
4Shot group. One group per shot ("Shot S{n}"), with a summary of shot value, camera movement and duration under its label.
5Entity references. Chips such as @characters.thomas that bring each entity's reference into the shot.
6Shot node. The shot's Shot value, Camera movement, Duration and Action, the data you composed in Storyboard.
7Storyboard panel. The storyboard image of the shot, brought over from the Storyboard tab.
8Production group. The production stage of the scene, where the "Shot production" image nodes and your video nodes live. This is where final frames are made.
9Text. Adds a text node, for notes, descriptions or prompt pieces you cite with @handles.
10Image. "Add image node": upload a picture or generate one with an image model.
11Audio. Adds an audio node, for a voice or a sound you want next to the shots.
12Video. "Add video node": generates a clip from a prompt, a start frame, an end frame or reference images.
13LLM. "Add LLM node": Gemini 3.8 Flash or Mistral Large 4, with a thinking level (Minimal, Low, Medium, High) and references sent as "Attach media" or "Names only". Use it to write or rewrite prompts from other nodes.
14Bundle. "Add media bundler": gathers media so you can get them all at once with "Download ZIP".
15Image tools. "Image tools" adds Crop and Camera angle as canvas nodes. The Tools group also has "Video tools" with Upscale (Topaz models, 1080p or 4k).
16Pipeline. "Add pipeline": adds "Reference to video" or "Storyboard panels to video" to a scene, built for the shots you choose.
17Find. Searches the canvas groups so you can jump to a scene or a shot on a big project.
18Zoom, fit and lock. + and - zoom, the frame icon fits everything in view, and the padlock locks the canvas against accidental edits. Scrolling pans, pinch or Cmd/Ctrl + scroll zooms, Space + drag pans, and Shift, Cmd or Ctrl + click selects several nodes.
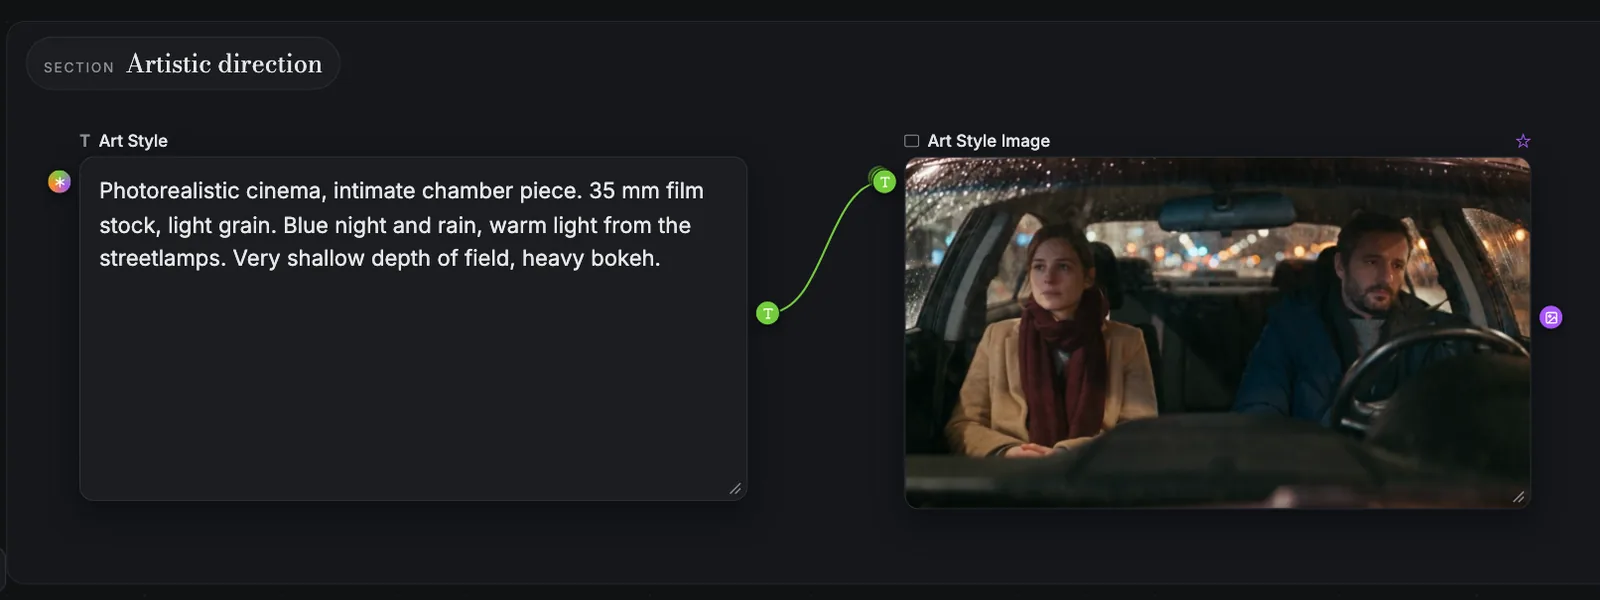
The "Artistic direction" section defines the look of the whole film: a written "Art Style" and an "Art Style Image" that shows it. Production references and shot images cite them, so set them before you generate anything final.
Swipe sideways to see the whole screen.
1Artistic direction section. The section at the top of the production canvas. The production references of your characters, places and objects cite it through @art_direction handles.
2Art Style. The text that defines the look (default "Photorealistic standard cinema movie…"). Describe medium, film stock, palette, light and lens, as a cinematographer would.
3Art Style Image. An image that shows the look, generated from the Art Style text or uploaded. It shows the models the style, often more precisely than words.
4Connection. The wire that sends the Art Style text into the image. Change the text and the image warns "Inputs changed since last run" until you generate again.
5Output port. The image's output, cited in production prompts as @art_direction.art_style_image.
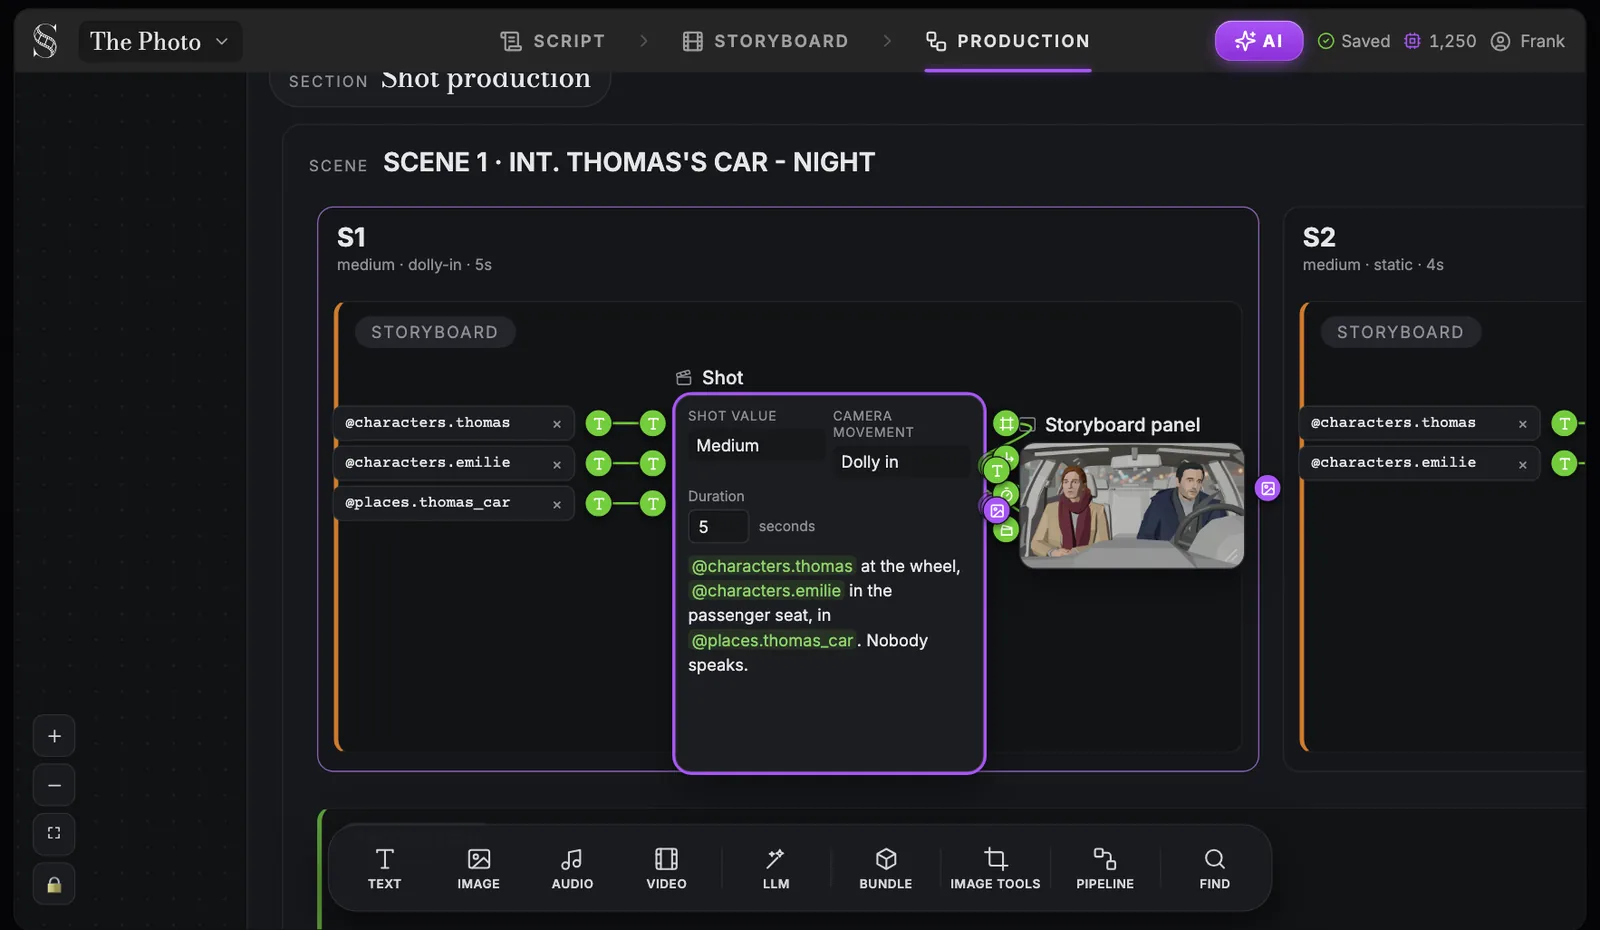
Each storyboard shot becomes a group on the production canvas: its references, a Shot node with the data you composed, and the storyboard panel. It is the starting point for the production image and the video of that shot.
Swipe sideways to see the whole screen.
1Scene group. The scene this shot belongs to (Scene 1 · INT. THOMAS'S CAR - NIGHT). Scene-level pipelines are added on its production group.
2Shot group. The group of one shot, named "Shot S{n}". Everything that produces this shot stays inside it.
3Shot summary. Shot value, camera movement and duration at a glance, so you can read the scene's coverage without opening each node.
4Storyboard group. The storyboard stage of the shot, holding its references, the Shot node and the panel.
5Entity references. The characters, places and objects cited in the action, each as a chip wired into the shot.
6Shot node. The shot's data. Its tooltip says "Managed prompt: edit shot value, camera movement, or action.": the prompt is built from these fields, so you edit them rather than a raw prompt.
7Shot value. The framing chosen in the shot composer, from Extreme close-up (ECU) to Insert.
8Camera movement. The move of the shot, one of the 17 options from Static to Zoom out.
9Duration. The shot's length in seconds: 4 by default, from 0.5 to 60. It matches the duration you drag on the storyboard sequencer.
10Action. The action text with its @references (@characters.thomas, @places.thomas_car). Keep the @handles: they tell the generation which reference to use.
11Storyboard panel. The panel generated in the Storyboard tab, kept beside the shot as the composition reference for its production image.
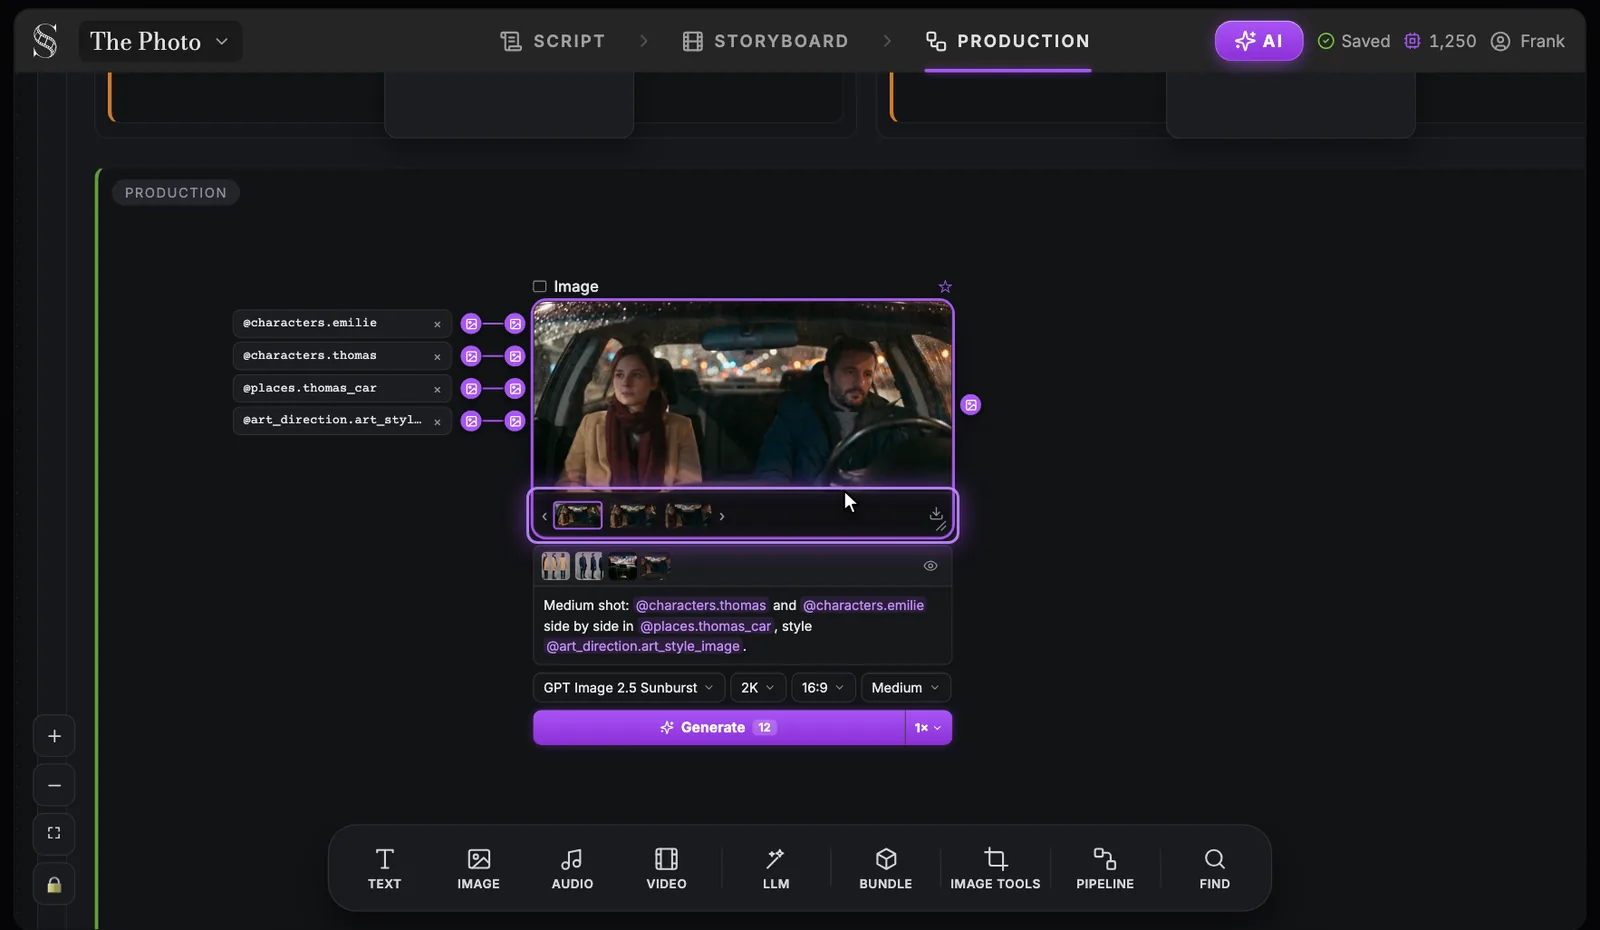
The image node is where a production frame is made: references on the left, a prompt that cites them with @handles, a model, a quality and a number of images per run. Each run adds takes you can compare before you choose the frame that goes to video.
Swipe sideways to see the whole screen.
1References. The entity sheets and art style wired into the node (@characters, @places, @art_direction). Wire a reference in, then cite it in the prompt by its @handle.
2Image preview. The current image of the node. Its output can feed a video node as a start frame or a reference.
3Takes. Every image this node has generated. Browse them with the arrows and save one with the download icon; running again does not erase earlier takes.
4Show what the model receives. "Show what the model receives" switches to the final prompt sent to the model; "Back to editable prompt" returns to your text. Check it when a result ignores an instruction.
5Prompt. Your instruction, with @references to the wired sheets. Spend the words on framing, action and light; the look comes from the art style reference.
7Quality. Low, Medium, High, Extra high or Max. Explore at a lower quality, render the chosen frame higher, and check the cost in the Generate tooltip.
8Generate. Runs the node. The credit cost shows on the button and in its tooltip, and the job appears in Generations.
9Images per generation. 1, 4 or 8 images per run. Generate several to choose a composition, one once you know what you want.
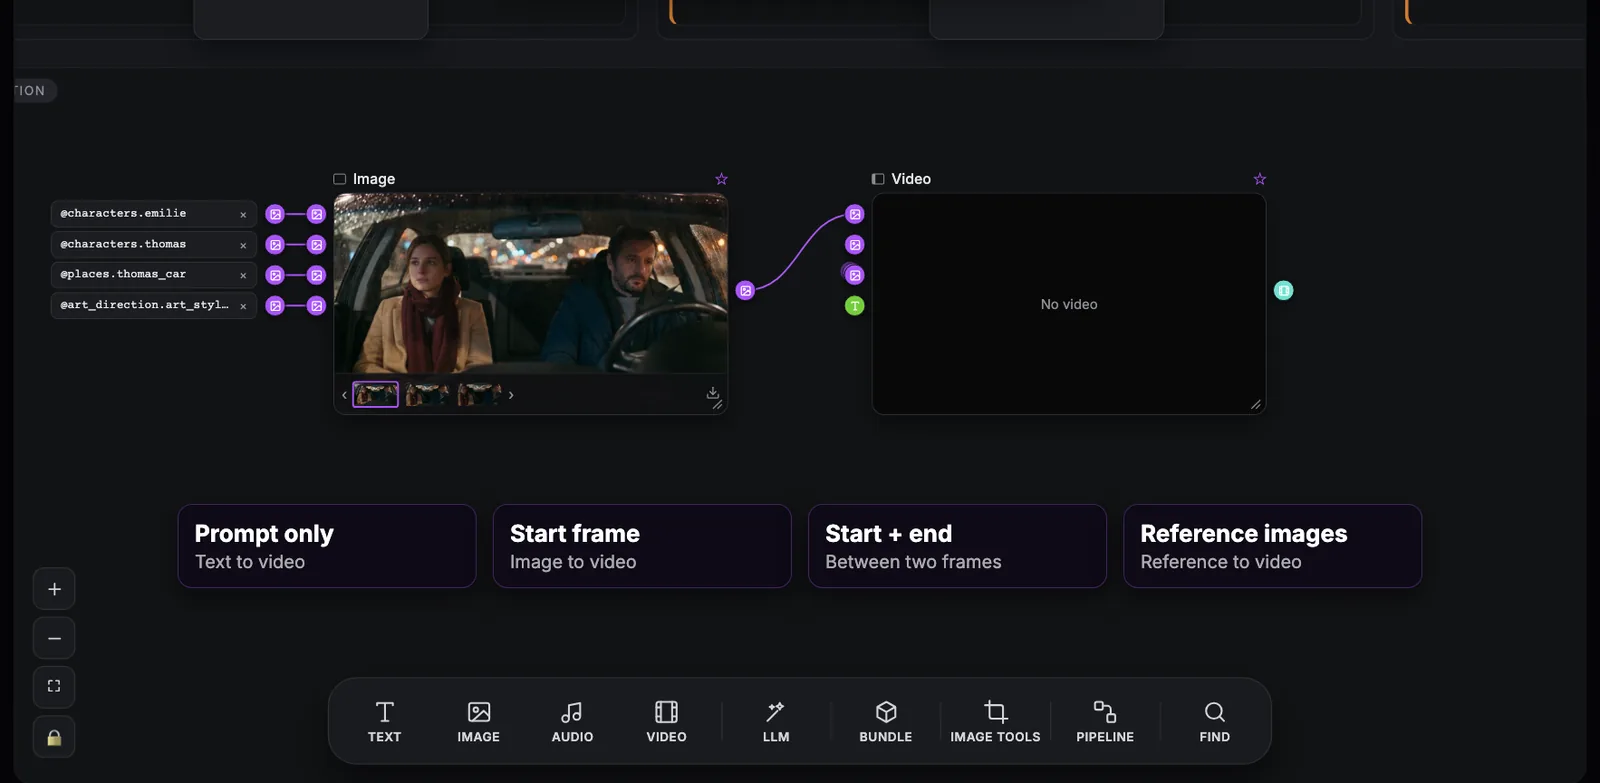
A video node can start from a text prompt alone, from a start frame, between a start and an end frame, or from reference images. What you wire into its input ports decides which; the usual path is a finished production image used as the start frame.
Swipe sideways to see the whole screen.
1Wired image. A production image connected to the video node. As a start frame it fixes the first frame, so the clip keeps your composition, faces and light.
2Input ports. The ports on the left of the node: "Start frame", "End frame", reference images and text. "Reference images are ignored while a start frame is connected."
3Video node. The node that generates the clip ("No video" until a run). Its prompt, model, resolution, duration and audio controls sit below the preview.
4Four ways to drive a video. Prompt only (text to video), Start frame (image to video), Start + end (between two frames) or Reference images (reference to video). Models differ: Kling v3.0 i2v needs a start frame, and Veo 3.1 reference-to-video is 8 s only.
The settings of a video node: prompt, model, resolution, duration and sound. Choose the model for the shot rather than by habit: each one has its own durations, resolutions and limits.
1Video node. The clip preview ("No video" until a run). Its "Generation history" strip keeps your takes and versions, and "Edit video" works on a result.
2Inputs. The ports for the start frame, the end frame, reference images and text. Reference images are ignored while a start frame is connected.
3Show what the model receives. Shows the final prompt sent to the model; "Back to editable prompt" returns to your text.
4Prompt. Describe the motion, the camera move and the sound, citing characters and places with @references. A counter ("{current} / {max}") shows how much room the model allows.
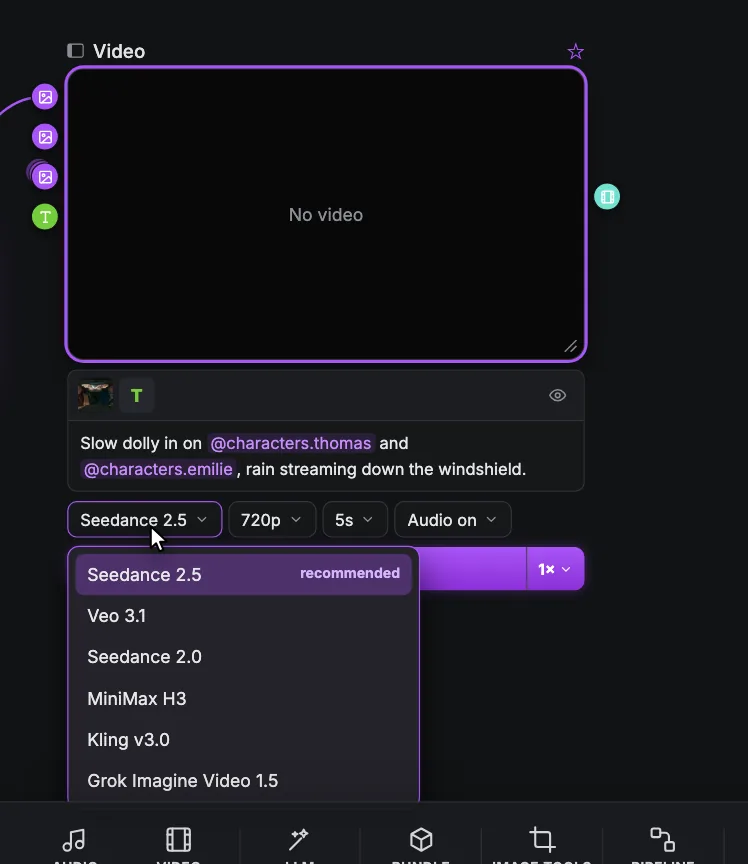
5Model. Seedance 2.5 is the default. Each setting first shows its common values; the rest appear under "All options".
6Video models. Seedance 2.5 (recommended), Veo 3.1 (16:9 and 9:16 only), Seedance 2.0, MiniMax H3, Kling v3.0 i2v (needs a start frame), Kling v3.0 t2v, Kling v3.0 Motion Control (may be blocked without video references) and Grok Imagine Video 1.5. The Kling models add a Mode, Standard or Pro.
7Resolution. 720p or 1080p on most models, 2k on MiniMax H3, 1080p and 4k on Veo 3.1 at 8 s only. Seedance 2.5 adds a 480p "Draft" ("Low-resolution draft for a quick, cheaper preview.") that you can finish within 7 days with "Finish seedance draft".
8Duration. Seedance 2.5 and 2.0: 4, 5, 6, 8, 10, 12 or 15 s (Seedance 2.5 goes up to 30 s). Veo 3.1: 4, 6 or 8 s. Kling v3.0: 5 or 10 s. Grok Imagine Video 1.5: 4, 6, 8 or 10 s. MiniMax H3: 5 to 15 s. Match it to the shot.
9Audio on / off. "Audio on" or "Audio off". MiniMax H3 and Grok Imagine Video 1.5 always generate audio; Kling v3.0 Motion Control has none.
A pipeline builds, in one go, the nodes that turn several shots of a scene into one clip. Open it with "Pipeline" in the toolbar on a scene's production group, choose the template, then the shots it covers.
Swipe sideways to see the whole screen.
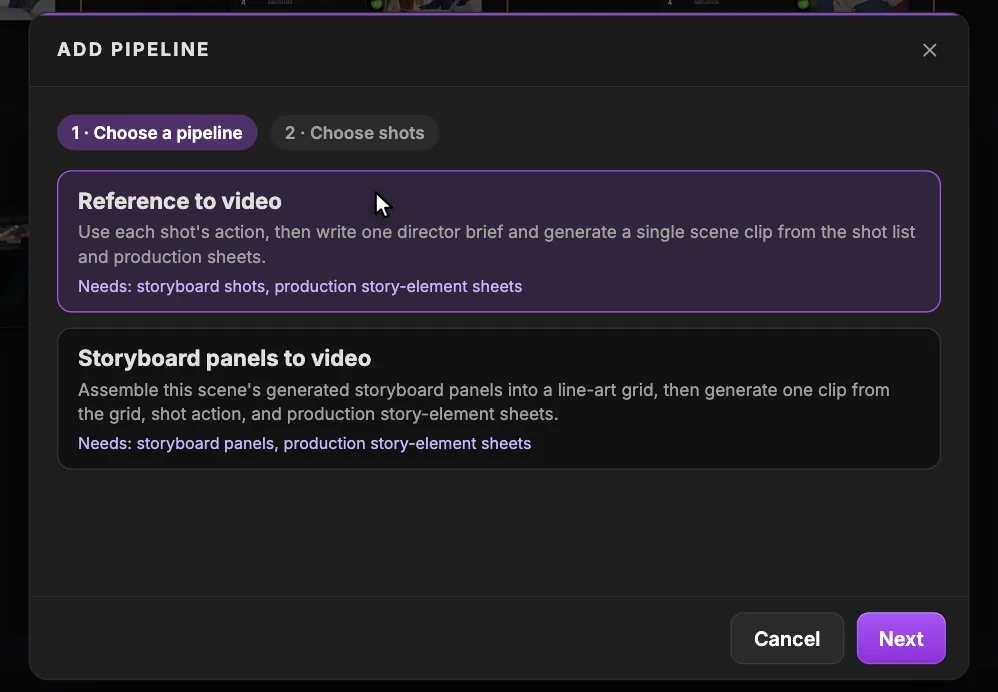
11. Choose a pipeline. Step 1: pick the template. Two exist today.
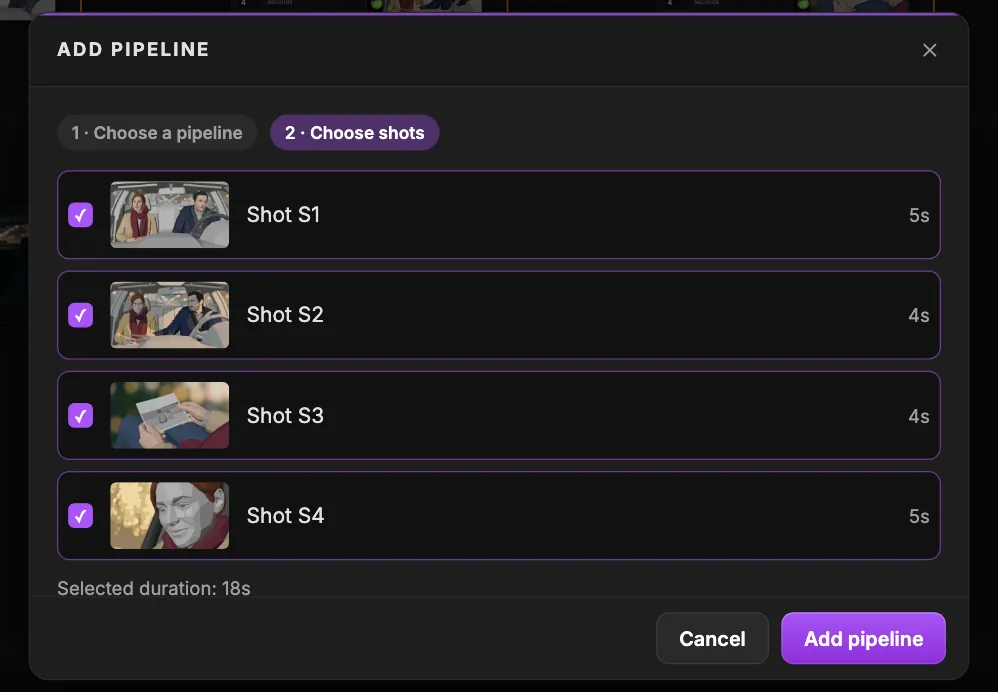
22. Choose shots. Step 2: tick the shots of the scene the clip will cover.
3Reference to video. "Use each shot's action, then write one director brief and generate a single scene clip from the shot list and production sheets." It builds a "Prompt director" LLM node (in Names-only mode) feeding a "Scene video" node.
4What it needs. What must exist first: here storyboard shots and production story-element sheets. Generate the sheets before you run, or the clip has nothing to keep your characters consistent with.
5Storyboard panels to video. Assembles the scene's generated storyboard panels into a line-art grid ("Storyboard grid"), then a "Prompt director" and a "Scene video". Up to 14 panels; choose it when the composition of your panels must drive the clip.
The second step lists the shots of the scene with their thumbnail and duration. Tick the ones the clip should cover, check the total, and add the pipeline.
Swipe sideways to see the whole screen.
12. Choose shots. The current step; "Back" returns to the choice of pipeline.
2Include this shot. Tick or untick a shot to include it in the scene clip. A shot that already belongs to another pipeline is marked "Already in a pipeline".
3Shot. The shot's label and storyboard thumbnail; a shot without one shows "No storyboard panel yet". You can still add the pipeline and generate the missing panels afterwards.
4Shot duration. The shot's duration from the storyboard.
5Selected duration. The total of the ticked shots. If it exceeds what the model can generate, the dialog warns you and suggests adding a second pipeline for the remaining shots.
6Add pipeline. Creates the pipeline's nodes, wired, in the scene's production group.
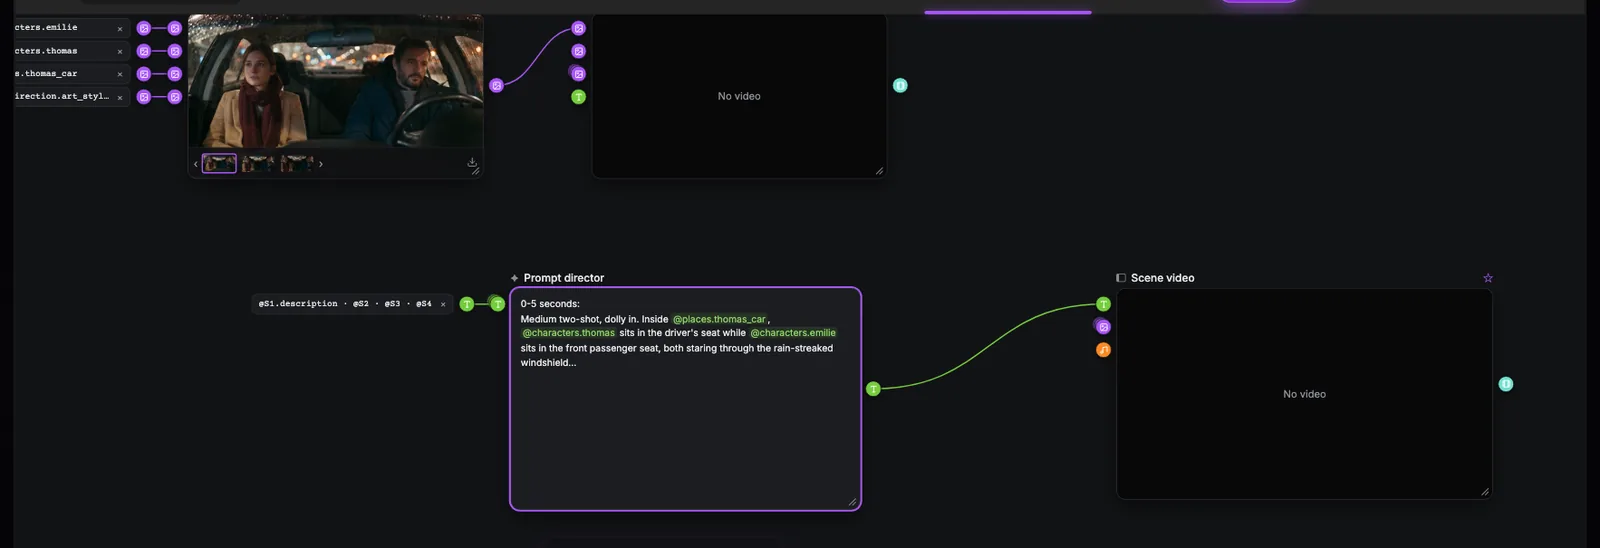
What "Reference to video" builds: the shots' actions feed a "Prompt director" LLM node that writes one timed director brief, and that brief drives a single "Scene video" node. Your single-shot image and video nodes stay where they are.
Swipe sideways to see the whole screen.
1Shot actions. The actions of the selected shots, cited as handles (@S1.description and the others) and wired into the director as text.
2Prompt director. An LLM node in "Names only" mode: it reads the shot list and writes one director brief, timed shot by shot. Read and edit the brief before you spend credits on the clip.
3Brief to video. The wire that sends the brief into the Scene video prompt. Change the director's text and the video warns "Inputs changed since last run".
4Scene video. A video node that generates one clip for the selected shots. Choose its model, resolution and duration like any video node.
5Single-shot nodes. The image and video nodes of a single shot. Keep them for shots that need their own clip, a precise start frame or a retake outside the scene clip.
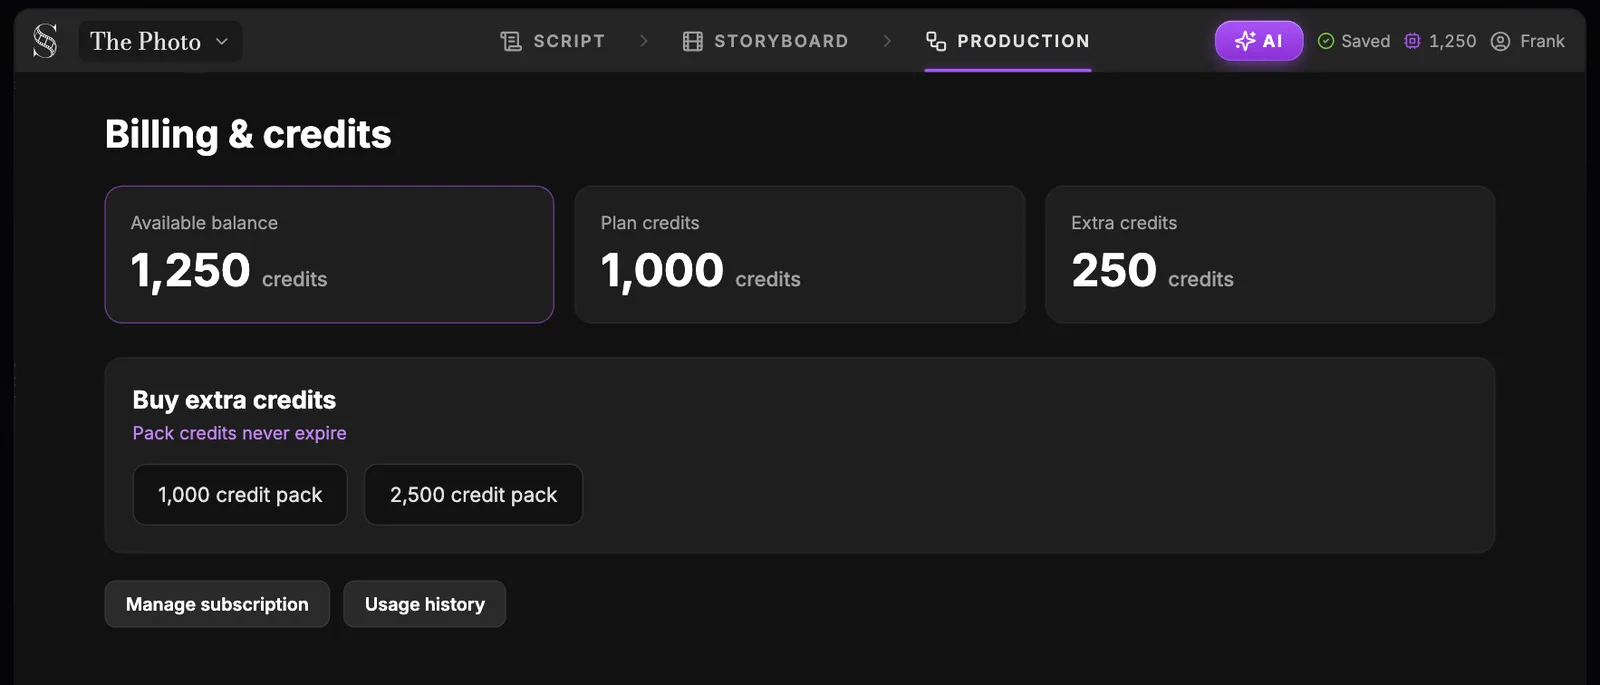
Open it from the credit chip in the header. It shows your balance split between plan credits and extra credits, the credit packs, your plan and your usage history. Every AI button spends credits, and its tooltip tells you how many before you click.
Swipe sideways to see the whole screen.
1Credit balance. The chip in the header with your total credits; click it ("View billing & credits") to open this screen. Guests and paused members do not see it.
2Available balance. Everything you can spend right now: plan credits plus extra credits. 1 credit is $0.005.
3Plan credits. The credits your plan gives you each month: 6,000 on Auteur ($39.99/month), 25,000 on Studio ($149.99/month). Screenwriter is free forever for the script tools, and new accounts get 20 free credits.
4Extra credits. Credits bought in packs. They never expire.
5Credit packs. Buy extra credits before a big render. Packs need Auteur or Studio; on the free plan you see "Subscribe to Auteur or Studio to buy packs."
6Manage subscription. Opens the management of your plan and billing. In an organisation, only owners change the plan or buy credits.
7Usage history. What spent your credits, generation by generation. Check it to see which steps of your workflow cost the most.